Posted at 2023-04-25 Comments Technology

1、安装Sublime Text4
到 https://www.sublimetext.com/download 下载安装包,下载完成后点击安装即可。
2、安装插件
Package Control
要想安装其他的插件,首先就得安装Package Control。
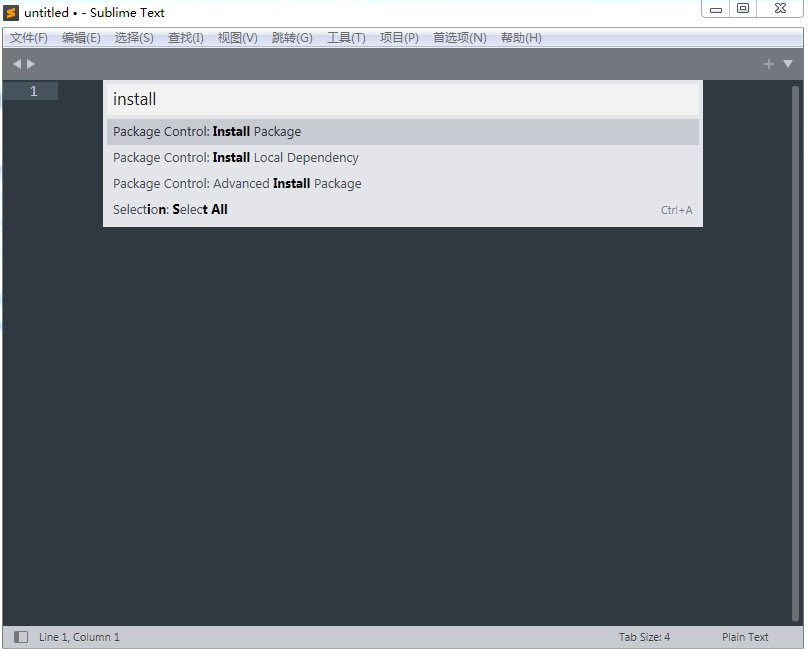
打开Sublime Text4,按下Ctr+Shift+P快捷键,打开命令窗口,输入Install,选择Package Control: Install Package选项。
汉化
重复上一步的操作,会弹出如下搜索框,输入 Chinese,并选择第一项——“ChineseLocalizations”。
安装其他插件
重复操作。
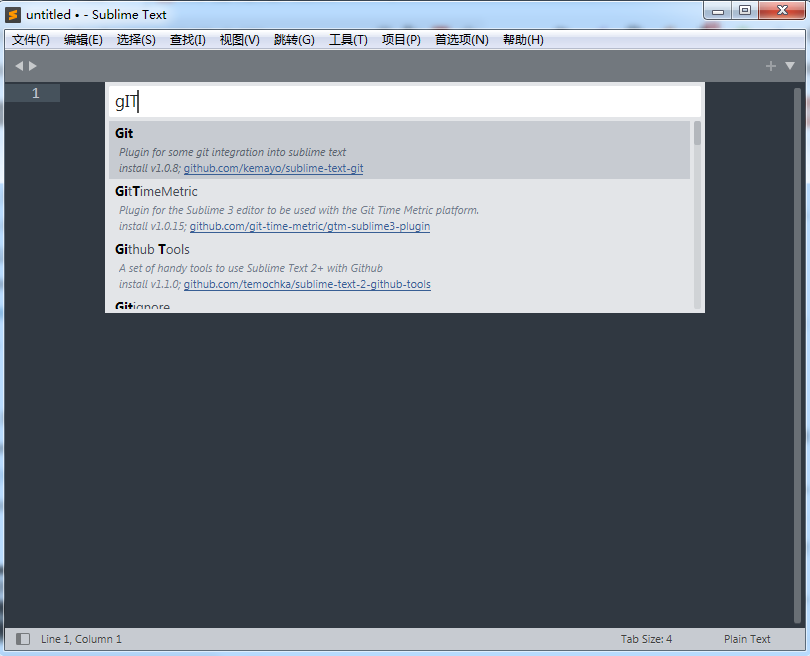
在组件窗口中输入插件名称,选择插件进行安装。
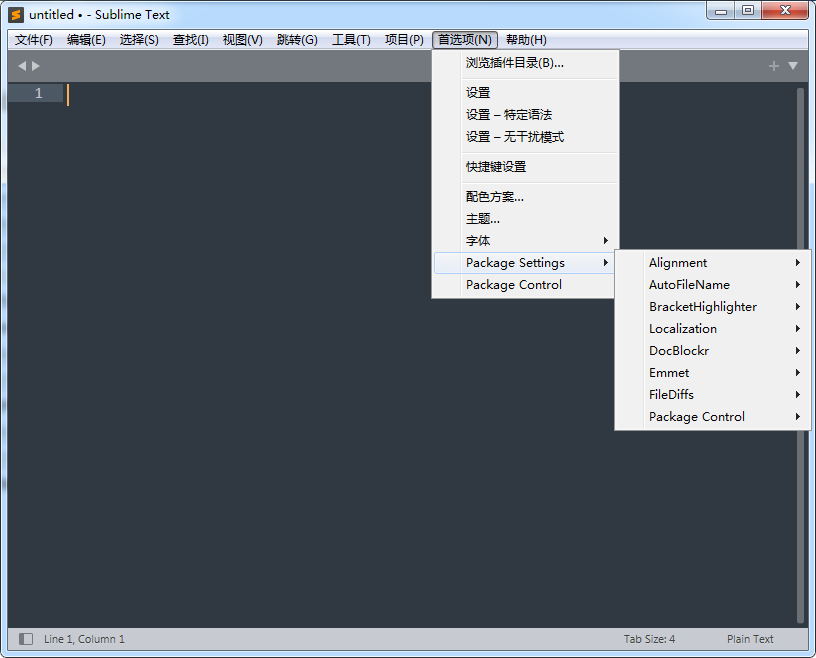
等待安装,安装完成后,查看,Package Settings中是否存在插件。
从仓库安装插件
- Crtl + Shift + p 调出 package control,输入 add repository,确定
- 输入 github 仓库地址,例如 https://github.com/bani/SublimeFormatSQL (Notice:结尾的.git要去掉)
- Crtl + Shift + p 调出 package control,输入 install package,确定,然后再输入 github 仓库的名称,比如 SublimeFormatSQL,确定安装。
3、卸载插件
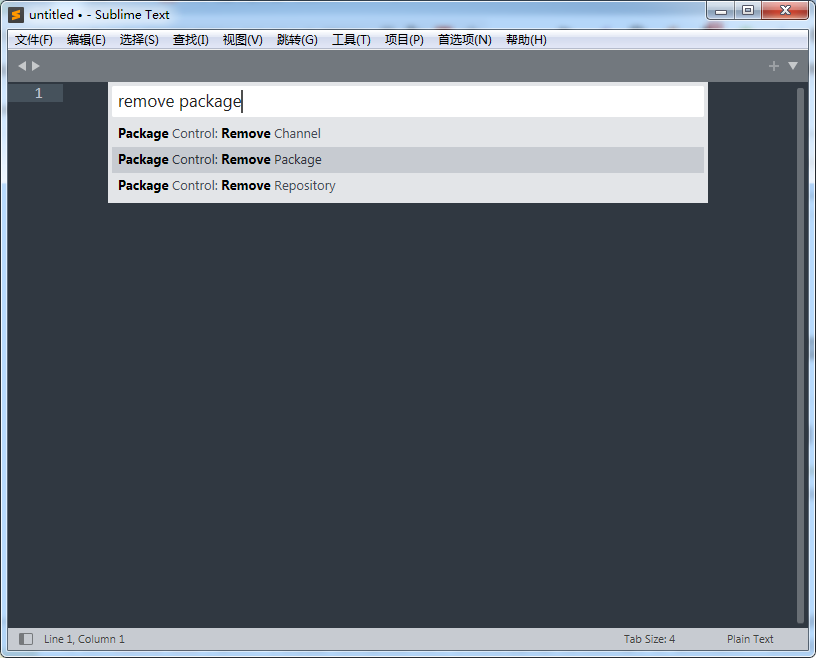
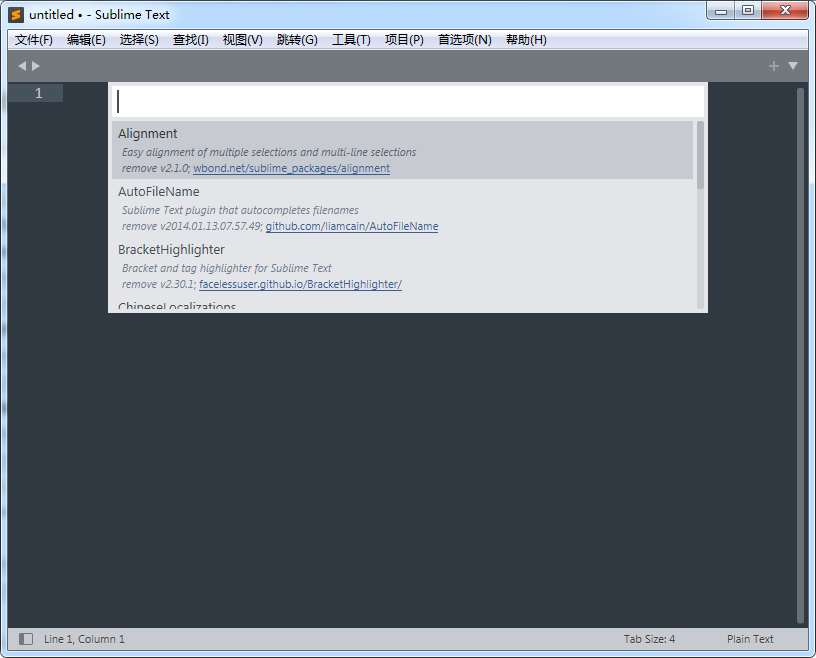
Ctrl+Shift+P 打开Package Control,输入remove package回车,然后找到你要卸载的插件进行卸载。
4、插件推荐
Emmet
代码快速编辑神器 视频演示地址http://docs.emmet.io/
只需要简单的输入一行代码,就可以快速生成代码结构
JSFormat
JavaScript的代码格式化插件
在已压缩的JS文件中,右键选择jsFormat或者使用默认快捷键(Ctrl+Alt+F)
SublimeCodeIntel
SublimeCodeIntel 作为一个代码提示和补全插件,支持 JavaScript、Mason、XBL、XUL、RHTML、SCSS、Python、HTML、Ruby、Python3、XML、Sass、XSLT、Django、HTML5、Perl、CSS、Twig、Less、Smarty、Node.js、Tcl、TemplateToolkit 和 PHP 等所有语言,是 Sublime Text 自带代码提示功能基础上一个更好的扩展,自带代码提示功能只可提示系统代码,而SublimeCodeIntel则可以提示用户自定义代码。SublimeCodeIntel支持跳转到变量、函数定义的功能,另外还有自动补全的功能,十分方便。
SublimeLinter
SublimeLinter是少数几个能在sublime text 3工作的代码检查插件,SublimeLinter支持JavaScript、CSS、HTML、Java、PHP、Python、Ruby等十多种开发语言,但前提是需要配置相应语言的环境,要检查JavaScript代码需要安装node.js,检查PHP代码需要安装PHP并配置环境等。SublimeLinter可以及时提示编写代码中存在的不规范和错误的写法,并培养我们良好的编码习惯和风格。
sublime-autoprefixer
快速给CSS添加私有前缀插件(解决各大浏览器兼容性问题)
Ctrl+Shift+P,选择autoprefixer
Bracket Highlighter
符号匹配插件
可匹配[], (), {}, “”, ”, <tag></tag>,高亮标记,便于查看起始和结束标记
DocBlockr
快速生成注释
输入/*、/**然后回车,还有很多用法https://packagecontrol.io/packages/DocBlockr
Alignment
Aligment插件让开发者自动对齐代码,包括PHP、CSS、JavaScript语言。使得代码看起来更整齐美观,更具可读性。
FileDiffs
FileDiffs插件可以让开发者比较两个不同文件的差异,比较的对象包括当前文件、另一文件、剪切板中的代码甚至未保存文件等。
ColorPicker
功能:调色板
简介:需要输入颜色时,可直接选取颜色
使用:快捷键Windows: ctrl+shift+c
IMESupport
sublime中文输入法支持光标跟随
ConvertToUTF8
功能:文件转码成utf-8
简介:通过本插件,您可以编辑并保存目前编码不被 Sublime Text 支持的文件,特别是中日韩用户使用的 GB2312,GBK,BIG5,EUC-KR,EUC-JP ,ANSI等。ConvertToUTF8 同时支持 Sublime Text 2 和 3。
使用:安装插件后自动转换为utf-8格式
使用:快捷操作为: Ctrl + Shift + h
AutoFileName
快捷输入文件名
输入"/"即可看到相对于本项目文件夹的其他文件
Git
功能:git管理
简介:插件基本上实现了git的所有功能
使用:https://github.com/kemayo/sublime-text-git/wiki
html-css-js prettify
功能:快速整理我们的代码结构,让代码缩进合适,删除多余的空格/空行
简介:一键美化HTML/CSS/JS代码
livereload
功能:插件实时预览html文件
使用:Sublime中使用livereload插件实时预览html文件
插件安装问题
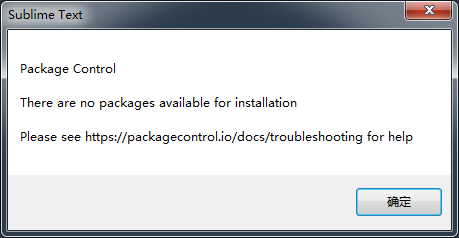
解决There are no packages available for installation
通过Sublime Text的Package Control来安装一些插件,但是点击Package Control:Install Package之后一段时间,弹出一个窗口,提示信息为:There are no packages available for installation:
解决方法:
首选项-Package Settings-Package Control-Settings
添加如下配置:
"channels":[
		"http://cst.stu.126.net/u/json/cms/channel_v3.json"
	],
重启可用。
解决Unable to download XXX. Please view the console for more details.
解决方法:
Preferences 》Package Settings 》 Package Control 》 Settings - User
增加如下内容:
"debug": true,
"downloader_precedence":
{
    "linux": [ "curl", "urllib", "wget" ],
    "osx": [ "curl", "urllib" ],
    "windows": [ "wininet" ]
},
最终内容如下:
{
    "bootstrapped": true,
    "debug": true,
    "installed_packages":
    [
        "Package Control"
    ],
    "downloader_precedence":
    {
        "linux": [ "curl", "urllib",    "wget" ],
        "osx": [ "curl", "urllib" ],
        "windows": [ "wininet" ]
    },
}
再次安装插件就没问题了。
参考
sublime实用插件推荐(最全)
推荐几款炫酷的Sublime Text插件
Git学习第(三)篇:Sublime Text3 Git插件安装与使用_sublime text git
VScode前端开发必备插件——Emmet配置及常用语法_vscode emmet插件
Sublime Text3安装及插件的安装卸载
Sublime Text 4 设置中文、汉化_sublime text4 中文
Sublime Text3解决There are no packages available for installation
Sublime Text 解决 Unable to download XXX 问题
Sublime - 从指定github仓库安装插件_sumlime4 add repository
sublime插件 —— 一键美化HTML/CSS/JS代码_sublime美化代码_我有两颗糖的博客
Sublime中使用livereload插件实时预览html文件_sublime预览html_fujuhao的博客
Posted at 2023-04-19 Comments Technology

vim的下载与安装
下载windows版vim
从github下载windows版的vim:https://github.com/vim/vim-win32-installer/releases
安装vim
无特殊要求默认安装即可。
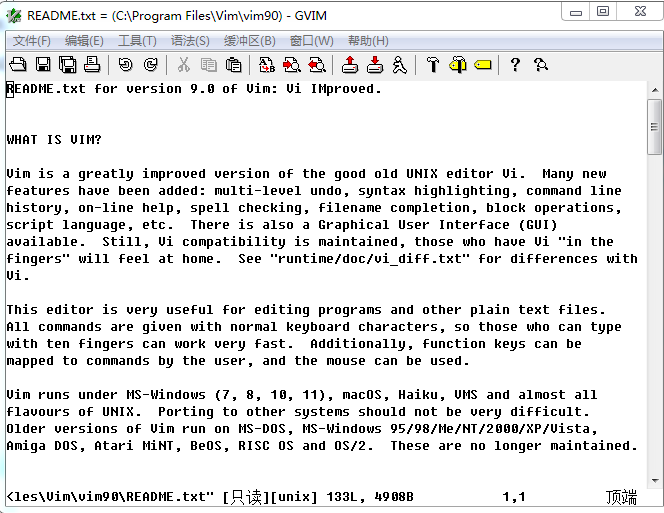
安装完成后默认打开README文件。
添加环境变量
在安装路径中找到vim.exe或者gvim.exe(两者在同一文件夹下),复制路径。
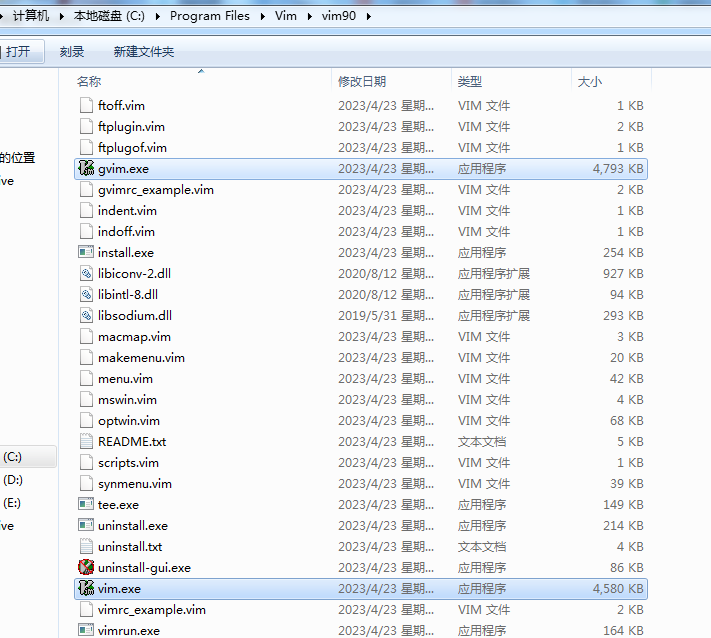
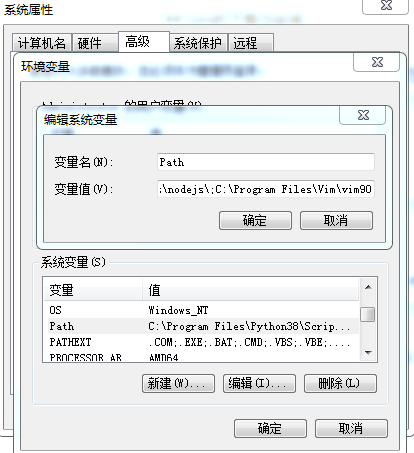
右键我的电脑->属性->高级系统设置->环境变量,选中Path,并点击编辑,添加路径。
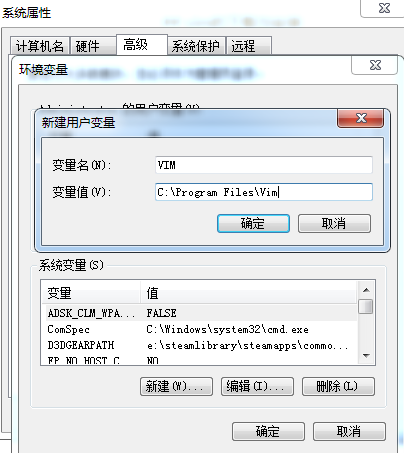
添加vim的一个用户变量$VIM,右键我的电脑->属性->高级系统设置->环境变量,点击上面的新建。
然后输入新建的环境变量名VIM以及变量值,并点击确定。
认识vim
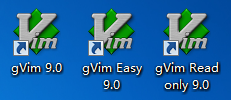
安装结束后桌面Vim
菜单栏Vim
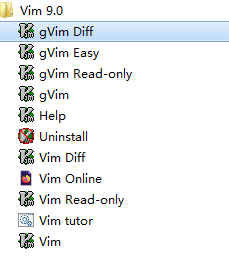
- 有g和没有g
gVim 是在windows下的Gui图形用户界面的的 vim (GUI Vim),支持windows的一些快捷方式,支持鼠标操作
vim 是在windows下的类似linux vi 编辑的界面,只能用键盘操作
vim的操作指令同时适用于gVim - Vim, Vim Diff, Vim Easy, Vim Read-only
Diff 是用来对比两个文件内容用的,直接打开挺没用的,不过直接拖2个文件到快捷方式上倒是可行;
Easy启动的时候是insert模式,适合普通windows用户的习惯;
Read-Only的用途:比如用read-only打开已经用vim打开过的文件,就不会提示让人烦躁的.swp文件存在的问题;
我们暂时会使用Vim来入门,最后您会使用gVim编程,这是因为gVim在没有配置的时候比Vim还不方便操作。
Vim基本的使用说明
用Vim打开文件
在cmd下输入vim + 路径即可,同时直接将文件拖动到快捷方式图标上也可以。
Vim的四种模式
vim 共分为四种模式,分别是普通模式(Normal mode)、底行模式(Last line mode)、输入模式(Insert mode)和可视化模式(Visual mode)。四种模式的切换与作用如下
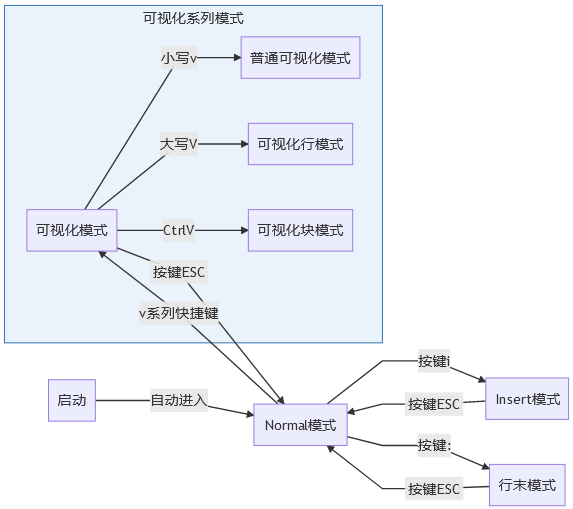
Normal Mode
这个模式一般用于浏览代码与进入底行模式输入命令,使用快捷键修改文章
| 快捷键 | 效果 |
|---|---|
| h 或 向左箭头键(←) | 光标向左移动一个字符 |
| j 或 向下箭头键(↓) | 光标向下移动一个字符 |
| k 或 向上箭头键(↑) | 光标向上移动一个字符 |
| l 或 向右箭头键(→) | 光标向右移动一个字符 |
用上面的按键你就可以上下浏览代码了,但是不建议使用方向键
Vim中还有一些键位是进行光标移动的
| 快捷键 | 效果 |
|---|---|
| [Ctrl] + [f] | 屏幕『向下』移动一页,相当于 [Page Down]按键 (常用) |
| [Ctrl] + [b] | 屏幕『向上』移动一页,相当于 [Page Up] 按键 (常用) |
| [Ctrl] + [d] | 屏幕『向下』移动半页 |
| [Ctrl] + [u] | 屏幕『向上』移动半页 |
| + | 光标移动到非空格符的下一行 |
| - | 光标移动到非空格符的上一行 |
| n < space > | 那个 n 表示『数字』,例如 20 。按下数字后再按空格键,光标会向右移动这一行的 n 个字符。例如 20< space > 则光标会向后面移动 20 个字符距离。 |
| M | 光标移动到这个屏幕的中央那一行的第一个字符 |
| L | 光标移动到这个屏幕的最下方那一行的第一个字符 |
| G | 移动到这个档案的最后一行(常用) |
| nG | n 为数字。移动到这个档案的第 n 行。例如 20G 则会移动到这个档案的第 20 行(可配合 :set nu) |
| gg | 移动到这个档案的第一行,相当于 1G 啊! (常用) |
| n< Enter > | n 为数字。光标向下移动 n 行(常用) |
以上是光标移动命令,然后是文档查询替换命令
| 命令 | 作用 |
|---|---|
| /word | 向光标之下寻找一个名称为 word 的字符串。例如要在档案内搜寻 vbird 这个字符串,就输入 / vbird 即可! (常用) |
| ?word | 向光标之上寻找一个字符串名称为 word 的字符串。 |
| n | 这个 n 是英文按键。代表重复前一个搜寻的动作。举例来说, 如果刚刚我们执行 /vbird 去向下搜寻 vbird 这个字符串,则按下 n 后,会向下继续搜寻下一个名称为 vbird 的字符串。如果是执行 ?vbird 的话,那么按下 n 则会向上继续搜寻名称为 vbird 的字符串! |
| N | 这个 N 是英文按键。与 n 刚好相反,为『反向』进行前一个搜寻动作。 例如 /vbird 后,按下 N 则表示『向上』搜寻 vbird 。 |
| 使用 /word 配合 n 及 N 是非常有帮助的!可以让你重复的找到一些你搜寻的关键词! | |
| :n1,n2s/word1/word2/g | n1 与 n2 为数字。在第 n1 与 n2 行之间寻找 word1 这个字符串,并将该字符串取代为 word2 !举例来说,在 100 到 200 行之间搜寻 vbird 并取代为 VBIRD 则: 『:100,200s/vbird/VBIRD/g』。(常用) |
| :1,$s/word1/word2/g 或 :%s/word1/word2/g | 从第一行到最后一行寻找 word1 字符串,并将该字符串取代为 word2 !(常用) |
| :1,$s/word1/word2/gc 或 :%s/word1/word2/gc | 从第一行到最后一行寻找 word1 字符串,并将该字符串取代为 word2 !且在取代前显示提示字符给用户确认 (confirm) 是否需要取代!(常用) |
最后是最常用的增删改命令
| 快捷键 | 作用 |
|---|---|
| x, X | 在一行字当中,x 为向后删除一个字符 (相当于 [del] 按键), X 为向前删除一个字符( 相当于 [backspace] 亦即是退格键) (常用) |
| nx | n 为数字,连续向后删除 n 个字符。举例来说,我要连续删除 10 个字符, 『10x』。 |
| dd | 删除游标所在的那一整行(常用) |
| ndd | n 为数字。删除光标所在的向下 n 行,例如 20dd 则是删除 20 行 (常用) |
| d1G | 删除光标所在到第一行的所有数据 |
| dG | 删除光标所在到最后一行的所有数据 |
| d$ | 删除游标所在处,到该行的最后一个字符 |
| d0 | 那个是数字的 0 ,删除游标所在处,到该行的最前面一个字符 |
| yy | 复制游标所在的那一行(常用) |
| nyy | n 为数字。复制光标所在的向下 n 行,例如 20yy 则是复制 20 行(常用) |
| y1G | 复制游标所在行到第一行的所有数据 |
| yG | 复制游标所在行到最后一行的所有数据 |
| y0 | 复制光标所在的那个字符到该行行首的所有数据 |
| y$ | 复制光标所在的那个字符到该行行尾的所有数据 |
| p, P | p 为将已复制的数据在光标下一行贴上,P 则为贴在游标上一行! 举例来说,我目前光标在第 20 行,且已经复制了 10 行数据。则按下 p 后, 那 10 行数据会贴在原本的 20 行之后,亦即由 21 行开始贴。但如果是按下 P 呢? 那么原本的第 20 行会被推到变成 30 行。 (常用) |
| J | 将光标所在行与下一行的数据结合成同一行 |
| c | 重复删除多个数据,例如向下删除 10 行,[ 10cj ] |
| u | 复原前一个动作。(常用) |
| [Ctrl]+r | 重做上一个动作。(常用) |
| . | 不要怀疑!这就是小数点!意思是重复前一个动作的意思。 如果你想要重复删除、重复贴上等等动作,按下小数点『.』就好了! (常用) |
以上的增删改查命令有一定的命名规律,比如y是复制,然后复制什么没说,你用yw就是复制一个单词(word),重复写一个命令就是对这个对行操作,例如yy就是复制一行,还可以y+数字,例如y3就是复制三行,还可以与其他命令组合比如yG就是从当前光标位置复制到文档最后,这样组合才可以让我们高效的使用Vim
Last line mode模式
我一直觉得这就是Vim的Normal模式,结果别人都觉得这是一个新模式,那就当他是个新模式吧
你会发现在没有配置Vim的其他功能的时候,Vim的下面会写有一个Normal等,但是似乎下面还有一行,这一行是让你输入命令的,想要输入命令必须使用\或者:触发,\是用来查找内容的,严格说属于Normal模式,所以其实只有:开头的命令
| 命令 | 作用 |
|---|---|
| :w | 将编辑的数据写入硬盘档案中(常用) |
| :w! | 若文件属性为『只读』时,强制写入该档案。不过,到底能不能写入, 还是跟你对该档案的档案权限有关啊! |
| :q | 离开 vi (常用) |
| :q! | 若曾修改过档案,又不想储存,使用 ! 为强制离开不储存档案。 |
| 注意一下啊,那个惊叹号 (!) 在 vi 当中,常常具有『强制』的意思~ | |
| :wq | 储存后离开,若为 :wq! 则为强制储存后离开 (常用) |
| :w [filename] | 将编辑的数据储存成另一个档案(类似另存新档) |
| :r [filename] | 在编辑的数据中,读入另一个档案的数据。亦即将 『filename』 这个档案内容加到游标所在行后面 |
| :n1,n2 w [filename] | 将 n1 到 n2 的内容储存成 filename 这个档案。 |
| :! command | 暂时离开 vi 到指令行模式下执行 command 的显示结果!例如 『:! ls /home』即可在 vi 当中察看 /home 底下以 ls 输出的档案信息! |
还有很多,但是都是特殊的命令,或者某一个插件特有的,这里不做介绍
Insert模式
插入模式是让你正常写代码的,注意的是,插入模式下hjkl的上下左右切换是失效的,可以用方向键,但是不建议,还是退出编辑模式在normal下改光标方便,进入插入模式的快捷键最常用的是i,还有如下的也可以
| 快捷键 | 作用 |
|---|---|
| i, I | 进入输入模式(Insert mode): i 为『从目前光标所在处输入』, I 为『在目前所在行的第一个非空格符处开始输入』。 (常用) |
| a, A | 进入输入模式(Insert mode): a 为『从目前光标所在的下一个字符处开始输入』, A 为『从光标所在行的最后一个字符处开始输入』。(常用) |
| o, O | 进入输入模式(Insert mode): 这是英文字母 o 的大小写。o 为『在目前光标所在的下一行处输入新的一行』; O 为在目前光标所在处的上一行输入新的一行!(常用) |
| r, R | 进入取代模式(Replace mode): r 只会取代光标所在的那一个字符一次;R会一直取代光标所在的文字,直到按下 ESC 为止;(常用) |
这一部分没什么好说的,因为没有快捷键(否则你打着打着代码就触发了什么快捷键)
Visual模式
可视化模式在很多文献中都没有介绍,但是是一个非常好用的模式,在这个模式下你可以用鼠标选择内容要选取一段文本,首先将光标移到段首,在普通模式下按 v 进入可视模式,然后把光标移到段末。 需要注意,光标所在字符是包含在选区中的
- v 进入字符可视化模式
- V 进入行可视化模式
- Ctrl+v 进入块可视化模式
块选择在表格中删除指定列非常有用
用 v 命令进入的字符可视化模式(Characterwise visual mode)。文本选择是以字符为单位的。
用 V 命令进入的行可视化模式(Linewise visual mode)。文本选择是以行为单位的。
用 ctrl-V 进入的块可视化模式(Blockwise visual mode)。可以选择一个矩形内的文本。
使用鼠标或者hjkl即可选中字符/行/块,然后可以y,x…
更有用的是对块批量操作,例如批量注释可以这么写
批量注释:
Ctrl + v 进入块选择模式,然后移动光标选中你要注释的行,再按大写的 I 进入行首插入模式输入注释符号如 // 或 #,输入完毕之后,按两下 ESC,Vim 会自动将你选中的所有行首都加上注释,保存退出完成注释。
取消注释:
Ctrl + v 进入块选择模式,选中你要删除的行首的注释符号,注意 // 要选中两个,选好之后按 d 即可删除注释,ESC 保存退出
还可以在选择文字后输入:然后把你在平时这么用的就怎么写,注意按:会多出一些东西不要管他,例如
:A //这是一堆注释
然后Vim会根据你所写,先对每一样在Normal模式下使用A把光标移动到该行行尾,然后进入Insert模式输入//这是一堆注释对每一行都操作结束之后就会自动退出到Normal模式
具体的这个模式如何使用见Vim可视化入门
配置vim
安装好的vim文件夹下有一个_vimrc文件,相当于Linux下vim的.vimrc文件,在里面配置vim,大多数情况和Linux一样。
Windows 7 C:\Program Files\Vim\_vimrc中默认是这样的——
" Vim with all enhancements
source $VIMRUNTIME/vimrc_example.vim

" Use the internal diff if available.
" Otherwise use the special 'diffexpr' for Windows.
if &diffopt !~# 'internal'
  set diffexpr=MyDiff()
endif
function MyDiff()
  let opt = '-a --binary '
  if &diffopt =~ 'icase' | let opt = opt . '-i ' | endif
  if &diffopt =~ 'iwhite' | let opt = opt . '-b ' | endif
  let arg1 = v:fname_in
  if arg1 =~ ' ' | let arg1 = '"' . arg1 . '"' | endif
  let arg1 = substitute(arg1, '!', '\!', 'g')
  let arg2 = v:fname_new
  if arg2 =~ ' ' | let arg2 = '"' . arg2 . '"' | endif
  let arg2 = substitute(arg2, '!', '\!', 'g')
  let arg3 = v:fname_out
  if arg3 =~ ' ' | let arg3 = '"' . arg3 . '"' | endif
  let arg3 = substitute(arg3, '!', '\!', 'g')
  if $VIMRUNTIME =~ ' '
    if &sh =~ '\<cmd'
      if empty(&shellxquote)
        let l:shxq_sav = ''
        set shellxquote&
      endif
      let cmd = '"' . $VIMRUNTIME . '\diff"'
    else
      let cmd = substitute($VIMRUNTIME, ' ', '" ', '') . '\diff"'
    endif
  else
    let cmd = $VIMRUNTIME . '\diff'
  endif
  let cmd = substitute(cmd, '!', '\!', 'g')
  silent execute '!' . cmd . ' ' . opt . arg1 . ' ' . arg2 . ' > ' . arg3
  if exists('l:shxq_sav')
    let &shellxquote=l:shxq_sav
  endif
endfunction
你会发现在Vim安装目录和C://User/你的用户名下还有一个,我们使用自己用户名下的,如果没有的话就自己新建一个,这个不是因为你的Vim没安装,他就是没有。
第一个Vim配置,行号
找到或者新建这个文件,右键选中用Vim打开,我们就打开了一个空的_vimrc文件,试着往里面写下set number,这个配置的意思是自动为添加行号,这样你写代码就可以在左边看到行号了
按动ZZ(大写的)保存文件,然而行号并没有出来,这是因为我们没有"刷新配置文件",在Normal下输入命令:source $MYVIMRC然后你就可以看到行号了,至此你成功配置了第一个Vimrc
设置快捷键映射
但是这似乎比较麻烦,每次修改之后还要输入那么长的刷新保存,如果有个快捷键帮助我们就好了,我设置的快捷键是大写的R,也就是Shift+R,那么我们应该如何设置呢?首先要想好自己要设置的快捷键,不能与之前的快捷键相重合,还有快捷键的生效范围,是只有在Normal模式下生效还是在四个模式下都生效。例如我将大写R作为快捷键最好只在Normal下操作,否则在Insert模式下我输入大写的R就没法输入了,但是例如F5这样的快捷键从来不会与其他模式冲突我们就可以设置为全局的
快捷键映射可以将一个组合键映射到一个命令,一个其他的组合键或者其他语法为
前缀+map 快捷键 映射结果
这里的前缀限定了map的作用范围是那几个模式,不写前缀默认是前缀n
- nmap:只有在Normal模式下生效
- vmap:只有在Visual模式下生效
- imap:只有在Insert模式下生效
- cmap:只有在行底命令的模式下生效
- Xnoremap:X是前面的n/v/i/c,nore表示非递归的例如a被映射为了b,b被映射为了c,那么如果是递归的的话a就映射为了c
对于被映射与要映射的动作按键遵循以下写法
- 普通按键就直接写
- Alt组合键写成
<A-X>,例如Alt+S就是<A-S> - Ctrl组合键写成
<C-X>,例如Ctrl+S就是<C-S> - FX写成
<FX>,例如<F5>就是F5 - 四个方向键写成
<方向>,例如<LEFT>就是方向左键 - ESC就写成
<ESC> - Leader键就写成
- 回车写成
<CR>
关于leader键:
Vim预置有很多快捷键,再加上各类插件的快捷键,大量快捷键出现在单层空间中难免引起冲突。为缓解该问题,而引入了前缀键<leader>。藉由前缀键, 则可以衍生出更多的快捷键命名空间(namespace)。例如将r键配置为<leader>r、<leader><leader>r等多个快捷键。前缀键默认为\
但是在我的键盘上\太远了,于是我就把leader换成了空格,只需要如下的命令let mapleader = "\<space>"写在开头就完成了替换。
针对上面的问题我们就可以把刷新配置文件映射成S,配置如下
map R :source $MYVIMRC<CR>
安装插件管理器
Vim好用就在于有大量插件供我们使用,这样我们可以自己配置自己喜欢的Vim,这里我们介绍插件管理器Vim-Pluig,同时我们一般的插件都是在GitHub上托管的,所以我们一般也是在GitHub上找插件,Vim的插件非常好识别,他使用的语言大多会写Vim script。
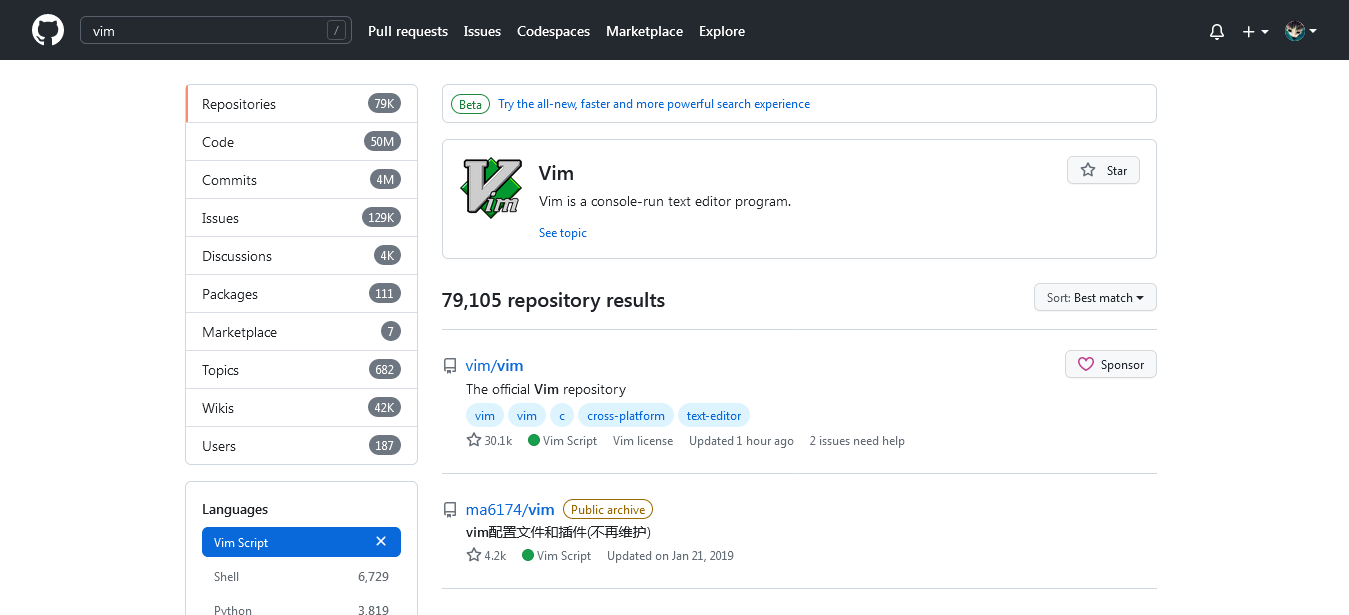
打开插件管理器所在仓库。
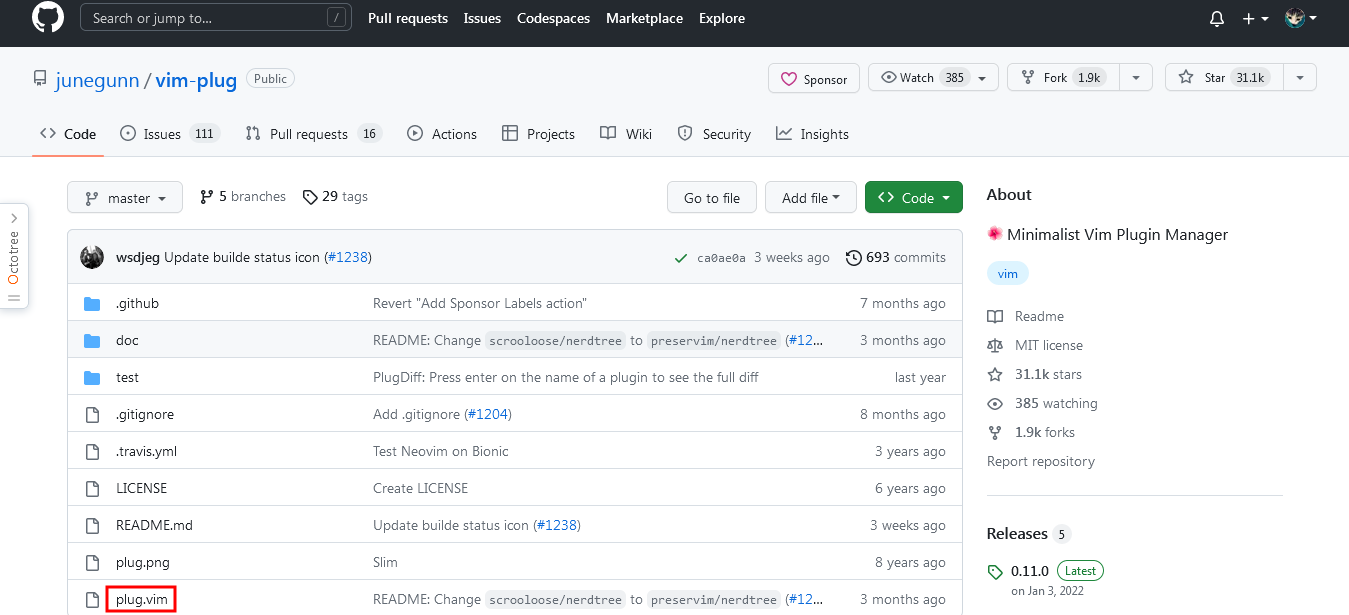
下载如下文件并放入Vim的安装目录下的autoload。
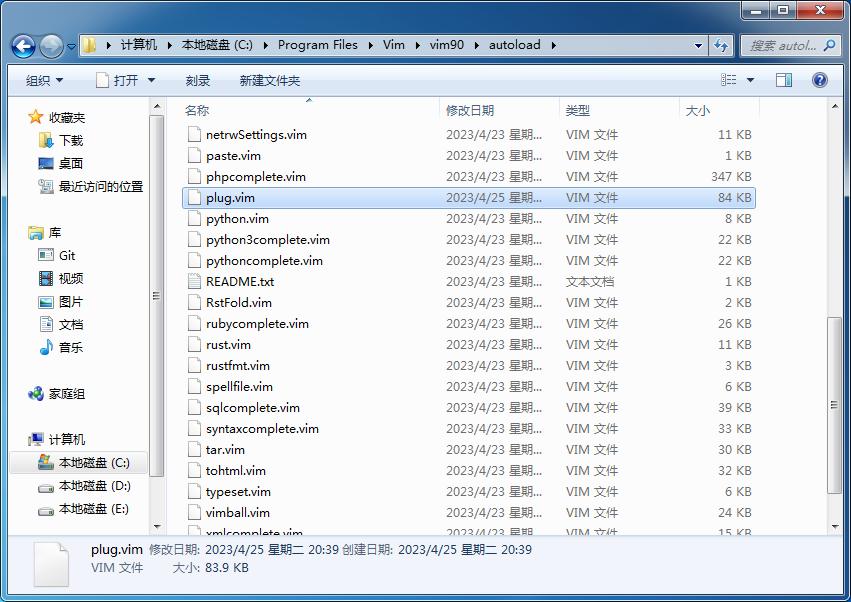
这样我们就完成了插件管理器的安装
之后我们开始尝试安装第一个插件
首先在vimrc中写下这样三行,他可以帮助插件管理器识别你要装那些插件
call plug#begin('~/.vim/plugged')

call plug#end()
以后只要是需要安装的插件我们只需要把地址写在里面就可以直接安装了
另一款插件管理器—— Vundle 的安装教程:Windows gvim安装插件_gvim插件
尝试安装第一个插件
我们先来尝试安装一个主题插件。
首先我们找到这个主题的GitHub库。
那如何告诉插件管理器我要安装这个插件,这个插件的安装包在哪里呢?
刚刚那个库的地址是
https://github.com/connorholyday/vim-snazzy
我们发现https://github.com/是GitHub的前缀,而插件管理器默认库在GitHub所以只要告诉插件connorholyday/vim-snazzy就可以了,于是我们只需要在哪两行代中间写上:
Plug 'connorholyday/vim-snazzy'
即为——
call plug#begin('~/.vim/plugged')
Plug 'connorholyday/vim-snazzy'
call plug#end()
完事,我们要让插件管理器去安装它,只需保存并刷新配置文件,输入命令:PlugInstall回车,等他跑完进度条即可。
至此我们完成了第一个插件的安装。
尝试卸载第一个插件
如果哪一天插件不想要了,可以卸载,方法很简单,要么删除插件安装的哪一行,要么把他注释掉(vim下的注释是"),然后保存刷新配置文件,输入命令:PlugClean。
Powershell中使用Vim
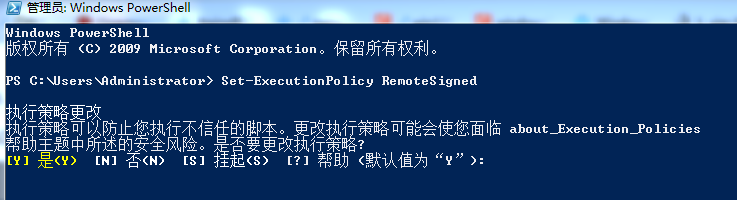
执行Set-ExecutionPolicy RemoteSigned命令,在对话框中选择Y
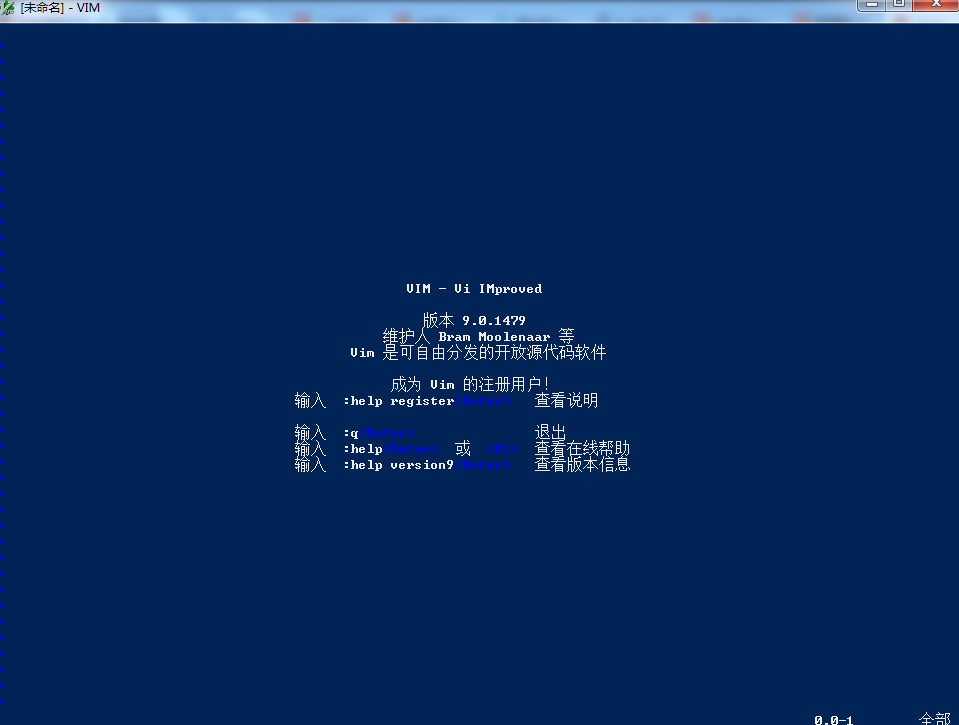
重启Shell,输入vim进行测试
参考
1. vim 的安装及配置 - QIYUEXIN - 博客园
windows10安装配置vim_win10 vim_八块腹肌怎么练的博客
Vim使用全指南 (环境配置,插件推荐,美化) (C++,Python,MarkDown,R…)_vim 编辑插件_Liukairui的博客
Powershell中使用Vim_powershell输入vim后蓝屏了_themingyi的博客
(Linux学习笔记) - vi/vim编辑器的使用
Windows gvim安装插件_gvim插件_其铄的博客-CSDN博客
Posted at 2023-04-16 Comments Technology

hexo安装
Hexo简介
Hexo是一款基于Node.js的静态博客框架,依赖少易于安装使用,可以方便的生成静态网页托管在GitHub和Coding上。
Hexo官网——快速、简洁且高效的博客框架
Hexo安装
1. 安装git,略
2. 安装node.js,略
3. 安装hexo
打开cmd或git bash,安装hexo
npm install -g hexo-cli
(卸载hexo)
npm uninstall hexo-cli -g
hexo -v 查看hexo版本
hexo -v
新建一个blog路径,初始化hexo
hexo init myblog
定位到myblog文件夹安装node_modules
cd myblog
npm install
npm install 报错问题解决合集
安装Node时自带的npm地址默认是:http://registry.npmjs.org ,npm install没反应。
使用国内镜像有2种方法:
一、直接修改镜像地址
方式一、npm config set key value 命令,设置指定的镜像地址
npm config set registry https://registry.npmmirror.com
npm info underscore (这个只是为了检验上面的设置命令是否成功,若成功,会返回[指定包]的信息)
方式二、npm –registry命令
npm --registry https://registry.npmmirror.com info underscore (npm info underscore依然是为了检验是否设置成功)
方式三、修改配置文件~/.npmrc (win系统在C:\Users\用户名.npmrc) 加入下面内容
registry = https://registry.npmmirror.com
其实1,2,3都是修改npm的配置文件.npmrc .
二、用封装好的cnpm命令
cnpm
如果觉得直接修改比较麻烦的话,就用cnpm命令吧,先用
$ npm install -g cnpm --registry=https://registry.npmmirror.com
如果需要解除镜像并恢复到官方源,请执行以下命令:
npm config set registry https://registry.npmjs.org
 hexo g  --生成网站静态文件到默认设置的 public 文件夹
 hexo s	 --启动本地服务器,默认地址:http://localhost:4000/
 hexo clean	 --清除缓存文件 db.json 和已生成的静态文件 public
hexo暂时修改默认端口:
hexo s -p 5000
永久修改启动端口:
vim node_modules\hexo-server\index.js
修改其中默认的port值。
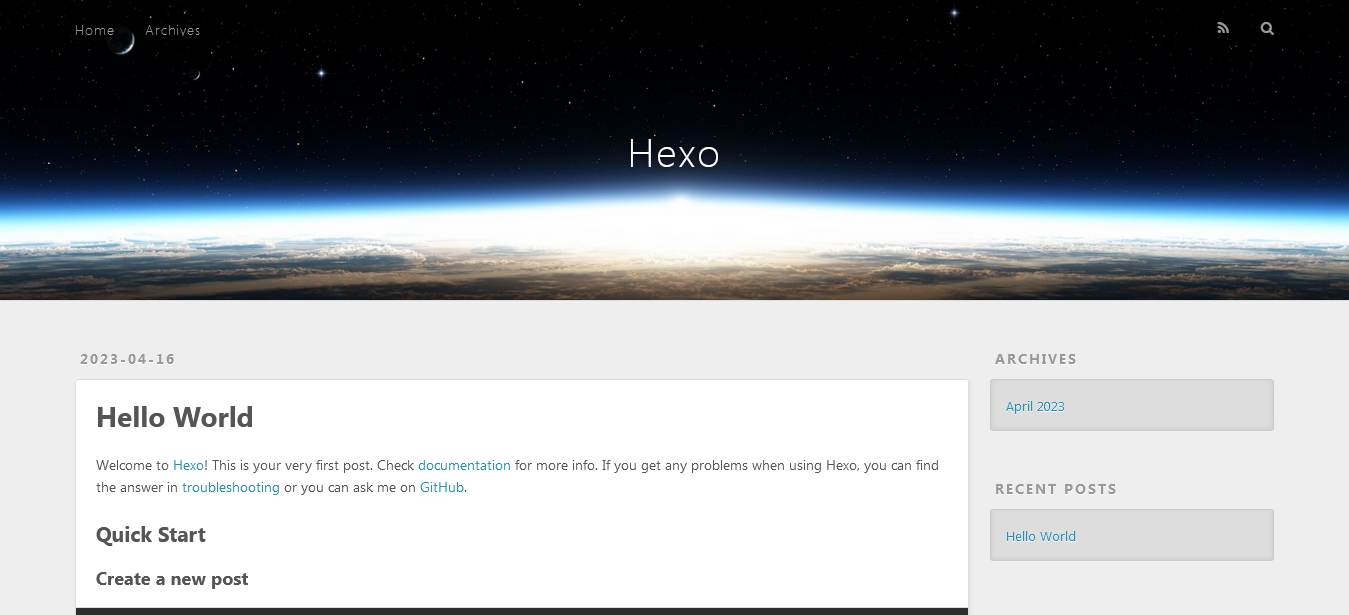
默认hexo主题如图所示——
hexo主题修改
安装
我选择 hexo-theme-shana主题,git拉取到themes文件夹下
git clone https://github.com/ShanaMaid/hexo-theme-shana themes/shana
配置
修改hexo根目录下的 _config.yml
`language: zh-CN`
`theme: shana`
同时将themes/shana/_source/的tags和categories文件夹拷贝到hexo根目录下的source文件夹下
更新
cd themes/shana
git pull origin master
使用该主题的同志请阅读hexo-theme-shana/README.md at master · ShanaMaid/hexo-theme-shana,这里就不赘述了。
主题也可以通过npm方式安装,这种方式就不在themes目录下,而在node_modules目录,详情可以看各主题的文档说明。
Gitee配置
创建gitee公开仓库
仓库名必须是用户名
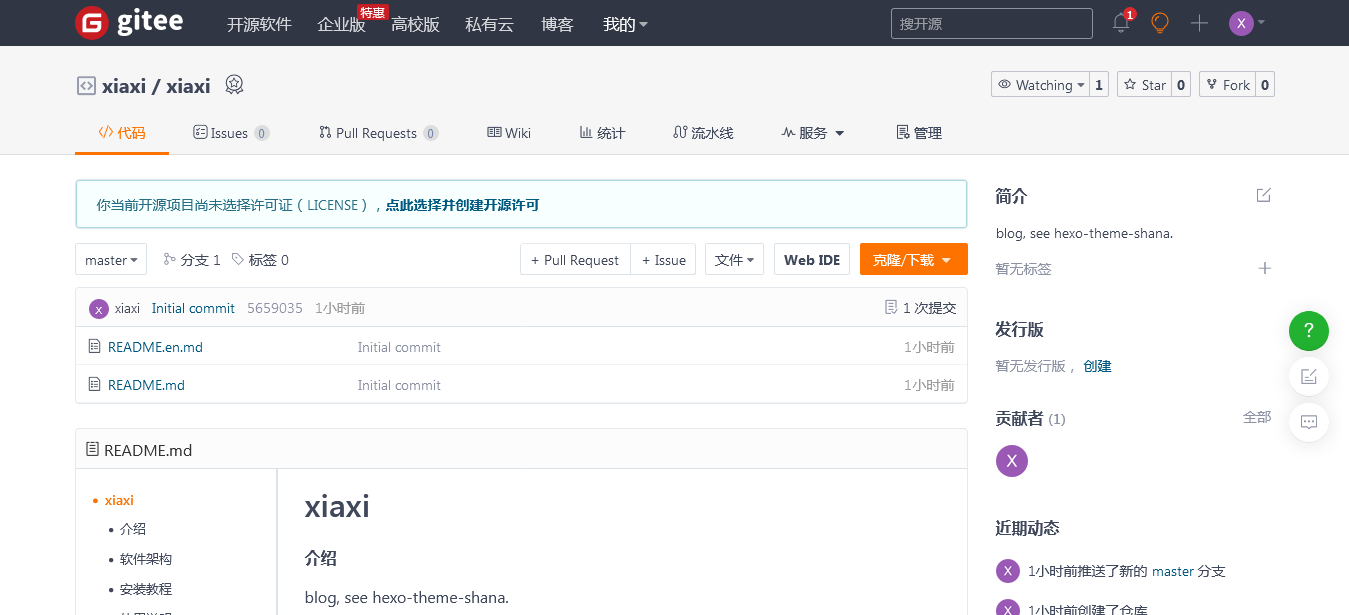
安装部署命令
npm install hexo-deployer-git --save
配置 _confing.yml
找到Deployment,配置gitee仓库
# Deployment
## Docs: https://hexo.io/docs/one-command-deployment
deploy:
  type: git
  repository: https://gitee.com/xiaxi626/xiaxi.git
  branch: master
创建仓库时的README.md描述文件会被hexo 提交覆盖掉。
在source目录下创建README.md
在_confing.yml配置中找到skip_render添加
skip_render: README.md
hexo 推送
hexo c    -- 清除缓存json和生成的静态文件
hexo g    --生成静态文件
hexo d	  --上传到git
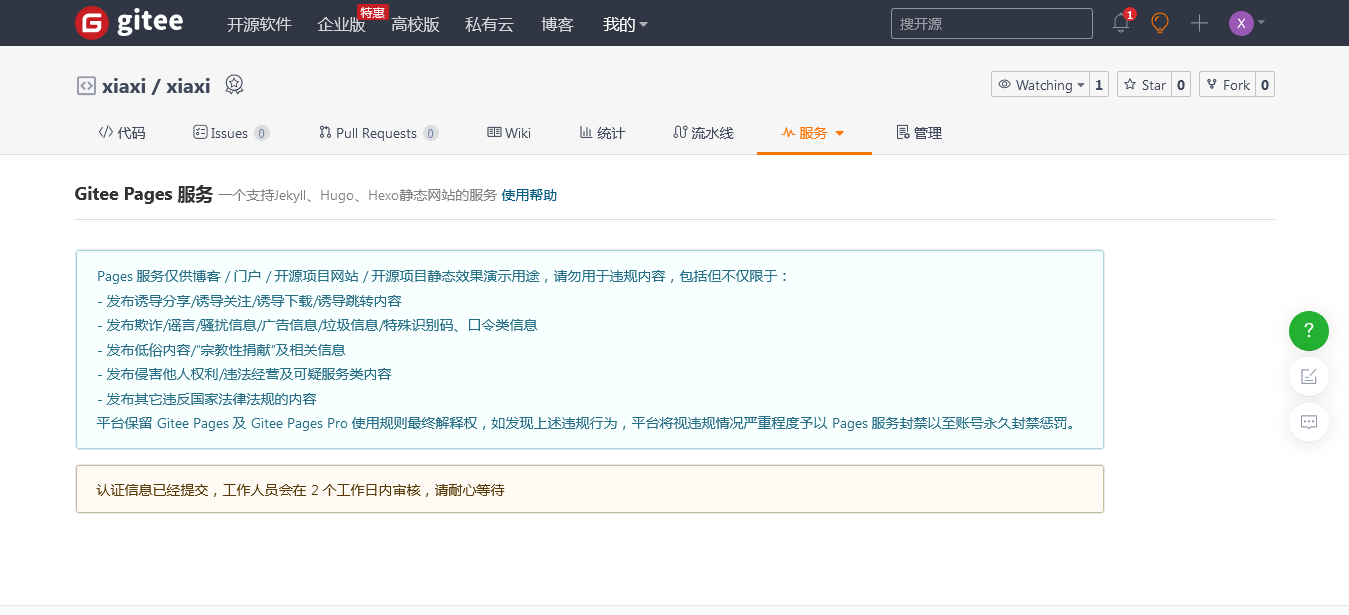
开启GiteePages
服务→Gitee Pages→启动
需要实名认证,等待2个工作日
参考
Hexo + Gitee 博客搭建详细指南 - 腾讯云开发者社区-腾讯云
npm install 使用国内镜像 - 趙小傑 - 博客园
使用阿里云npm镜像加速-阿里云开发者社区
在Gitee搭建属于自己的博客_gitee搭建个人博客_jiuqi_玖柒的博客-CSDN博客
_page-0001.jpg)
_page-0002.jpg)
_page-0003.jpg)
_page-0004.jpg)
_page-0005.jpg)
_page-0006.jpg)
_page-0007.jpg)
_page-0008.jpg)
_page-0009.jpg)
_page-0010.jpg)
_page-0011.jpg)
_page-0012.jpg)
_page-0013.jpg)
_page-0014.jpg)
_page-0015.jpg)
_page-0016.jpg)
_page-0017.jpg)
_page-0018.jpg)
_page-0019.jpg)
_page-0020.jpg)
_page-0021.jpg)
_page-0022.jpg)
_page-0023.jpg)
_page-0024.jpg)
_page-0025.jpg)
_page-0026.jpg)
_page-0027.jpg)
_page-0028.jpg)
_page-0029.jpg)
_page-0030.jpg)
_page-0031.jpg)
_page-0032.jpg)
_page-0033.jpg)
_page-0034.jpg)
_page-0035.jpg)
_page-0036.jpg)
_page-0037.jpg)
_page-0038.jpg)
_page-0039.jpg)
_page-0040.jpg)

Posted at 2023-03-25 Comments Technology
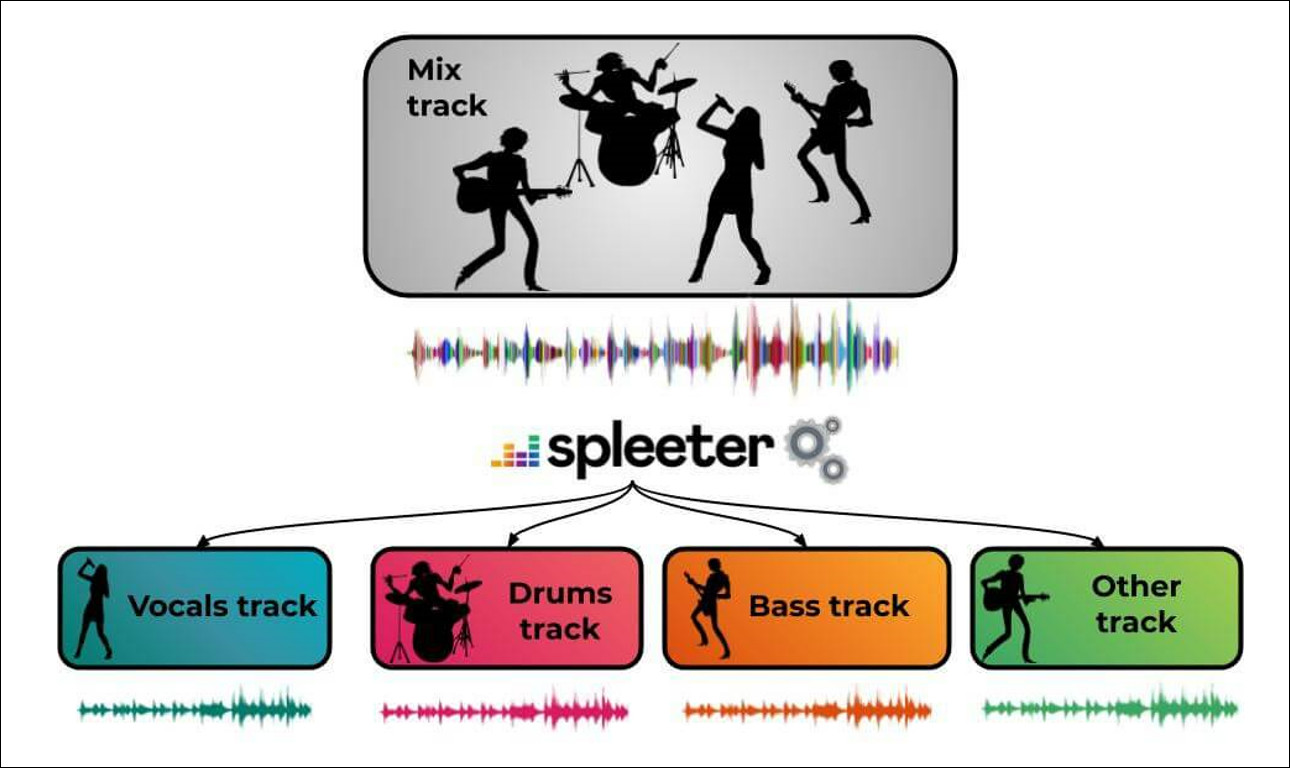
Spleeter 是什么

Spleeter是Deezer的音源分离库,用Python编写的预训练模型,使用Tensorflow。它使训练音源分离模型变得容易(假设你有一个孤立的音源数据集),并提供已经训练好的最先进的模型来执行各种类型的分离:
- 声乐(唱腔)/伴奏分离(2个音轨)
- 声乐/鼓/贝司/其他分离(4个音轨)
- 声乐/鼓/贝斯/钢琴/其他分离 (5个音轨)
2音轨和4音轨模型在 musdb 数据集上有很高的性能。Spleeter也非常快,因为它在GPU上运行时,可以将音频文件分离成4个音轨,比实时速度快100倍。
我们设计了Spleeter,所以你可以直接从命令行中使用它,也可以直接在你自己的 development pipeline 中作为一个Python库。它可以用pip安装或与Docker一起使用。
使用Spleeter的项目和软件
自从它被发布以来,有多个 fork 通过指导用户界面(GUI)或独立的免费或付费的网站展示Spleeter。
Spleeter 的预训练模型也已经被专业的音频软件所使用。这里有一个非详尽的列表:
- iZotope RX 8 中的音乐平衡功能
- SpectralLayers 7 中 Unmix 功能里的 SpectralLayers
- Acoustica 7 中的 Acon Digital
- 在 VirtualDJ 音源隔离功能中
- 在 NeuralMix 和 djayPRO 应用程序套件中的 Algoriddim
快速入门
想尝试一下,但不想安装任何东西?我们已经建了一个 Google Colab。
准备好进入它了吗?只需几行字,你就可以安装Spleeter,并从一个示例音频文件中分离出人声和伴奏部分。你首先需要安装 ffmpeg 和 libsndfile。它可以在大多数平台上使用Conda完成:
# install dependencies using conda
conda install -c conda-forge ffmpeg libsndfile
# install spleeter with pip
pip install spleeter
# download an example audio file (if you don't have wget, use another tool for downloading)
wget https://github.com/deezer/spleeter/raw/master/audio_example.mp3
# separate the example audio into two components
spleeter separate -p spleeter:2stems -o output audio_example.mp3
:warning: 注意,我们不再推荐使用conda来安装spleeter。
:warning: 苹果M1芯片有已知的问题,主要是由于TensorFlow的兼容性问题。在这些问题被修复之前,你可以使用这个变通办法。
你应该会在output/audio_example文件夹中得到两个分离的音频文件(vocals.wav和accompatiment.wav)。
关于详细的文档,请查看仓库的wiki
开发和测试
这个项目是用Poetry管理的,要运行测试套件,你可以执行以下一组命令:
# Clone spleeter repository
git clone https://github.com/Deezer/spleeter && cd spleeter
# Install poetry
pip install poetry
# Install spleeter dependencies
poetry install
# Run unit test suite
poetry run pytest tests/
疑难解答
Spleeter是一个复杂的软件,尽管我们不断努力改善和测试它,但你可能会遇到意想不到的问题。如果是这种情况,请先查看常见问题页面以及当前开放的问题列表。
Windows用户
似乎有时快捷键命令 spleeter 在Windows上不能正常工作。这是一个已知的问题,我们希望能很快解决。在此期间,在命令行中用 python -m spleeter separate 代替 spleeter separate ,它应该可以工作。
在线使用 Google Colab
打开 Colab ,保存副本,开始使用。
这里预先写好了项目的整个代码,点击“代码执行程序”-“全部运行”,将所有的代码都运行一下。
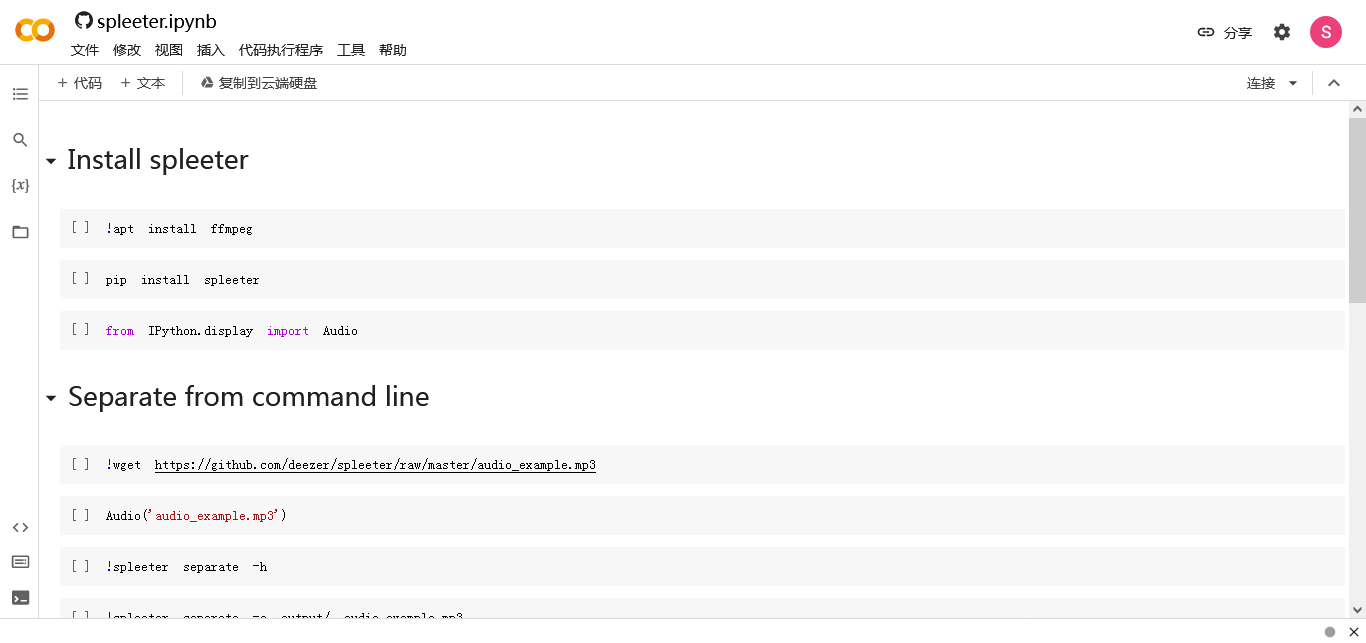
程序会自动运行,安装各种依赖、库文件,并将一个预设的audio_example.mp3 音频文件进行人声、伴奏分离。
我们试一下分离自己上传的音频文件,这里准备了一个叫 op-audio.mp3 的文件,点击左边的上传按钮即可将文件上传到云端。
/*装载 Google 云端硬盘*/
from google.colab import drive
drive.mount('/content/drive')
/*在右边新建一个代码块,照着上面的分离代码修改一下,再运行一遍。*/
spleeter separate -o output/ op-audio.mp3
注意这里不要改上面代码,不然——
!wget /content/op-audio.mp3
/content/op-audio.mp3: Scheme missing.
当然你也可以像示例一样分离存储在 github 仓库中的音频文件,像这样
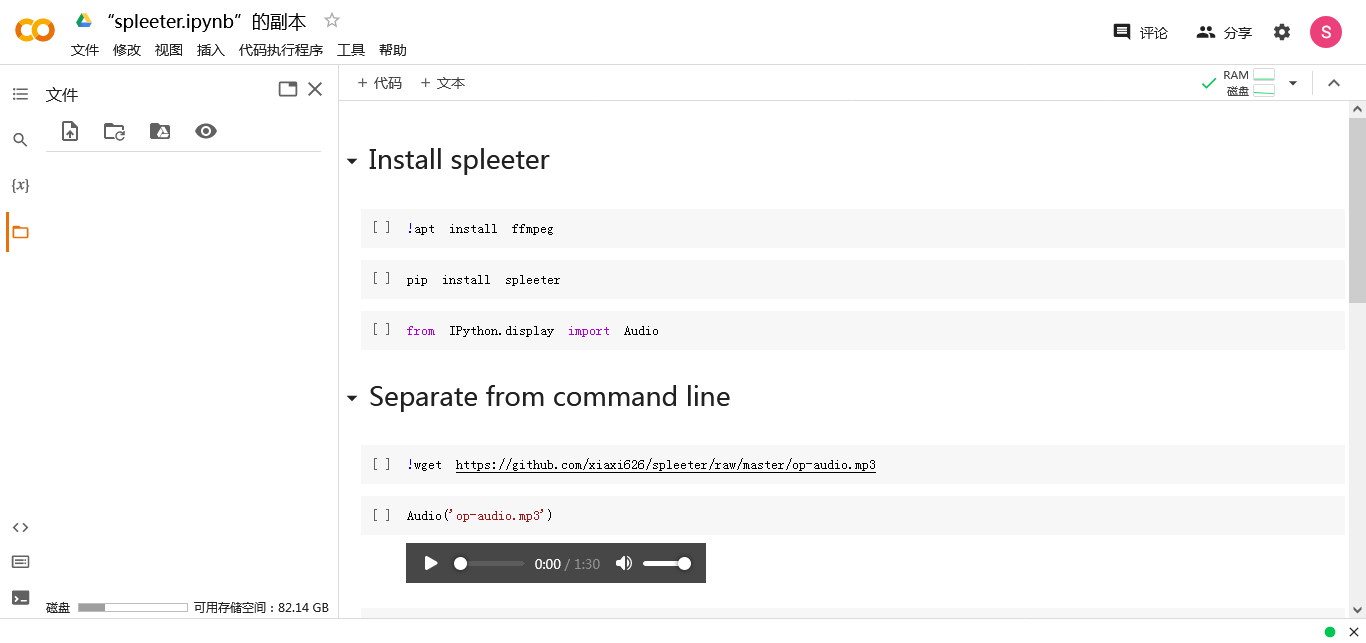
最后分离出来两个文件,accompaniment.wav为伴奏,vocals.wav为人声。
安装 spleeterGUI 图形界面软件
spleeterGUI 是基于 spleeter 进行深入开发的适用于 windows 平台的图形化界面软件。
下载地址:https://github.com/boy1dr/SpleeterGui
最新的安装程序可以从这里下载 https://makenweb.com/#spleetergui
不需要安装python或spleeter,这个应用程序包含一个预装了spleeter的便携式python版本。
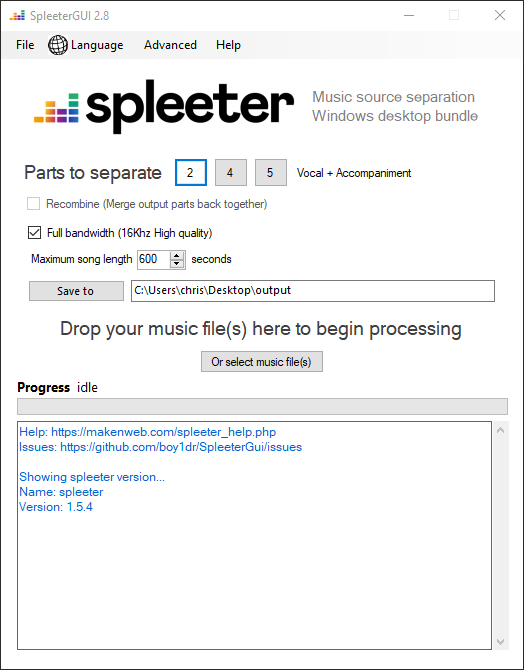
这个项目的目的是使Windows用户能够轻松地下载和运行Spleeter,而不需要使用命令行工具来完成。
支持的语言: 阿拉伯语、中文、英语、法语、印地语、意大利语、日语、俄语、西班牙语。
Intel Pentium & Celeron CPU不能运行spleeter
如果你运行的不是intel i5/7/9或Ryzen 5/7,或者不确定你的CPU是否支持AVX,请在尝试安装spleeter之前使用AVX检查工具(上文)。
打开软件后选择 parts to separate(分离声部,一般就是2),设置好文件保存路径(save to),选择需要分离的音频文件(支持多个音频文件),即可快速导出!
加载多个音频文件时,输出路径下会输出多个原文件名的文件夹,内含 accompaniment.wav 和 vocals.wav。
运行过程中遇到问题请前往 Github Issue 和 spleeter_help 搜索。
问题
httpx.ReadTimeout: The read operation timed out
Can’t load save_path when it is None
解决方法
删除“…/SpleeterGUI/pretrained_models“文件夹中的模型文件夹(如“2stems”)。
下载“https://github.com/deezer/spleeter/releases“中“Spleeter public release“的文件,把它们解压到“pretrained_models“文件夹。
Posted at 2023-03-17 Comments Technology
故障
最近频繁遇到“Com Surrogate 已停止工作”
  应用程序名:    DllHost.exe
  应用程序版本:    6.1.7600.16385
  应用程序时间戳:    4a5bca54
  故障模块名称:    DL180pdfl.dll
  故障模块版本:    18.0.0.2
  故障模块时间戳:    5e4e9f10
  异常代码:    c0000005
  异常偏移:    000000000010c045
  OS 版本:    6.1.7601.2.1.0.256.1
  区域设置 ID:    2052
  其他信息 1:    2d77
  其他信息 2:    2d77fd4d485c292455d4611a06bf410b
  其他信息 3:    480d
  其他信息 4:    480dc49c94a08920f82ec978d8269db2

联机阅读隐私声明:
  http://go.microsoft.com/fwlink/?linkid=104288&clcid=0x0804

如果无法获取联机隐私声明,请脱机阅读我们的隐私声明:
  C:\Windows\system32\zh-CN\erofflps.txt
解决办法
第一种
找到 故障模块 文件,删除;
第二种
-
点击“计算机” →“ 属性” → “高级系统设置” → “高级” → “性能 ”→ “设置”
-
进入设置后,再点击进入“数据执行保护”
-
选下面的“单选按钮为除下列选定程序之外的所有程序和服务启用DEP” 点添加,路径是C:\Windows\System32\dllhost.exe,其实默认就是 System32目录,直接输入 dllhost.exe 点打开,这样会弹出一个警告窗口,不要理,直接点确定
-
点击确定后,然后重启计算机,这时你就会发现com surrogate已停止工作的故障已经解决了
注:经测试,Windows 7 SP1 上数据执行保护提示“您不能在64-位可执行文件上设置 DEP 属性”。
第三种
1.Win+R调出运行框,输入Eventvwr.msc【注意大小写】打开事件查看器。
2.展开Windows日志,应用程序,找到对应的Application Error日志,查看崩溃模块。
3.如果崩溃模块属于第三方软件,则考虑卸载重装对应的软件。
EventData

   DllHost.exe
   6.1.7600.16385
   4a5bca54
   DL180pdfl.dll
   18.0.0.2
   5e4e9f10
   c0000005
   000000000010c045
   5254
   01d958ce0149ceca
   C:\Windows\system32\DllHost.exe
   C:\Program Files (x86)\ABBYY FineReader 15\x64\DL180pdfl.dll
   435714bb-c4c1-11ed-b98c-f4b7e25ae2ec
Posted at 2023-03-12 Comments Technology

PIP是通用的Python包管理工具,可以方便安装、列出,卸载python的模块/库/包等。
注意:在Python3.4(一说是3.6)及更新的版本中,PIP已经捆绑安装了,不需要再单独安装(应该需要更新)。
安装卸载
常见使用, 例如:
cmd下:
安装pycurl包
pip install pycurl
列出已经安装的python包
pip list
输出pycurl包的信息
pip show pycurl
卸载pycurl包
pip uninstall pycurl
导出包名到
pip freeze > package20210627.txt
pip国内位置
-i https://mirrors.aliyun.com/pypi/simple/
批量安装和卸载
pip install -r package.txt
pip uninstall -r package.txt
pip install -r “F:\Program Project\python\packages\packages.txt”
添加环境变量
path=%path%;C:\Python27
安装pip
python -m pip install pip
上代码提示:No module named pip
py2 -m ensurepip
升级pip
python37 -m pip install --upgrade pip
查看可更新包:
pip list --outdated --format=columns
安装批量更新命令
pip install pip-review
依次更新所有包
pip -review --local --interactive
pip list --outdated #列出所有过期的库
pip install --upgrade 库名
python pip 删除所有包
导出所有包
pip freeze > requirements.txt
删除所有包
pip uninstall -r requirements.txt
or
pip uninstall -r requirements.txt -y
命令
Commands:
  install                     Install packages.
  download                    Download packages.
  uninstall                   Uninstall packages.
  freeze                      Output installed packages in requirements format.
  inspect                     Inspect the python environment.
  list                        List installed packages.
  show                        Show information about installed packages.
  check                       Verify installed packages have compatible dependencies.
  config                      Manage local and global configuration.
  search                      Search PyPI for packages.
  cache                       Inspect and manage pip's wheel cache.
  index                       Inspect information available from package indexes.
  wheel                       Build wheels from your requirements.
  hash                        Compute hashes of package archives.
  completion                  A helper command used for command completion.
  debug                       Show information useful for debugging.
  help                        Show help for commands.
常用选项
General Options:
  -h, --help                  Show help.
  --debug                     Let unhandled exceptions propagate outside the
                              main subroutine, instead of logging them to
                              stderr.
  --isolated                  Run pip in an isolated mode, ignoring
                              environment variables and user configuration.
  --require-virtualenv        Allow pip to only run in a virtual environment;
                              exit with an error otherwise.
  --python <python>           Run pip with the specified Python interpreter.
  -v, --verbose               Give more output. Option is additive, and can be
                              used up to 3 times.
  -V, --version               Show version and exit.
  -q, --quiet                 Give less output. Option is additive, and can be
                              used up to 3 times (corresponding to WARNING,
                              ERROR, and CRITICAL logging levels).
  --log <path>                Path to a verbose appending log.
  --no-input                  Disable prompting for input.
  --proxy <proxy>             Specify a proxy in the form
                              scheme://[user:passwd@]proxy.server:port.
  --retries <retries>         Maximum number of retries each connection should
                              attempt (default 5 times).
  --timeout <sec>             Set the socket timeout (default 15 seconds).
  --exists-action <action>    Default action when a path already exists:
                              (s)witch, (i)gnore, (w)ipe, (b)ackup, (a)bort.
  --trusted-host <hostname>   Mark this host or host:port pair as trusted,
                              even though it does not have valid or any HTTPS.
  --cert <path>               Path to PEM-encoded CA certificate bundle. If
                              provided, overrides the default. See 'SSL
                              Certificate Verification' in pip documentation
                              for more information.
  --client-cert <path>        Path to SSL client certificate, a single file
                              containing the private key and the certificate
                              in PEM format.
  --cache-dir <dir>           Store the cache data in <dir>.
  --no-cache-dir              Disable the cache.
  --disable-pip-version-check
                              Don't periodically check PyPI to determine
                              whether a new version of pip is available for
                              download. Implied with --no-index.
  --no-color                  Suppress colored output.
  --no-python-version-warning
                              Silence deprecation warnings for upcoming
                              unsupported Pythons.
  --use-feature <feature>     Enable new functionality, that may be backward
                              incompatible.
  --use-deprecated <feature>  Enable deprecated functionality, that will be
                              removed in the future.
常见问题
问题一
ERROR: pip’s dependency resolver does not currently take into account all the packages that are installed. This behaviour is the source of the following dependency conflicts.
pip 的依赖项解析器当前未考虑安装的所有包。此行为是以下依赖项冲突的根源。
Installing collected packages: mpmath, sympy, pillow, numpy, networkx, MarkupSafe, idna, filelock, charset-normalizer, certifi, requests, jinja2, torch, torchvision, torchaudio
  Attempting uninstall: torchvision
    Found existing installation: torchvision 0.14.1
    Uninstalling torchvision-0.14.1:
      Successfully uninstalled torchvision-0.14.1
  Attempting uninstall: torchaudio
    Found existing installation: torchaudio 0.13.1
    Uninstalling torchaudio-0.13.1:
      Successfully uninstalled torchaudio-0.13.1
ERROR: pip's dependency resolver does not currently take into account all the packages that are installed. This behaviour is the source of the following dependency conflicts.
transformers 4.26.1 requires huggingface-hub<1.0,>=0.11.0, which is not installed.
transformers 4.26.1 requires packaging>=20.0, which is not installed.
transformers 4.26.1 requires pyyaml>=5.1, which is not installed.
transformers 4.26.1 requires regex!=2019.12.17, which is not installed.
transformers 4.26.1 requires tokenizers!=0.11.3,<0.14,>=0.11.1, which is not installed.
Successfully installed MarkupSafe-2.1.2 certifi-2022.12.7 charset-normalizer-2.1.1 filelock-3.9.0 idna-3.4 jinja2-3.1.2 mpmath-1.2.1 networkx-3.0rc1 numpy-1.24.1 pillow-9.3.0 requests-2.28.1 sympy-1.11.1 torch-2.1.0.dev20230312+cpu torchaudio-2.0.0.dev20230312+cpu torchvision-0.15.0.dev20230312+cpu
重新安装这几个包
问题二
Read timed out 超时问题
一般windows系统出现这个问题,可以在命令后面加上–user参数,类似:

pip install pyinstaller
# 上句报超时错误
pip install pyinstaller --user
使用–help去查看–user的作用

大意就是:把这个包换个地方安装
问题三
你想要安装一个第三方包,但是没有权限将它安装到系统Python库中去。 或者,你可能想要安装一个供自己使用的包,而不是系统上面所有用户。
Python有一个用户安装目录,通常类似”~/.local/lib/python3.3/site-packages”。 要强制在这个目录中安装包,可使用安装选项“–user”。例如:
python3 setup.py install --user
或者
pip install --user packagename
在sys.path中用户的“site-packages”目录位于系统的“site-packages”目录之前。 因此,你安装在里面的包就比系统已安装的包优先级高 (尽管并不总是这样,要取决于第三方包管理器,比如distribute或pip)。
讨论
通常包会被安装到系统的site-packages目录中去,路径类似“/usr/local/lib/python3.3/site-packages”。 不过,这样做需要有管理员权限并且使用sudo命令。 就算你有这样的权限去执行命令,使用sudo去安装一个新的,可能没有被验证过的包有时候也不安全。
安装包到用户目录中通常是一个有效的方案,它允许你创建一个自定义安装。
另外,你还可以创建一个虚拟环境。
问题四
Installing build dependencies error安装构建依赖错误
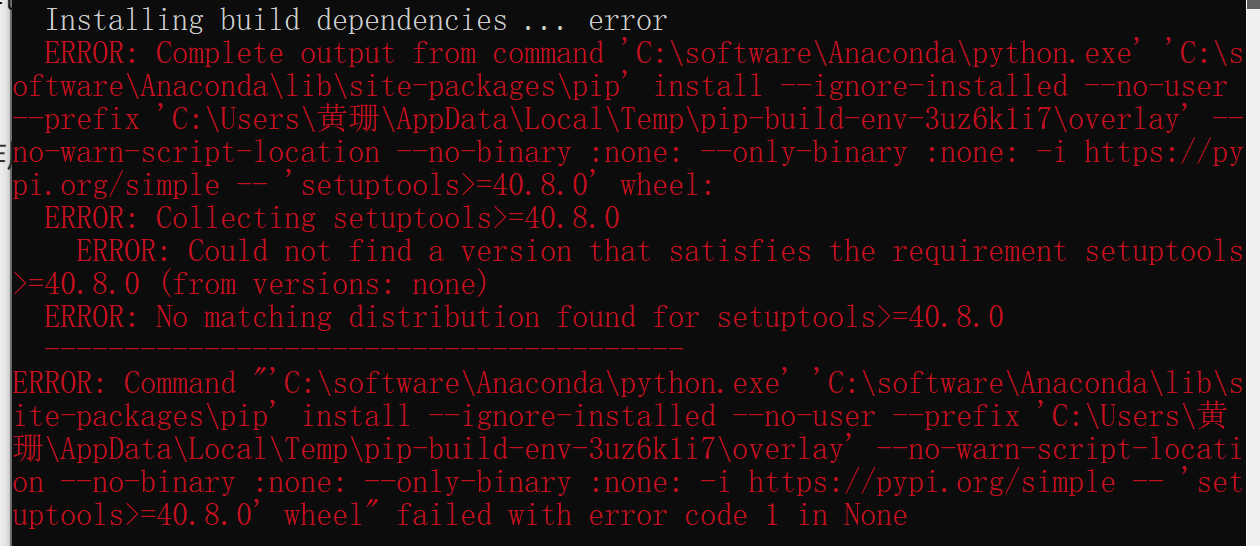
一般这种都是因为缺乏一些依赖包导致的,可以考虑直接使用conda安装,
conda install -c conda-forge pyinstaller
问题五
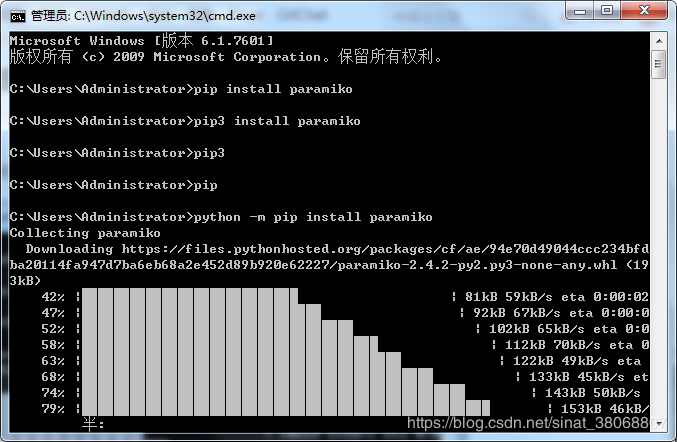
pip install 没反应怎么办
用python -m pip install便可
参考
Posted at 2023-03-08 Comments Technology
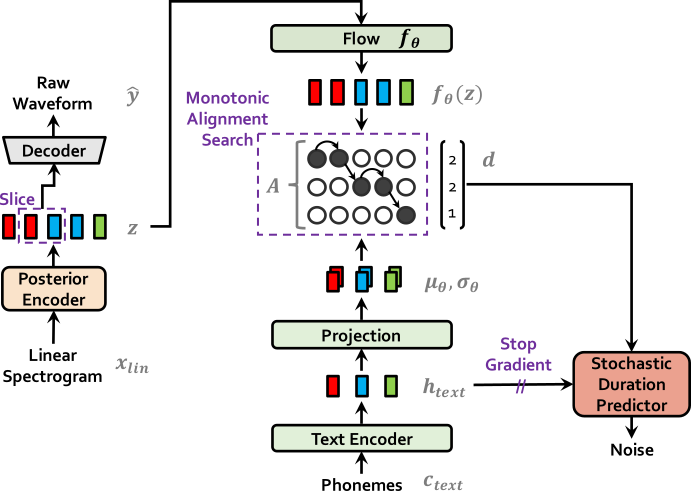
前期准备
准备过程
Visit our demo for audio samples.
We also provide the pretrained models.
** Update note: Thanks to Rishikesh (ऋषिकेश), our interactive TTS demo is now available on Colab Notebook.
预训练模型在Google Drive上,需要科学上网
- 下载数据集
i. 下载并解压缩 LJ Speech 数据集,然后重命名或创建指向数据集文件夹的链接:ln -s /path/to/LJSpeech-1.1/wavs DUMMY1
ii. 对于 mult-speaker 设置,下载并提取VCTK数据集,并将wav文件降采样至22050 Hz。然后重命名或创建指向数据集文件夹的链接:ln -s /path/to/VCTK-Corpus/downsampled_wavs DUMMY2
在Linux系统中存在两种链接文件方式- 软链接(类似windows下的快捷方式)
ln -s 原文件名 链接文件名- 硬链接(类似复制文件)
如果文件被删除,则软链接文件失去指向,变为不可用ln 原文件名 链接文件名
如果文件被删除,由于硬链接文件直接指向内容,因此不受影响
详解:深度剖析 Linux 的 3 种“拷贝”命令
Administrator@AUTOBVT-Q90417J MINGW64 /e/vits (main)
$ ln -s "E:\vits\LJSpeech-1.1\wavs" DUMMY1
/*请用上面的命令,生成的 DUMMY1 文件夹里是 wavs 文件夹中的文件,没有 wavs 文件夹*/
Administrator@AUTOBVT-Q90417J MINGW64 /e/vits (main)
$ ln -s "E:\vits\LJSpeech-1.1\wavs" DUMMY1
/*如果删掉 DUMMY1 文件夹中 wavs 文件,输入上面的命令 DUMMY1 文件夹中会出现 wavs 文件夹*/
Administrator@AUTOBVT-Q90417J MINGW64 /e/vits (main)
$ ln -s E:\vits\LJSpeech-1.1\wavs DUMMY1
/*如果删掉 DUMMY1 文件夹中 wavs 文件,输入上面的命令会出现*/
ln: failed to create symbolic link 'DUMMY1/vitsLJSpeech-1.1wavs': No such file or directory
/*创建一个 DUMMY1 空白文件夹,使用下面的命令*/
Administrator@AUTOBVT-Q90417J MINGW64 /e/vits (main)
$ ln -s E:\vits\LJSpeech-1.1\wavs DUMMY1
ln: failed to create symbolic link 'DUMMY1/vitsLJSpeech-1.1wavs': No such file or directory
/*不创建 DUMMY1 空白文件夹,使用下面的命令*/
Administrator@AUTOBVT-Q90417J MINGW64 /e/vits (main)
$ ln -s E:\vits\LJSpeech-1.1\wavs DUMMY1
ln: failed to create symbolic link 'DUMMY1': No such file or directory
- 如果您使用自己的数据集,请构建单调对齐搜索并运行预处理。
# Cython-version Monotonoic Alignment Search
cd monotonic_align
python setup.py build_ext --inplace

# Preprocessing (g2p) for your own datasets. Preprocessed phonemes for LJ Speech and VCTK have been already provided.
# python preprocess.py --text_index 1 --filelists filelists/ljs_audio_text_train_filelist.txt filelists/ljs_audio_text_val_filelist.txt filelists/ljs_audio_text_test_filelist.txt
# python preprocess.py --text_index 2 --filelists filelists/vctk_audio_sid_text_train_filelist.txt filelists/vctk_audio_sid_text_val_filelist.txt filelists/vctk_audio_sid_text_test_filelist.txt
翻回头我们看看数据集
LJspeech数据集
描述:
这是一个公共领域的语音数据集,由13,100个简短的音频剪辑组成,这些音频剪辑是单个说话者阅读7本非小说类书籍中的段落。为每个剪辑提供转录。短片的长度从1秒到10秒不等,总长度约为24小时。
这些文本出版于1884年至1964年,属于公有领域。该音频于2016-17年由LibriVox项目录制,也属于公有领域。
Homepage: The LJ Speech Dataset
介绍:
ljspeech
在网上翻了翻——
LJspeech数据集 1.0版
链接:https://pan.baidu.com/s/1OGDXtmNtKn-5258HfabTGA
提取码:jkre
LJspeech数据集 1.1版
数据集:http://data.keithito.com/data/speech/LJSpeech-1.1.tar.bz2 (用迅雷下载很快)
百度网盘地址:链接:https://pan.baidu.com/s/197LRZLNBb5gyREpYsMpkCg 提取码:7o1a
现在我没下载官方提供的预训练模型,
VCTK数据集
描述:
CSTR VCTK语料库包括110名英语使用者使用不同口音发出的语音数据。每个演讲者朗读大约400个句子,这些句子选自一份报纸、rainbow文章和一段用于语音重音档案的启发段落。
文本是根据贪婪算法选择的,贪婪算法可以增加上下文和语音覆盖率。
所有语音数据均使用相同的录音设置进行录音:一个全向麦克风(DPA 4035)和一个小振膜电容麦克风,带宽非常宽(Sennheiser MKH 800),采样频率为96kHz,24位,位于爱丁堡大学的半消声室中。
所有记录均转换为16位,降采样至48 kHz
该语料库最初用于基于HMM的文本到语音合成系统,尤其是基于说话人自适应HMM的语音合成,该合成使用多个说话人的平均语音模型和说话人自适应技术。该语料库也适用于基于DNN的多说话人文语合成系统和波形建模。这里的思想和PCA提取人脸特征加上平均人脸来合成指定人脸的思想类似
Homepage: CSTR VCTK Corpus: English Multi-speaker Corpus for CSTR Voice Cloning Toolkit (version 0.92)
介绍:
关于VCTK数据集
-MNIST dataset
vctk
训练示例
# LJ Speech
python train.py -c configs/ljs_base.json -m ljs_base

# VCTK
python train_ms.py -c configs/vctk_base.json -m vctk_base
训练测试
用 LJspeech 和 VCTK 数据集测试
已下载 LJspeech 数据集并创建指向数据集文件夹的链接,没有下载预训练模型,直接运行
# LJ Speech
python train.py -c configs/ljs_base.json -m ljs_base
cmd运行结果——
Administrator@AUTOBVT-Q90417J MINGW64 /e/vits (main)
$ python train.py -c configs/ljs_base.json -m ljs_base
DEBUG:numba.core.byteflow:bytecode dump:
>          0    NOP(arg=None, lineno=1054)
           2    LOAD_FAST(arg=0, lineno=1054)
           4    LOAD_CONST(arg=1, lineno=1054)
           6    BINARY_SUBSCR(arg=None, lineno=1054)
           8    LOAD_FAST(arg=0, lineno=1054)
          10    LOAD_CONST(arg=2, lineno=1054)
          12    BINARY_SUBSCR(arg=None, lineno=1054)
          14    COMPARE_OP(arg=4, lineno=1054)
          16    LOAD_FAST(arg=0, lineno=1054)
          18    LOAD_CONST(arg=1, lineno=1054)
          20    BINARY_SUBSCR(arg=None, lineno=1054)
          22    LOAD_FAST(arg=0, lineno=1054)
          24    LOAD_CONST(arg=3, lineno=1054)
          26    BINARY_SUBSCR(arg=None, lineno=1054)
          28    COMPARE_OP(arg=5, lineno=1054)
          30    BINARY_AND(arg=None, lineno=1054)
          32    RETURN_VALUE(arg=None, lineno=1054)
DEBUG:numba.core.byteflow:pending: deque([State(pc_initial=0 nstack_initial=0)])
DEBUG:numba.core.byteflow:stack: []
DEBUG:numba.core.byteflow:dispatch pc=0, inst=NOP(arg=None, lineno=1054)
DEBUG:numba.core.byteflow:stack []
DEBUG:numba.core.byteflow:dispatch pc=2, inst=LOAD_FAST(arg=0, lineno=1054)
DEBUG:numba.core.byteflow:stack []
DEBUG:numba.core.byteflow:dispatch pc=4, inst=LOAD_CONST(arg=1, lineno=1054)
DEBUG:numba.core.byteflow:stack ['$x2.0']
DEBUG:numba.core.byteflow:dispatch pc=6, inst=BINARY_SUBSCR(arg=None, lineno=1054)
DEBUG:numba.core.byteflow:stack ['$x2.0', '$const4.1']
DEBUG:numba.core.byteflow:dispatch pc=8, inst=LOAD_FAST(arg=0, lineno=1054)
DEBUG:numba.core.byteflow:stack ['$6binary_subscr.2']
DEBUG:numba.core.byteflow:dispatch pc=10, inst=LOAD_CONST(arg=2, lineno=1054)
DEBUG:numba.core.byteflow:stack ['$6binary_subscr.2', '$x8.3']
DEBUG:numba.core.byteflow:dispatch pc=12, inst=BINARY_SUBSCR(arg=None, lineno=1054)
DEBUG:numba.core.byteflow:stack ['$6binary_subscr.2', '$x8.3', '$const10.4']
DEBUG:numba.core.byteflow:dispatch pc=14, inst=COMPARE_OP(arg=4, lineno=1054)
DEBUG:numba.core.byteflow:stack ['$6binary_subscr.2', '$12binary_subscr.5']
DEBUG:numba.core.byteflow:dispatch pc=16, inst=LOAD_FAST(arg=0, lineno=1054)
DEBUG:numba.core.byteflow:stack ['$14compare_op.6']
DEBUG:numba.core.byteflow:dispatch pc=18, inst=LOAD_CONST(arg=1, lineno=1054)
DEBUG:numba.core.byteflow:stack ['$14compare_op.6', '$x16.7']
DEBUG:numba.core.byteflow:dispatch pc=20, inst=BINARY_SUBSCR(arg=None, lineno=1054)
DEBUG:numba.core.byteflow:stack ['$14compare_op.6', '$x16.7', '$const18.8']
DEBUG:numba.core.byteflow:dispatch pc=22, inst=LOAD_FAST(arg=0, lineno=1054)
DEBUG:numba.core.byteflow:stack ['$14compare_op.6', '$20binary_subscr.9']
DEBUG:numba.core.byteflow:dispatch pc=24, inst=LOAD_CONST(arg=3, lineno=1054)
DEBUG:numba.core.byteflow:stack ['$14compare_op.6', '$20binary_subscr.9', '$x22.10']
DEBUG:numba.core.byteflow:dispatch pc=26, inst=BINARY_SUBSCR(arg=None, lineno=1054)
DEBUG:numba.core.byteflow:stack ['$14compare_op.6', '$20binary_subscr.9', '$x22.10', '$const24.11']
DEBUG:numba.core.byteflow:dispatch pc=28, inst=COMPARE_OP(arg=5, lineno=1054)
DEBUG:numba.core.byteflow:stack ['$14compare_op.6', '$20binary_subscr.9', '$26binary_subscr.12']
DEBUG:numba.core.byteflow:dispatch pc=30, inst=BINARY_AND(arg=None, lineno=1054)
DEBUG:numba.core.byteflow:stack ['$14compare_op.6', '$28compare_op.13']
DEBUG:numba.core.byteflow:dispatch pc=32, inst=RETURN_VALUE(arg=None, lineno=1054)
DEBUG:numba.core.byteflow:stack ['$30binary_and.14']
DEBUG:numba.core.byteflow:end state. edges=[]
DEBUG:numba.core.byteflow:-------------------------Prune PHIs-------------------------
DEBUG:numba.core.byteflow:Used_phis: defaultdict(<class 'set'>, {State(pc_initial=0 nstack_initial=0): set()})
DEBUG:numba.core.byteflow:defmap: {}
DEBUG:numba.core.byteflow:phismap: defaultdict(<class 'set'>, {})
DEBUG:numba.core.byteflow:changing phismap: defaultdict(<class 'set'>, {})
DEBUG:numba.core.byteflow:keep phismap: {}
DEBUG:numba.core.byteflow:new_out: defaultdict(<class 'dict'>, {})
DEBUG:numba.core.byteflow:----------------------DONE Prune PHIs-----------------------
DEBUG:numba.core.byteflow:block_infos State(pc_initial=0 nstack_initial=0):
AdaptBlockInfo(insts=((0, {}), (2, {'res': '$x2.0'}), (4, {'res': '$const4.1'}), (6, {'index': '$const4.1', 'target': '$x2.0', 'res': '$6binary_subscr.2'}), (8, {'res': '$x8.3'}), (10, {'res': '$const10.4'}), (12, {'index': '$const10.4', 'target': '$x8.3', 'res': '$12binary_subscr.5'}), (14, {'lhs': '$6binary_subscr.2', 'rhs': '$12binary_subscr.5', 'res': '$14compare_op.6'}), (16, {'res': '$x16.7'}), (18, {'res': '$const18.8'}), (20, {'index': '$const18.8', 'target': '$x16.7', 'res': '$20binary_subscr.9'}), (22, {'res': '$x22.10'}), (24, {'res': '$const24.11'}), (26, {'index': '$const24.11', 'target': '$x22.10', 'res': '$26binary_subscr.12'}), (28, {'lhs': '$20binary_subscr.9', 'rhs': '$26binary_subscr.12', 'res': '$28compare_op.13'}), (30, {'lhs': '$14compare_op.6', 'rhs': '$28compare_op.13', 'res': '$30binary_and.14'}), (32, {'retval': '$30binary_and.14', 'castval': '$32return_value.15'})), outgoing_phis={}, blockstack=(), active_try_block=None, outgoing_edgepushed={})
DEBUG:numba.core.interpreter:label 0:
    x = arg(0, name=x)                       ['x']
    $const4.1 = const(int, 0)                ['$const4.1']
    $6binary_subscr.2 = getitem(value=x, index=$const4.1, fn=<built-in function getitem>) ['$6binary_subscr.2', '$const4.1', 'x']
    $const10.4 = const(int, -1)              ['$const10.4']
    $12binary_subscr.5 = getitem(value=x, index=$const10.4, fn=<built-in function getitem>) ['$12binary_subscr.5', '$const10.4', 'x']
    $14compare_op.6 = $6binary_subscr.2 > $12binary_subscr.5 ['$12binary_subscr.5', '$14compare_op.6', '$6binary_subscr.2']
    $const18.8 = const(int, 0)               ['$const18.8']
    $20binary_subscr.9 = getitem(value=x, index=$const18.8, fn=<built-in function getitem>) ['$20binary_subscr.9', '$const18.8', 'x']
    $const24.11 = const(int, 1)              ['$const24.11']
    $26binary_subscr.12 = getitem(value=x, index=$const24.11, fn=<built-in function getitem>) ['$26binary_subscr.12', '$const24.11', 'x']
    $28compare_op.13 = $20binary_subscr.9 >= $26binary_subscr.12 ['$20binary_subscr.9', '$26binary_subscr.12', '$28compare_op.13']
    $30binary_and.14 = $14compare_op.6 & $28compare_op.13 ['$14compare_op.6', '$28compare_op.13', '$30binary_and.14']
    $32return_value.15 = cast(value=$30binary_and.14) ['$30binary_and.14', '$32return_value.15']
    return $32return_value.15                ['$32return_value.15']

DEBUG:numba.core.byteflow:bytecode dump:
>          0    NOP(arg=None, lineno=1060)
           2    LOAD_FAST(arg=0, lineno=1060)
           4    LOAD_CONST(arg=1, lineno=1060)
           6    BINARY_SUBSCR(arg=None, lineno=1060)
           8    LOAD_FAST(arg=0, lineno=1060)
          10    LOAD_CONST(arg=2, lineno=1060)
          12    BINARY_SUBSCR(arg=None, lineno=1060)
          14    COMPARE_OP(arg=0, lineno=1060)
          16    LOAD_FAST(arg=0, lineno=1060)
          18    LOAD_CONST(arg=1, lineno=1060)
          20    BINARY_SUBSCR(arg=None, lineno=1060)
          22    LOAD_FAST(arg=0, lineno=1060)
          24    LOAD_CONST(arg=3, lineno=1060)
          26    BINARY_SUBSCR(arg=None, lineno=1060)
          28    COMPARE_OP(arg=1, lineno=1060)
          30    BINARY_AND(arg=None, lineno=1060)
          32    RETURN_VALUE(arg=None, lineno=1060)
DEBUG:numba.core.byteflow:pending: deque([State(pc_initial=0 nstack_initial=0)])
DEBUG:numba.core.byteflow:stack: []
DEBUG:numba.core.byteflow:dispatch pc=0, inst=NOP(arg=None, lineno=1060)
DEBUG:numba.core.byteflow:stack []
DEBUG:numba.core.byteflow:dispatch pc=2, inst=LOAD_FAST(arg=0, lineno=1060)
DEBUG:numba.core.byteflow:stack []
DEBUG:numba.core.byteflow:dispatch pc=4, inst=LOAD_CONST(arg=1, lineno=1060)
DEBUG:numba.core.byteflow:stack ['$x2.0']
DEBUG:numba.core.byteflow:dispatch pc=6, inst=BINARY_SUBSCR(arg=None, lineno=1060)
DEBUG:numba.core.byteflow:stack ['$x2.0', '$const4.1']
DEBUG:numba.core.byteflow:dispatch pc=8, inst=LOAD_FAST(arg=0, lineno=1060)
DEBUG:numba.core.byteflow:stack ['$6binary_subscr.2']
DEBUG:numba.core.byteflow:dispatch pc=10, inst=LOAD_CONST(arg=2, lineno=1060)
DEBUG:numba.core.byteflow:stack ['$6binary_subscr.2', '$x8.3']
DEBUG:numba.core.byteflow:dispatch pc=12, inst=BINARY_SUBSCR(arg=None, lineno=1060)
DEBUG:numba.core.byteflow:stack ['$6binary_subscr.2', '$x8.3', '$const10.4']
DEBUG:numba.core.byteflow:dispatch pc=14, inst=COMPARE_OP(arg=0, lineno=1060)
DEBUG:numba.core.byteflow:stack ['$6binary_subscr.2', '$12binary_subscr.5']
DEBUG:numba.core.byteflow:dispatch pc=16, inst=LOAD_FAST(arg=0, lineno=1060)
DEBUG:numba.core.byteflow:stack ['$14compare_op.6']
DEBUG:numba.core.byteflow:dispatch pc=18, inst=LOAD_CONST(arg=1, lineno=1060)
DEBUG:numba.core.byteflow:stack ['$14compare_op.6', '$x16.7']
DEBUG:numba.core.byteflow:dispatch pc=20, inst=BINARY_SUBSCR(arg=None, lineno=1060)
DEBUG:numba.core.byteflow:stack ['$14compare_op.6', '$x16.7', '$const18.8']
DEBUG:numba.core.byteflow:dispatch pc=22, inst=LOAD_FAST(arg=0, lineno=1060)
DEBUG:numba.core.byteflow:stack ['$14compare_op.6', '$20binary_subscr.9']
DEBUG:numba.core.byteflow:dispatch pc=24, inst=LOAD_CONST(arg=3, lineno=1060)
DEBUG:numba.core.byteflow:stack ['$14compare_op.6', '$20binary_subscr.9', '$x22.10']
DEBUG:numba.core.byteflow:dispatch pc=26, inst=BINARY_SUBSCR(arg=None, lineno=1060)
DEBUG:numba.core.byteflow:stack ['$14compare_op.6', '$20binary_subscr.9', '$x22.10', '$const24.11']
DEBUG:numba.core.byteflow:dispatch pc=28, inst=COMPARE_OP(arg=1, lineno=1060)
DEBUG:numba.core.byteflow:stack ['$14compare_op.6', '$20binary_subscr.9', '$26binary_subscr.12']
DEBUG:numba.core.byteflow:dispatch pc=30, inst=BINARY_AND(arg=None, lineno=1060)
DEBUG:numba.core.byteflow:stack ['$14compare_op.6', '$28compare_op.13']
DEBUG:numba.core.byteflow:dispatch pc=32, inst=RETURN_VALUE(arg=None, lineno=1060)
DEBUG:numba.core.byteflow:stack ['$30binary_and.14']
DEBUG:numba.core.byteflow:end state. edges=[]
DEBUG:numba.core.byteflow:-------------------------Prune PHIs-------------------------
DEBUG:numba.core.byteflow:Used_phis: defaultdict(<class 'set'>, {State(pc_initial=0 nstack_initial=0): set()})
DEBUG:numba.core.byteflow:defmap: {}
DEBUG:numba.core.byteflow:phismap: defaultdict(<class 'set'>, {})
DEBUG:numba.core.byteflow:changing phismap: defaultdict(<class 'set'>, {})
DEBUG:numba.core.byteflow:keep phismap: {}
DEBUG:numba.core.byteflow:new_out: defaultdict(<class 'dict'>, {})
DEBUG:numba.core.byteflow:----------------------DONE Prune PHIs-----------------------
DEBUG:numba.core.byteflow:block_infos State(pc_initial=0 nstack_initial=0):
AdaptBlockInfo(insts=((0, {}), (2, {'res': '$x2.0'}), (4, {'res': '$const4.1'}), (6, {'index': '$const4.1', 'target': '$x2.0', 'res': '$6binary_subscr.2'}), (8, {'res': '$x8.3'}), (10, {'res': '$const10.4'}), (12, {'index': '$const10.4', 'target': '$x8.3', 'res': '$12binary_subscr.5'}), (14, {'lhs': '$6binary_subscr.2', 'rhs': '$12binary_subscr.5', 'res': '$14compare_op.6'}), (16, {'res': '$x16.7'}), (18, {'res': '$const18.8'}), (20, {'index': '$const18.8', 'target': '$x16.7', 'res': '$20binary_subscr.9'}), (22, {'res': '$x22.10'}), (24, {'res': '$const24.11'}), (26, {'index': '$const24.11', 'target': '$x22.10', 'res': '$26binary_subscr.12'}), (28, {'lhs': '$20binary_subscr.9', 'rhs': '$26binary_subscr.12', 'res': '$28compare_op.13'}), (30, {'lhs': '$14compare_op.6', 'rhs': '$28compare_op.13', 'res': '$30binary_and.14'}), (32, {'retval': '$30binary_and.14', 'castval': '$32return_value.15'})), outgoing_phis={}, blockstack=(), active_try_block=None, outgoing_edgepushed={})
DEBUG:numba.core.interpreter:label 0:
    x = arg(0, name=x)                       ['x']
    $const4.1 = const(int, 0)                ['$const4.1']
    $6binary_subscr.2 = getitem(value=x, index=$const4.1, fn=<built-in function getitem>) ['$6binary_subscr.2', '$const4.1', 'x']
    $const10.4 = const(int, -1)              ['$const10.4']
    $12binary_subscr.5 = getitem(value=x, index=$const10.4, fn=<built-in function getitem>) ['$12binary_subscr.5', '$const10.4', 'x']
    $14compare_op.6 = $6binary_subscr.2 < $12binary_subscr.5 ['$12binary_subscr.5', '$14compare_op.6', '$6binary_subscr.2']
    $const18.8 = const(int, 0)               ['$const18.8']
    $20binary_subscr.9 = getitem(value=x, index=$const18.8, fn=<built-in function getitem>) ['$20binary_subscr.9', '$const18.8', 'x']
    $const24.11 = const(int, 1)              ['$const24.11']
    $26binary_subscr.12 = getitem(value=x, index=$const24.11, fn=<built-in function getitem>) ['$26binary_subscr.12', '$const24.11', 'x']
    $28compare_op.13 = $20binary_subscr.9 <= $26binary_subscr.12 ['$20binary_subscr.9', '$26binary_subscr.12', '$28compare_op.13']
    $30binary_and.14 = $14compare_op.6 & $28compare_op.13 ['$14compare_op.6', '$28compare_op.13', '$30binary_and.14']
    $32return_value.15 = cast(value=$30binary_and.14) ['$30binary_and.14', '$32return_value.15']
    return $32return_value.15                ['$32return_value.15']

Traceback (most recent call last):
  File "train.py", line 23, in <module>
    from models import (
  File "E:\vits\models.py", line 10, in <module>
    import monotonic_align
  File "E:\vits\monotonic_align\__init__.py", line 3, in <module>
    from .monotonic_align.core import maximum_path_c
ModuleNotFoundError: No module named 'monotonic_align.monotonic_align'
创建了E:\vits\monotonic_align\__pycache__和E:\vits\__pycache__。
ModuleNotFoundError:没有名为“monotonic_align.monotonic_align”的模块
构建单调对齐搜索并运行预处理
# Cython-version Monotonoic Alignment Search
cd monotonic_align
python setup.py build_ext --inplace
cmd运行结果——
Administrator@AUTOBVT-Q90417J MINGW64 /e/vits (main)
$ cd monotonic_align

Administrator@AUTOBVT-Q90417J MINGW64 /e/vits/monotonic_align (main)
$ python setup.py build_ext --inplace
Compiling core.pyx because it changed.
[1/1] Cythonizing core.pyx
running build_ext
building 'monotonic_align.core' extension
C:\Program Files\Python38\lib\site-packages\Cython\Compiler\Main.py:369: FutureWarning: Cython directive 'language_level' not set, using 2 for now (Py2). This will change in a later release! File: E:\vits\monotonic_align\core.pyx
  tree = Parsing.p_module(s, pxd, full_module_name)
error: Unable to find vcvarsall.bat
报告了两个错误
1、C:\Program Files\Python38\lib\site-packages\Cython\Compiler\Main.py:369: FutureWarning: Cython directive 'language_level' not set, using 2 for now (Py2). This will change in a later release!
如果你期望编译的版本不是python2,那就指定自己要用哪个版本编译,或者在每个要编译的版本 .py 文件顶上添加一行指定cython版本,即# cython: language_level=3,但如果有成千上成个 .py 或 .pyx 文件,就不好处理了,在 setup.py 中添加:
cythonize(module_item,compiler_directives={'language_level': '3'})
此处摘自Cython directive ’language_level’ not set, using 2 for now (Py2)
Cython——[FutureWarning: Cython directive ‘language_level’ not set, using 2 for now (Py2)]解决方案
2、在运行带Cython模块的py文件时,有可能输出如下报错信息:
error: Unable to find vcvarsall.bat
原因是没有找到vcvarsall.bat指定的vc++编译器进行编译。大多数解决方案都要求安装Visual Studio。
当前主流Python版本与VC和VS的版本对应关系及各版本VS下载地址:
| CPython | Visual C++ | Visual Studio | Visual Studio下载地址 |
|---|---|---|---|
| 2.6, 2.7, 3.0, 3.1, 3.2 | 9.0 | Visual Studio 2008 | x86下载 x64下载 |
| 3.3, 3.4 | 10.0 | Visual Studio 2010 | x86下载 x64下载 |
| 3.5 | 14.0 | Visual Studio 2015 | 下载 |
上表摘自Cython出现错误:Unable to find vcvarsall.bat
无需安装VS,一行命令解决"Unable to find vcvarsall.bat"提供了另一种解决方法
运行环境
- Windows 10 (64-bit)
- Python 3.7
1、安装anaconda。Anaconda强大的包管理和环境管理可以帮助我们节省大量时间与精力,让我们能更专注于代码,而不是把精力花在各种莫名其妙的环境或依赖问题上。
2、在anaconda的命令行中输入命令:conda install libpython
我用pip安装它:pip install libpython
cmd运行结果——
$ pip install libpython
Collecting libpython
  Downloading libpython-0.2.tar.gz (15 kB)
  Preparing metadata (setup.py): started
  Preparing metadata (setup.py): finished with status 'done'
Requirement already satisfied: requests in c:\program files\python38\lib\site-packages (from libpython) (2.28.2)
Requirement already satisfied: idna<4,>=2.5 in c:\program files\python38\lib\site-packages (from requests->libpython) (3.4)
Requirement already satisfied: urllib3<1.27,>=1.21.1 in c:\program files\python38\lib\site-packages (from requests->libpython) (1.26.14)
Requirement already satisfied: certifi>=2017.4.17 in c:\program files\python38\lib\site-packages (from requests->libpython) (2022.12.7)
Requirement already satisfied: charset-normalizer<4,>=2 in c:\program files\python38\lib\site-packages (from requests->libpython) (3.0.1)
Building wheels for collected packages: libpython
  Building wheel for libpython (setup.py): started
  Building wheel for libpython (setup.py): finished with status 'done'
  Created wheel for libpython: filename=libpython-0.2-py3-none-any.whl size=14410 sha256=c8c0bf0dbd5502f14e73d0da51314ce2507c4e118dc866d6722720c3f5c8c743
  Stored in directory: c:\users\administrator\appdata\local\pip\cache\wheels\f8\0e\ae\9a8610c41be91787c7899e435d6bcb161fa8df32ea3d371ecf
Successfully built libpython
Installing collected packages: libpython
Successfully installed libpython-0.2
回到「构建单调对齐搜索并运行预处理」,看看会发生什么
Administrator@AUTOBVT-Q90417J MINGW64 /e/vits (main)
$ cd monotonic_align

Administrator@AUTOBVT-Q90417J MINGW64 /e/vits/monotonic_align (main)
$ python setup.py build_ext --inplace
running build_ext
building 'monotonic_align.core' extension
error: Unable to find vcvarsall.bat
即便卸载 libpython 也不再出现
C:\Program Files\Python38\lib\site-packages\Cython\Compiler\Main.py:369: FutureWarning: Cython directive 'language_level' not set, using 2 for now (Py2). This will change in a later release! File: E:\vits\monotonic_align\core.pyx
  tree = Parsing.p_module(s, pxd, full_module_name)
删掉本地仓库重来方重现报错
看来在Windows 7 上安装 libpython 可能解决不了问题……
# Preprocessing (g2p) for your own datasets. Preprocessed phonemes for LJ Speech and VCTK have been already provided.
# python preprocess.py --text_index 1 --filelists filelists/ljs_audio_text_train_filelist.txt filelists/ljs_audio_text_val_filelist.txt filelists/ljs_audio_text_test_filelist.txt
# python preprocess.py --text_index 2 --filelists filelists/vctk_audio_sid_text_train_filelist.txt filelists/vctk_audio_sid_text_val_filelist.txt filelists/vctk_audio_sid_text_test_filelist.txt
cmd运行结果——
$ python preprocess.py --text_index 1 --filelists filelists/ljs_audio_text_train_filelist.txt filelists/ljs_audio_text_val_filelist.txt filelists/ljs_audio_text_test_filelist.txt
START: filelists/ljs_audio_text_train_filelist.txt
Traceback (most recent call last):
  File "preprocess.py", line 20, in <module>
    cleaned_text = text._clean_text(original_text, args.text_cleaners)
  File "E:\vits\text\__init__.py", line 53, in _clean_text
    text = cleaner(text)
  File "E:\vits\text\cleaners.py", line 98, in english_cleaners2
    phonemes = phonemize(text, language='en-us', backend='espeak', strip=True, preserve_punctuation=True, with_stress=True)
  File "C:\Program Files\Python38\lib\site-packages\phonemizer\phonemize.py", line 206, in phonemize
    phonemizer = BACKENDS[backend](
  File "C:\Program Files\Python38\lib\site-packages\phonemizer\backend\espeak\espeak.py", line 45, in __init__
    super().__init__(
  File "C:\Program Files\Python38\lib\site-packages\phonemizer\backend\espeak\base.py", line 39, in __init__
    super().__init__(
  File "C:\Program Files\Python38\lib\site-packages\phonemizer\backend\base.py", line 77, in __init__
    raise RuntimeError(  # pragma: nocover
RuntimeError: espeak not installed on your system
创建了E:\vits\text\__pycache__和E:\vits\__pycache__。
解决方法:
RuntimeError: espeak not installed on your system【已解决】
RuntimeError: espeak not installed on your system #44
未完待续
jaywalnut310/vits坑就踩到这里,安装的依赖库严重影响Whisper正常使用。以后用Linux再试。
与jaywalnut310/vits相关的「端到端语音合成模型VITS,日语数据训练」Ikaros/vits-japanese
下一篇开始学习
CjangCjengh/vits
下江小春也能看懂的语音模型训练教程
【VITS/语音合成】使用『预训练模型』快速拟合你的语音模型
Posted at 2023-03-06 Comments Technology
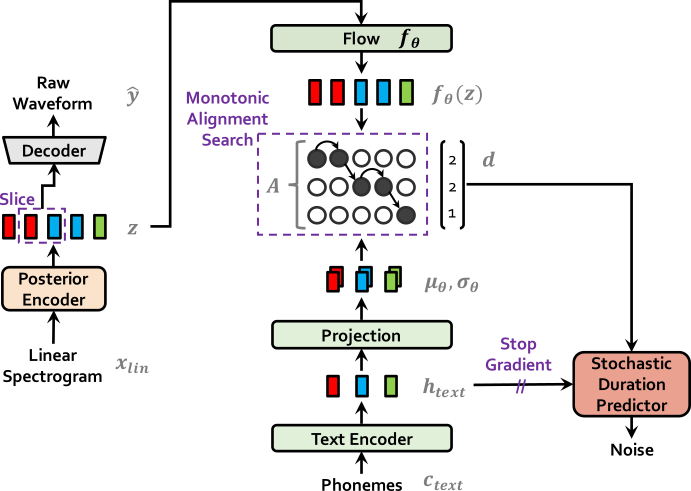
VITS(Variational Inference with adversarial learning for end-to-end Text-to-Speech)是一种结合变分推理(variational inference)、标准化流(normalizing flows)和对抗训练的高表现力语音合成模型。
论文地址:Conditional Variational Autoencoder with Adversarial Learning for End-to-End Text-to-Speech
细读论文:细读经典:VITS,用于语音合成带有对抗学习的条件变分自编码器
VITS Github 仓库:jaywalnut310/vits
前期准备
硬件要求:
内存最好在16G以上。
显存最好在12G以上,最低也得6G,而且必须是支持CUDA的N卡。A卡目前理论上也有办法跑torch,但是非常复杂且麻烦。
中文互联网上没找到小白能用的VITS本地训练教程(注:特指jaywalnut310/vits)。目前我的电脑无法完成本地训练,又无法长时间科学上网(学习jaywalnut310/vits仓库对应的云端训练),只能尝试一下是否可以完成模型训练前的所有操作。
VITS仓库README原文
-
Python >= 3.6
-
Clone this repository
-
Install python requirements. Please refer requirements.txt
i. You may need to install espeak first: apt-get install espeak
-
Download datasets
i. Download and extract the LJ Speech dataset, then rename or create a link to the dataset folder:
ln -s /path/to/LJSpeech-1.1/wavs DUMMY1
ii. For mult-speaker setting, download and extract the VCTK dataset, and downsample wav files to 22050 Hz. Then rename or create a link to the dataset folder:ln -s /path/to/VCTK-Corpus/downsampled_wavs DUMMY2 -
Build Monotonic Alignment Search and run preprocessing if you use your own datasets.
# Cython-version Monotonoic Alignment Search
cd monotonic_align
python setup.py build_ext --inplace

# Preprocessing (g2p) for your own datasets. Preprocessed phonemes for LJ Speech and VCTK have been already provided.
# python preprocess.py --text_index 1 --filelists filelists/ljs_audio_text_train_filelist.txt filelists/ljs_audio_text_val_filelist.txt filelists/ljs_audio_text_test_filelist.txt
# python preprocess.py --text_index 2 --filelists filelists/vctk_audio_sid_text_train_filelist.txt filelists/vctk_audio_sid_text_val_filelist.txt filelists/vctk_audio_sid_text_test_filelist.txt
准备过程
- Windows 7 用户选择 Python 3.8
- 克隆仓库
git clone git@github.com:jaywalnut310/vits.git
- 安装 Python 环境,参阅 requirements.txt,如下:
Cython==0.29.21
librosa==0.8.0
matplotlib==3.3.1
numpy==1.18.5
phonemizer==2.2.1
scipy==1.5.2
tensorboard==2.3.0
torch==1.6.0
torchvision==0.7.0
Unidecode==1.1.1
您可能需要先安装espeak:apt-get install espeak
安装espeak
Windows下的 apt-get 官网地址如下:https://chocolatey.org/
在Win7中尝试装chocolatey时挺折腾人的,可以看这两篇文章——
Windows7下的包管理器Chocolatey的安装
如何在Win 7中安装chocolatey
不想用Chocolatey有没有办法安装呢?
去 Espeak 官网下载Windows安装包(.exe文件)
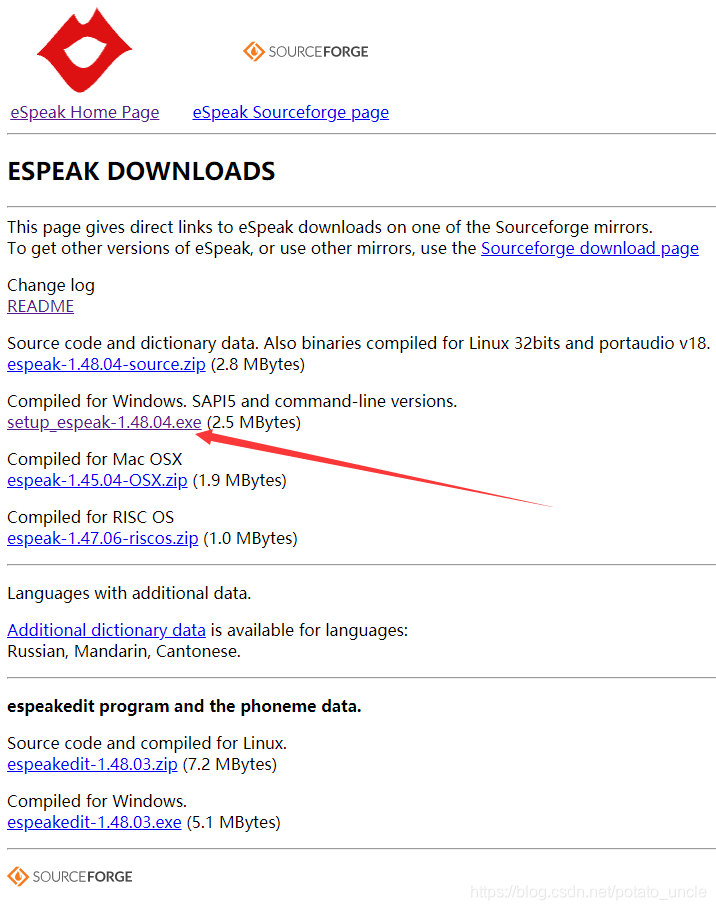
网页跳转打不开,搜索Github出来一个espeak-NG
安装espeak-NG看看
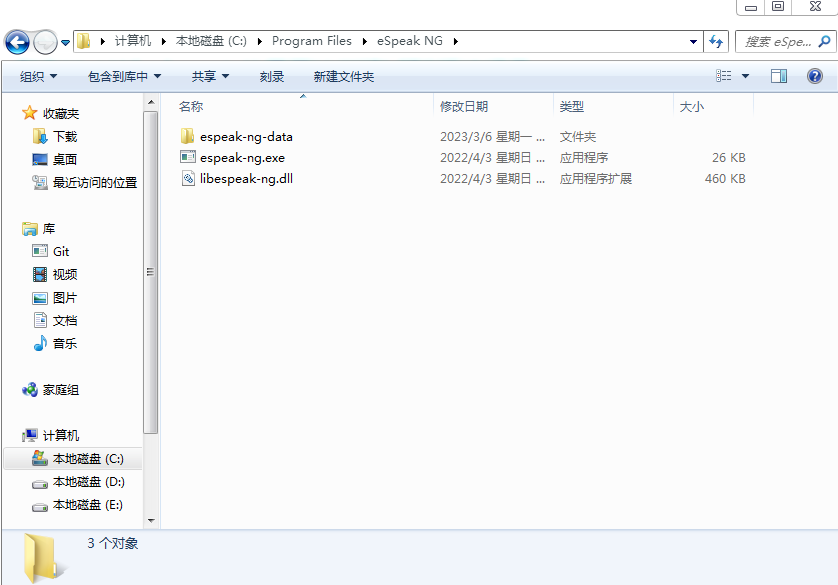
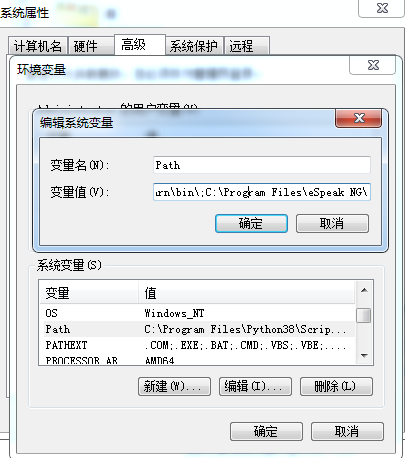
自动添加了系统环境变量
教程:eSpeak NG Windows 版中文发音简易教程
上面暂时下载不了,下载这个看看——
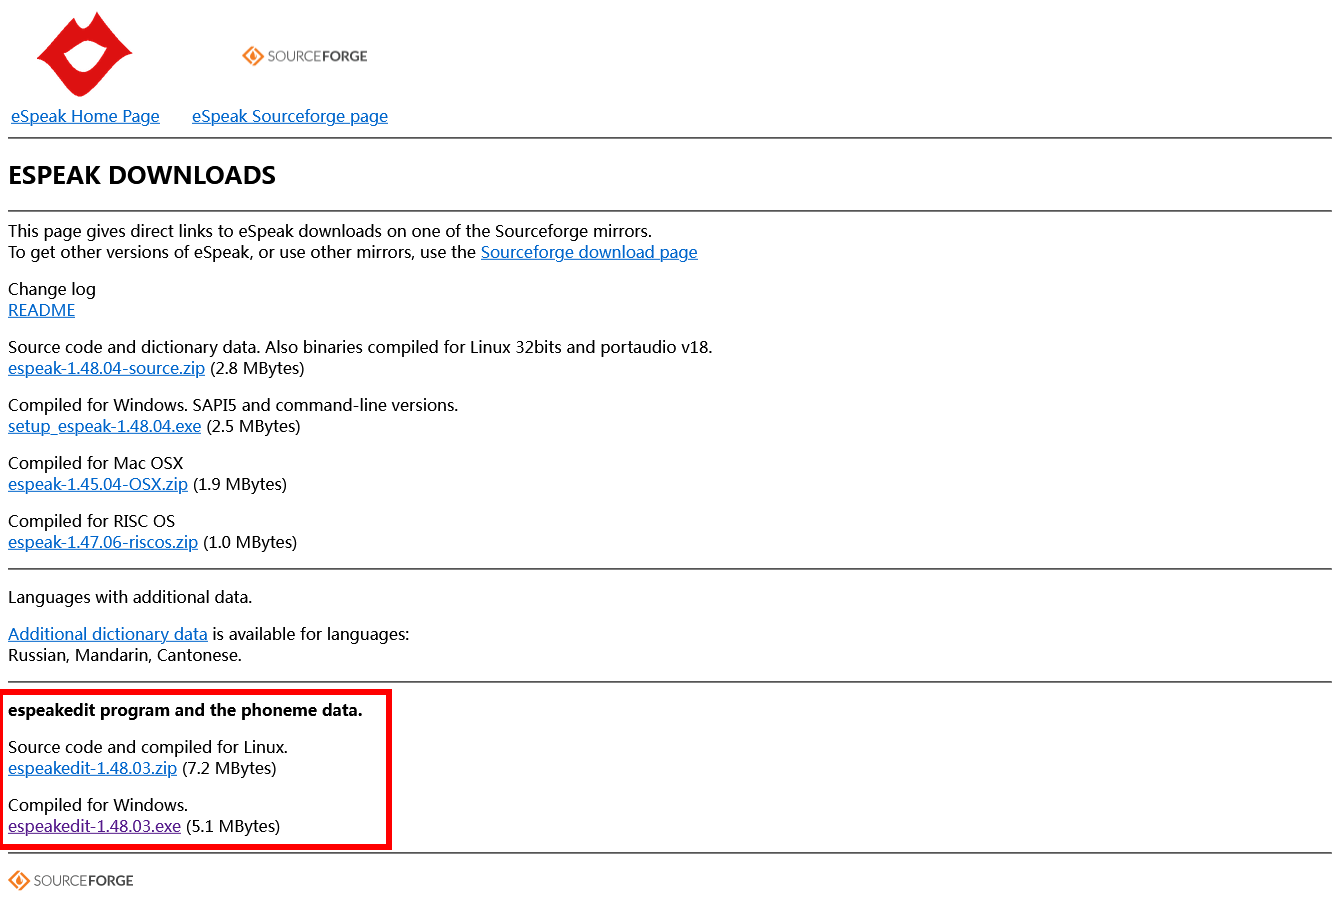
打开软件,提示——
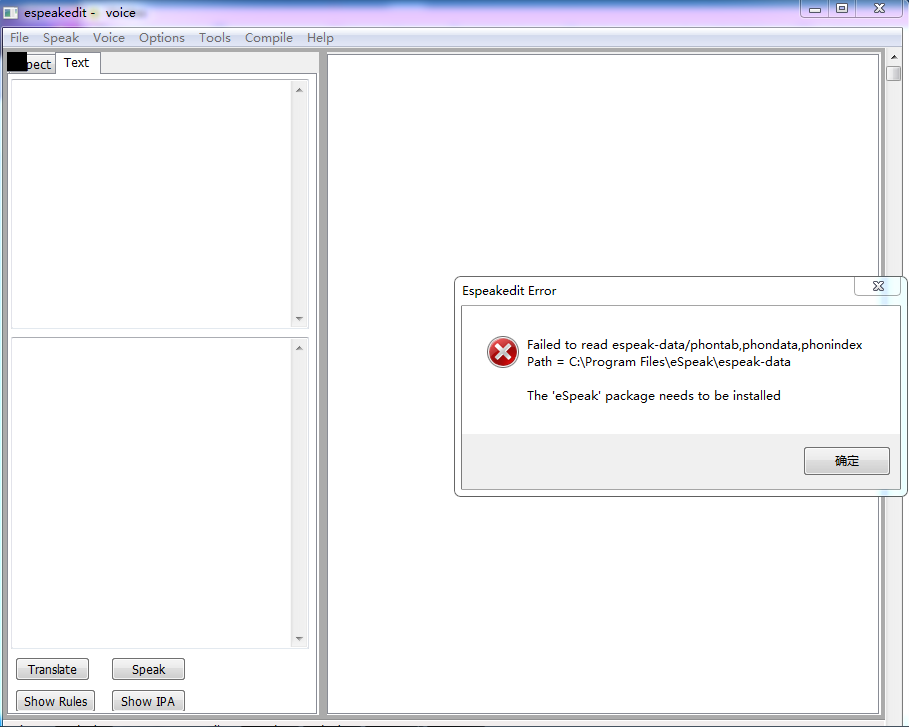
这是一个编辑器,需要读取C:\Program Files\eSpeak\espeak-data。
重启电脑后可以 eSpeak 下载页面打开了。
参阅Espeak最详细安装过程!安装 eSpeak 。
i. 安装过程修改安装路径为 C:\Program Files\eSpeak。
ii. 选择要安装的语言包,添加en-us、it、fr。
各种语言的缩写请参见下表,更多信息请点我:
af is an Africaans voice.
bs is a Bosnian voice.
ca is a Catalan voice.
cs is a Czech voice.
cy is a Welsh voice.
da is a Danish voice.
de is a German voice.
el is a Greek voice.
en is an English voice.
en-us is an American English voice.
eo is a Esperanto voice.
es is a Spanish voice.
es-la is a Spanish Latin American voice.
fi is a Finnish voice.
fr is a French voice.
fr-be is a French Belgian voice.
hi is a Hindi voice.
hr is a Croatian voice.
hu is a Hungarian voice.
hy is an Armenian voice.
hy-west is an Armenian-west voice.
id is an Indonesian voice.
is is an experimental Icelandic voice.
it is an Italian voice.
ka is a Georgian voice.
kn is a Kannada voice.
ku is a Kurdish voice.
la is a Latin voice.
lv is a Lativian voice.
mk is an experimental Macedonian voice.
ml is a Malayam voice.
nl is an experimental Dutch voice.
no is a Norwegian Bokmal voice.
pl is a Polish voice.
pt is a Brazilian Portuguese voice.
pt-pt is Portuguese voice.
ro is a Romanian voice.
ru is an experimental Russian voice.
sk is a Slovak voice.
sq is an Albanian voice.
sr is a Serbian voice.
sv is a Swedish voice.
sw is an experimental Swahili voice.
ta is a Tamil voice.
tr is a Turkish voice.
vi is a Vietnam voice.
zh is a Mandarin Chinese voice.
zh-yue is a Cantonese voice.
iii. 输入jp,安装后无法正常朗读,查阅Can’t find Japanese language code.
反复提到
“Can you check that ja_dict is really missing from C:\Program Files\eSpeak NG/espeak-ng-data”
尝试把 C:\Program Files\eSpeak NG\espeak-ng-data 部分除 lang 以外移动到 C:\Program Files\eSpeak\espeak-data ,安装时添加语言ja。
很好,程序寄了。
eSpeak的其他数据:在该网站下载文件后,解压缩到eSpeak的dictsource目录中。 在dictsource目录中,执行
espeak --compile=zh
espeak --compile=zh-yue
espeak --compile=ru
iV. 将 espeak/command_line 加入环境变量
另外,不知安装 eSpeak 后是否需要安装 python-espeak 。如果需要,打开这个网站——Text-To-Speech with Python Espeak。
Requires espeak and its libraries to be installed espeak/speak_lib.h should be in your include path somewhere. Install with

`python setup.py install`

or python setup.py build to get the library in the build without installation.
至此,eSpeak安装完成,没有按照官方建议 apt-get install espeak 可能会出错。
安装 requirements.txt 中相关包
首先命令行输入 pip list 查看已安装的库或第三方包信息。
C:\Users\Administrator>pip list
Package            Version
------------------ ----------
certifi            2022.12.7
charset-normalizer 3.0.1
colorama           0.4.6
ffmpeg-python      0.2.0
filelock           3.9.0
future             0.18.3
huggingface-hub    0.12.1
idna               3.4
more-itertools     9.0.0
numpy              1.24.2
openai-whisper     20230124
packaging          23.0
Pillow             9.4.0
pip                23.0.1
PyYAML             6.0
regex              2022.10.31
requests           2.28.2
setuptools         56.0.0
tokenizers         0.13.2
torch              1.13.1
torchaudio         0.13.1
torchvision        0.14.1
tqdm               4.64.1
transformers       4.26.1
typing_extensions  4.5.0
urllib3            1.26.14
看来现在需要安装
Cython==0.29.21
librosa==0.8.0
matplotlib==3.3.1
numpy==1.18.5
phonemizer==2.2.1
scipy==1.5.2
tensorboard==2.3.0
Unidecode==1.1.1
安装Cython
安装Cython的最简单方法是使用pip:
pip install Cython
最新的Cython版本始终可以从https://cython.org/下载 。
Cython的最新版本是3.0 beta 1(发布日期:2023年2月25日)。可以从PyPI包索引库中获得Cython。
解压缩tarball或zip文件,输入目录,然后运行:
python setup.py install
cmd安装过程——
Administrator@AUTOBVT-Q90417J MINGW64 ~
$ pip install Cython
Collecting Cython
  Downloading Cython-0.29.33-py2.py3-none-any.whl (987 kB)
     -------------------------------------- 987.3/987.3 kB 1.2 MB/s eta 0:00:00
Installing collected packages: Cython
Successfully installed Cython-0.29.33
Christoph Gohlke已经创建了Windows安装程序,可以在他的网站上下载。
下载whl文件,与手动安装 torch 类似的命令——
activate pytorch_env (就是用activate打开自己的环境)
cd Desktop (打开下载文件的地址)
pip install torch-1.4.0+cpu-cp36-cp36m-win_amd64.whl (直接安装)
(以上命令摘自python安装torch的详细步骤(亲测成功)
,activate pytorch_env不知道有没有起到作用,之前手动安装pytorch报了与文中类似的警告。)
对于一次性构建,例如用于CI /测试,在PyPI上提供的一个轮组件未涵盖的平台上,它比完全源构建快得多,以安装未编译(较慢)的Cython版本
pip install Cython --install-option="--no-cython-compile"
安装librosa
安装librosa的最简单方法是使用pip:
pip install librosa
如果安装了Anaconda,可以通过conda命令安装:
conda install -c conda-forge librosa
直接使用源码安装,需要提前下载源码(https://github.com/librosa/librosa/releases/),通过下面命令安装:
tar xzf librosa-VERSION.tar.gz
cd librosa-VERSION/
python setup.py install
cmd安装过程——
Administrator@AUTOBVT-Q90417J MINGW64 /
$ pip install librosa
Collecting librosa
  WARNING: Retrying (Retry(total=4, connect=None, read=None, redirect=None, status=None)) after connection broken by 'ConnectTimeoutError(<pip._vendor.urllib3.connection.HTTPSConnection object at 0x0000000004B31070>, 'Connection to files.pythonhosted.org timed out. (connect timeout=15)')': /packages/bc/2e/80370da514096c6190f8913668198380ea09c2d252cfa4e85a9c096d3b40/librosa-0.10.0-py3-none-any.whl
  WARNING: Retrying (Retry(total=3, connect=None, read=None, redirect=None, status=None)) after connection broken by 'ConnectTimeoutError(<pip._vendor.urllib3.connection.HTTPSConnection object at 0x0000000004B312E0>, 'Connection to files.pythonhosted.org timed out. (connect timeout=15)')': /packages/bc/2e/80370da514096c6190f8913668198380ea09c2d252cfa4e85a9c096d3b40/librosa-0.10.0-py3-none-any.whl
  WARNING: Retrying (Retry(total=2, connect=None, read=None, redirect=None, status=None)) after connection broken by 'ConnectTimeoutError(<pip._vendor.urllib3.connection.HTTPSConnection object at 0x0000000004B31460>, 'Connection to files.pythonhosted.org timed out. (connect timeout=15)')': /packages/bc/2e/80370da514096c6190f8913668198380ea09c2d252cfa4e85a9c096d3b40/librosa-0.10.0-py3-none-any.whl
  WARNING: Retrying (Retry(total=1, connect=None, read=None, redirect=None, status=None)) after connection broken by 'ConnectTimeoutError(<pip._vendor.urllib3.connection.HTTPSConnection object at 0x0000000004B31550>, 'Connection to files.pythonhosted.org timed out. (connect timeout=15)')': /packages/bc/2e/80370da514096c6190f8913668198380ea09c2d252cfa4e85a9c096d3b40/librosa-0.10.0-py3-none-any.whl
  WARNING: Retrying (Retry(total=0, connect=None, read=None, redirect=None, status=None)) after connection broken by 'ConnectTimeoutError(<pip._vendor.urllib3.connection.HTTPSConnection object at 0x0000000004B316D0>, 'Connection to files.pythonhosted.org timed out. (connect timeout=15)')': /packages/bc/2e/80370da514096c6190f8913668198380ea09c2d252cfa4e85a9c096d3b40/librosa-0.10.0-py3-none-any.whl
ERROR: Could not install packages due to an OSError: HTTPSConnectionPool(host='files.pythonhosted.org', port=443): Max retries exceeded with url: /packages/bc/2e/80370da514096c6190f8913668198380ea09c2d252cfa4e85a9c096d3b40/librosa-0.10.0-py3-none-any.whl (Caused by ConnectTimeoutError(<pip._vendor.urllib3.connection.HTTPSConnection object at 0x0000000004B31850>, 'Connection to files.pythonhosted.org timed out. (connect timeout=15)'))
连接超时了,所以我们只要用一些国内的pip源就可以完美的解决。
pip install [whatyouwant] -i url
[whatyouwant]替换成自己需要的包,url替换成pip源
几个国内的pip源
阿里云 http://mirrors.aliyun.com/pypi/simple/

中国科技大学 https://pypi.mirrors.ustc.edu.cn/simple/

豆瓣(douban) http://pypi.douban.com/simple/

清华大学 https://pypi.tuna.tsinghua.edu.cn/simple/

中国科学技术大学 http://pypi.mirrors.ustc.edu.cn/simple/
cmd输入 pip install librosa -i http://mirrors.aliyun.com/pypi/simple/ ,安装过程——
C:\Users\Administrator>pip install librosa -i http://mirrors.aliyun.com/pypi/simple/
Looking in indexes: http://mirrors.aliyun.com/pypi/simple/
WARNING: The repository located at mirrors.aliyun.com is not a trusted or secure
 host and is being ignored. If this repository is available via HTTPS we recomme
nd you use HTTPS instead, otherwise you may silence this warning and allow it an
yway with '--trusted-host mirrors.aliyun.com'.
ERROR: Could not find a version that satisfies the requirement librosa (from ver
sions: none)
ERROR: No matching distribution found for librosa
警告:存储库位于镜像。阿里云。com不是受信任或安全的主机,正在被忽略。如果此存储库可通过HTTPS访问,我们建议您改用HTTPS,否则您可能会使此waming静音,并允许使用’-受信任的主机镜像。阿里云。com”。
解决方法:在pip命令后面加上--trusted-host mirrors.aliyun.com
pip install librosa -i http://mirrors.aliyun.com/pypi/simple/ --trusted-host mirrors.aliyun.com
cmd安装过程——
Administrator@AUTOBVT-Q90417J MINGW64 /
$ pip install librosa -i http://mirrors.aliyun.com/pypi/simple/ --trusted-host mirrors.aliyun.com
Looking in indexes: http://mirrors.aliyun.com/pypi/simple/
Collecting librosa
  Downloading http://mirrors.aliyun.com/pypi/packages/bc/2e/80370da514096c6190f8913668198380ea09c2d252cfa4e85a9c096d3b40/librosa-0.10.0-py3-none-any.whl (252 kB)
     ------------------------------------ 252.9/252.9 kB 353.7 kB/s eta 0:00:00
Collecting audioread>=2.1.9
  Downloading http://mirrors.aliyun.com/pypi/packages/5d/cb/82a002441902dccbe427406785db07af10182245ee639ea9f4d92907c923/audioread-3.0.0.tar.gz (377 kB)
     ------------------------------------ 377.0/377.0 kB 346.0 kB/s eta 0:00:00
  Preparing metadata (setup.py): started
  Preparing metadata (setup.py): finished with status 'done'
Collecting scikit-learn>=0.20.0
  Downloading http://mirrors.aliyun.com/pypi/packages/5d/30/3af7a1073da6181208cdefe749f8243cd66e1036601bc870dfafb7fd3602/scikit_learn-1.2.1-cp38-cp38-win_amd64.whl (8.3 MB)
     ---------------------------------------- 8.3/8.3 MB 385.0 kB/s eta 0:00:00
Collecting numba>=0.51.0
  Downloading http://mirrors.aliyun.com/pypi/packages/22/6e/880d8ae26f26a3ecce71922797cc09b3b8a4e5274adecd0793f9b59d50b8/numba-0.56.4-cp38-cp38-win_amd64.whl (2.5 MB)
     ---------------------------------------- 2.5/2.5 MB 387.2 kB/s eta 0:00:00
Collecting joblib>=0.14
  Downloading http://mirrors.aliyun.com/pypi/packages/91/d4/3b4c8e5a30604df4c7518c562d4bf0502f2fa29221459226e140cf846512/joblib-1.2.0-py3-none-any.whl (297 kB)
     ------------------------------------ 298.0/298.0 kB 335.3 kB/s eta 0:00:00
Collecting soxr>=0.3.2
  Downloading http://mirrors.aliyun.com/pypi/packages/e8/f5/bfcf99a10250381ed76793d930da816836f2ac8a276de48522001271cc98/soxr-0.3.4-cp38-cp38-win_amd64.whl (184 kB)
     ------------------------------------ 184.8/184.8 kB 338.9 kB/s eta 0:00:00
Requirement already satisfied: typing-extensions>=4.1.1 in c:\program files\python38\lib\site-packages (from librosa) (4.5.0)
Collecting lazy-loader>=0.1
  Downloading http://mirrors.aliyun.com/pypi/packages/bc/bf/58dbe1f382ecac2c0571c43b6e95028b14e159d67d75e49a00c26ef63d8f/lazy_loader-0.1-py3-none-any.whl (8.6 kB)
Requirement already satisfied: numpy>=1.20.3 in c:\program files\python38\lib\site-packages (from librosa) (1.24.2)
Collecting soundfile>=0.12.1
  Downloading http://mirrors.aliyun.com/pypi/packages/50/ff/26a4ee48d0b66625a4e4028a055b9f25bc9d7c7b2d17d21a45137621a50d/soundfile-0.12.1-py2.py3-none-win_amd64.whl (1.0 MB)
     ---------------------------------------- 1.0/1.0 MB 363.8 kB/s eta 0:00:00
Collecting scipy>=1.2.0
  Downloading http://mirrors.aliyun.com/pypi/packages/32/8e/7f403535ddf826348c9b8417791e28712019962f7e90ff845896d6325d09/scipy-1.10.1-cp38-cp38-win_amd64.whl (42.2 MB)
     -------------------------------------- 42.2/42.2 MB 391.8 kB/s eta 0:00:00
Collecting pooch>=1.0
  Downloading http://mirrors.aliyun.com/pypi/packages/84/8c/4da580db7fb4cfce8f5ed78e7d2aa542e6f201edd69d3d8a96917a8ff63c/pooch-1.7.0-py3-none-any.whl (60 kB)
     -------------------------------------- 60.9/60.9 kB 269.3 kB/s eta 0:00:00
Collecting decorator>=4.3.0
  Downloading http://mirrors.aliyun.com/pypi/packages/d5/50/83c593b07763e1161326b3b8c6686f0f4b0f24d5526546bee538c89837d6/decorator-5.1.1-py3-none-any.whl (9.1 kB)
Collecting msgpack>=1.0
  Downloading http://mirrors.aliyun.com/pypi/packages/45/79/9d51bf36ab55059f8e96b13161d5867bb4bb359b03e82f240f64898d3ece/msgpack-1.0.4-cp38-cp38-win_amd64.whl (62 kB)
     -------------------------------------- 62.2/62.2 kB 368.8 kB/s eta 0:00:00
Collecting importlib-metadata
  Downloading http://mirrors.aliyun.com/pypi/packages/26/a7/9da7d5b23fc98ab3d424ac2c65613d63c1f401efb84ad50f2fa27b2caab4/importlib_metadata-6.0.0-py3-none-any.whl (21 kB)
Collecting numpy>=1.20.3
  Downloading http://mirrors.aliyun.com/pypi/packages/4c/42/6274f92514fbefcb1caa66d56d82ac7ac89f7652c0cef1e159a4b79e09f1/numpy-1.23.5-cp38-cp38-win_amd64.whl (14.7 MB)
     -------------------------------------- 14.7/14.7 MB 391.7 kB/s eta 0:00:00
Collecting llvmlite<0.40,>=0.39.0dev0
  Downloading http://mirrors.aliyun.com/pypi/packages/75/7f/9055977016e713a5c033c376a9ea9cb3d1092a02ee1421c41ccbcc5aa043/llvmlite-0.39.1-cp38-cp38-win_amd64.whl (23.2 MB)
     -------------------------------------- 23.2/23.2 MB 362.2 kB/s eta 0:00:00
Requirement already satisfied: setuptools in c:\program files\python38\lib\site-packages (from numba>=0.51.0->librosa) (56.0.0)
Collecting platformdirs>=2.5.0
  Downloading http://mirrors.aliyun.com/pypi/packages/ca/de/a33823fe54d52ea72fdae011115d737a2642d441c93b68ed17455a328e4c/platformdirs-3.1.0-py3-none-any.whl (14 kB)
Requirement already satisfied: requests>=2.19.0 in c:\program files\python38\lib\site-packages (from pooch>=1.0->librosa) (2.28.2)
Requirement already satisfied: packaging>=20.0 in c:\program files\python38\lib\site-packages (from pooch>=1.0->librosa) (23.0)
Collecting threadpoolctl>=2.0.0
  Downloading http://mirrors.aliyun.com/pypi/packages/61/cf/6e354304bcb9c6413c4e02a747b600061c21d38ba51e7e544ac7bc66aecc/threadpoolctl-3.1.0-py3-none-any.whl (14 kB)
Collecting cffi>=1.0
  Downloading http://mirrors.aliyun.com/pypi/packages/c9/e3/0a52838832408cfbbf3a59cb19bcd17e64eb33795c9710ca7d29ae10b5b7/cffi-1.15.1-cp38-cp38-win_amd64.whl (178 kB)
     ------------------------------------ 178.8/178.8 kB 327.4 kB/s eta 0:00:00
Collecting pycparser
  Downloading http://mirrors.aliyun.com/pypi/packages/62/d5/5f610ebe421e85889f2e55e33b7f9a6795bd982198517d912eb1c76e1a53/pycparser-2.21-py2.py3-none-any.whl (118 kB)
     ------------------------------------ 118.7/118.7 kB 330.7 kB/s eta 0:00:00
Requirement already satisfied: charset-normalizer<4,>=2 in c:\program files\python38\lib\site-packages (from requests>=2.19.0->pooch>=1.0->librosa) (3.0.1)
Requirement already satisfied: urllib3<1.27,>=1.21.1 in c:\program files\python38\lib\site-packages (from requests>=2.19.0->pooch>=1.0->librosa) (1.26.14)
Requirement already satisfied: certifi>=2017.4.17 in c:\program files\python38\lib\site-packages (from requests>=2.19.0->pooch>=1.0->librosa) (2022.12.7)
Requirement already satisfied: idna<4,>=2.5 in c:\program files\python38\lib\site-packages (from requests>=2.19.0->pooch>=1.0->librosa) (3.4)
Collecting zipp>=0.5
  Downloading http://mirrors.aliyun.com/pypi/packages/5b/fa/c9e82bbe1af6266adf08afb563905eb87cab83fde00a0a08963510621047/zipp-3.15.0-py3-none-any.whl (6.8 kB)
Installing collected packages: msgpack, zipp, threadpoolctl, pycparser, platformdirs, numpy, llvmlite, lazy-loader, joblib, decorator, audioread, soxr, scipy, pooch, importlib-metadata, cffi, soundfile, scikit-learn, numba, librosa
  Attempting uninstall: numpy
    Found existing installation: numpy 1.24.2
    Uninstalling numpy-1.24.2:
      Successfully uninstalled numpy-1.24.2
  DEPRECATION: audioread is being installed using the legacy 'setup.py install' method, because it does not have a 'pyproject.toml' and the 'wheel' package is not installed. pip 23.1 will enforce this behaviour change. A possible replacement is to enable the '--use-pep517' option. Discussion can be found at https://github.com/pypa/pip/issues/8559
  Running setup.py install for audioread: started
  Running setup.py install for audioread: finished with status 'done'
Successfully installed audioread-3.0.0 cffi-1.15.1 decorator-5.1.1 importlib-metadata-6.0.0 joblib-1.2.0 lazy-loader-0.1 librosa-0.10.0 llvmlite-0.39.1 msgpack-1.0.4 numba-0.56.4 numpy-1.23.5 platformdirs-3.1.0 pooch-1.7.0 pycparser-2.21 scikit-learn-1.2.1 scipy-1.10.1 soundfile-0.12.1 soxr-0.3.4 threadpoolctl-3.1.0 zipp-3.15.0
安装matplotlib
- 安装matplotlib的最简单方法是使用pip:
pip install matplotlib
用国内的pip源安装
pip install matplotlib -i http://mirrors.aliyun.com/pypi/simple/ --trusted-host mirrors.aliyun.com
该过程不仅安装了 matplotlib ,还安装了依赖的 numpy、python-dateutil、kiwisolver 、 pillow 、pyparsing 、cycler 、six 库。
- 如果安装了Anaconda,可以通过conda命令安装:
conda install matplotlib
- 安装每晚构建
Matplotlib 在 scipy-wheels-nightly Anaconda Cloud 组织上提供夜间开发构建轮。pip可以通过将 scipy-wheels-nightly 指定为要查询的包索引来安装这些轮子:
python -m pip install \
  --upgrade \
  --pre \
  --index-url https://pypi.anaconda.org/scipy-wheels-nightly/simple \
  --extra-index-url https://pypi.org/simple \
  matplotlib
- 如果您想从 tarball 构建,请从PyPI 文件页面获取最新的tar.gz发布文件。(python安装合适版本的matplotlib中的截图略有不同)
cmd安装过程——
Administrator@AUTOBVT-Q90417J MINGW64 /
$ pip install matplotlib -i http://mirrors.aliyun.com/pypi/simple/ --trusted-host mirrors.aliyun.com
Looking in indexes: http://mirrors.aliyun.com/pypi/simple/
Collecting matplotlib
  Downloading http://mirrors.aliyun.com/pypi/packages/92/01/2c04d328db6955d77f8f60c17068dde8aa66f153b2c599ca03c2cb0d5567/matplotlib-3.7.1-cp38-cp38-win_amd64.whl (7.6 MB)
     ---------------------------------------- 7.6/7.6 MB 389.8 kB/s eta 0:00:00
Requirement already satisfied: pillow>=6.2.0 in c:\program files\python38\lib\site-packages (from matplotlib) (9.4.0)
Collecting kiwisolver>=1.0.1
  Downloading http://mirrors.aliyun.com/pypi/packages/4f/05/59b34e788bf2b45c7157c3d898d567d28bc42986c1b6772fb1af329eea0d/kiwisolver-1.4.4-cp38-cp38-win_amd64.whl (55 kB)
     -------------------------------------- 55.4/55.4 kB 289.4 kB/s eta 0:00:00
Collecting contourpy>=1.0.1
  Downloading http://mirrors.aliyun.com/pypi/packages/08/ce/9bfe9f028cb5a8ee97898da52f4905e0e2d9ca8203ffdcdbe80e1769b549/contourpy-1.0.7-cp38-cp38-win_amd64.whl (162 kB)
     ------------------------------------ 163.0/163.0 kB 361.9 kB/s eta 0:00:00
Collecting pyparsing>=2.3.1
  Downloading http://mirrors.aliyun.com/pypi/packages/6c/10/a7d0fa5baea8fe7b50f448ab742f26f52b80bfca85ac2be9d35cdd9a3246/pyparsing-3.0.9-py3-none-any.whl (98 kB)
     -------------------------------------- 98.3/98.3 kB 297.6 kB/s eta 0:00:00
Requirement already satisfied: numpy>=1.20 in c:\program files\python38\lib\site-packages (from matplotlib) (1.23.5)
Collecting python-dateutil>=2.7
  Downloading http://mirrors.aliyun.com/pypi/packages/36/7a/87837f39d0296e723bb9b62bbb257d0355c7f6128853c78955f57342a56d/python_dateutil-2.8.2-py2.py3-none-any.whl (247 kB)
     ------------------------------------ 247.7/247.7 kB 354.4 kB/s eta 0:00:00
Collecting cycler>=0.10
  Downloading http://mirrors.aliyun.com/pypi/packages/5c/f9/695d6bedebd747e5eb0fe8fad57b72fdf25411273a39791cde838d5a8f51/cycler-0.11.0-py3-none-any.whl (6.4 kB)
Collecting importlib-resources>=3.2.0
  Downloading http://mirrors.aliyun.com/pypi/packages/38/71/c13ea695a4393639830bf96baea956538ba7a9d06fcce7cef10bfff20f72/importlib_resources-5.12.0-py3-none-any.whl (36 kB)
Requirement already satisfied: packaging>=20.0 in c:\program files\python38\lib\site-packages (from matplotlib) (23.0)
Collecting fonttools>=4.22.0
  Downloading http://mirrors.aliyun.com/pypi/packages/e3/d9/e9bae85e84737e76ebbcbea13607236da0c0699baed0ae4f1151b728a608/fonttools-4.38.0-py3-none-any.whl (965 kB)
     ------------------------------------ 965.4/965.4 kB 385.0 kB/s eta 0:00:00
Requirement already satisfied: zipp>=3.1.0 in c:\program files\python38\lib\site-packages (from importlib-resources>=3.2.0->matplotlib) (3.15.0)
Collecting six>=1.5
  Downloading http://mirrors.aliyun.com/pypi/packages/d9/5a/e7c31adbe875f2abbb91bd84cf2dc52d792b5a01506781dbcf25c91daf11/six-1.16.0-py2.py3-none-any.whl (11 kB)
Installing collected packages: six, pyparsing, kiwisolver, importlib-resources, fonttools, cycler, contourpy, python-dateutil, matplotlib
Successfully installed contourpy-1.0.7 cycler-0.11.0 fonttools-4.38.0 importlib-resources-5.12.0 kiwisolver-1.4.4 matplotlib-3.7.1 pyparsing-3.0.9 python-dateutil-2.8.2 six-1.16.0
python安装matplotlib模块报错问题
看了几篇博文,read timed out error :microsoft visual c+ is required error: command cl.exe failed with exit status 2 Check the logs for full command output. 报错经常串在一起。
- Check the logs for full command output.
输入pip install --upgrade pip指令 升级pip安装包。
输入pip install wheel指令安装wheel后在安装matplotlib
安装14.0以上版本的Microsoft C++ Build Tools,如Microsoft Visual C++ 14.0、Microsoft Visual C++ 2019。
以上pass,下载编译包以后,cmd命令输入pip install +编译包名称指令安装就可以了!编译包在上文提到的PyPI 文件页面下载。
(题外话)安装sklearn包的时候发现上面网站没有对应安装包,那只能上终极大招了:直接安装Microsoft Visual C++ 2015 BuildTools,不占用内存,而且完全满足python对C/C++源码编译的需求。安装包下载链接如下,下载以后联网默认安装步骤就可以了。 - read timed out
由于某原因导致访问pip仓库pypi时,安装时间超过默认值。
(1)将默认连接时长修改更长(不推荐)
pip3 --default-timeout=100 install [whatyouwant]
(2)进入pypi直接下载安装(不推荐)
- pypi地址:https://pypi.org/
- 安装方式:
下载完成后,进入安装包
python setup.py install
(3)使用清华大学开源软件镜像站(强烈推荐)
- 传送门:https://mirrors.tuna.tsinghua.edu.cn/
- 安装方式
pip install [whatyouwant] -i https://mirrors.ustc.edu.cn/pypi/web/simple/
- error: command cl.exe failed with exit status 2
python3.8下载matplotlib模块时,总是出现以下错误
ERROR: Command errored out with exit status 1: ‘c:\users\air\python\python38\python.exe’ -u -c ‘import sys, setuptools, tokenize; sys.argv[0] = ‘"’"‘C:\Users\air\AppData\Local\Temp\pip-install-5ntug3if\matplotlib\setup.py’"’"’; file=’"’"‘C:\Users\air\AppData\Local\Temp\pip-install-5ntug3if\matplotlib\setup.py’"’"’;f=getattr(tokenize, ‘"’"‘open’"’"’, open)(file);code=f.read().replace(’"’"’\r\n’"’"’, ‘"’"’\n’"’"’);f.close();exec(compile(code, file, ‘"’"’exec’"’"’))’ install –record ‘C:\Users\air\AppData\Local\Temp\pip-record-rp63qqyg\install-record.txt’ –single-version-externally-managed –compile Check the logs for full command output.
在cmd里输入下面的语句试试:
python -m pip install matplotlib
如果还是不行,再试试这个:
python -m pip install matplotlib --user air
安装 matplotlib 参阅资料:
【Python】matplotlib库的安装和简单使用
python安装matplotlib库三种失败情况
Python安装matplotlib库失败解决方法【Command errored out with exit status 1】
解决 python安装matplotlib模块报错问题详细步骤
pip安装python模块时报错443超时
安装phonemizer
Phonemizer 是一个精确寻址的 Python 包, 它将文本从其拼写表示转录为语音表示。该包设计用户友好的,并公开了一个高级音素化函数, 支持大约100种不同的语言。phonemizer 使用的默认后端是 eSpeak (Dunn & Vitolins,2019 年),一种基于语言专业知识和手写转录规则的文本转语音软件。它将文本转录成国际音标,并支持一百多种语言。使用 MBROLA 声音(Tits & Vitolins,2019),eSpeak 后端可用于大约 35 种语言,以 SAMPA 计算机可读语音字母表转录文本。
安装phonemizer前需要配置espeak。Phonemizer 文档
- 安装phonemizer的最简单方法是使用pip:
pip install phonemizer
用国内的pip源安装
pip install phonemizer -i http://mirrors.aliyun.com/pypi/simple/ --trusted-host mirrors.aliyun.com
该过程不仅安装了 phonemizer ,还安装了依赖的 attrs、babel、clldutils、colorlog、csvw、dlinfo、isodate、jsonschema、language-tags、lxml、markdown、markupsafe、pkgutil-resolve-name、pylatexenc、pyrsistent、pytz、rdflib、rfc3986、segments、tabulate、uritemplate 库。
- 或者从以下来源安装::
git clone https://github.com/bootphon/phonemizer
cd phonemizer
python setup.py install
如果在安装期间遇到错误,例如ImportError: No module named setuptools,请参阅问题#11。
- 如果您想从 tarball 构建,请从PyPI 文件页面获取最新的tar.gz发布文件。
当然你也可以选择下载whl文件
pip install phonemizer-3.2.1-py3-none-any.whl
cmd安装过程——
Administrator@AUTOBVT-Q90417J MINGW64 /
$ pip install phonemizer -i http://mirrors.aliyun.com/pypi/simple/ --trusted-host mirrors.aliyun.com
Looking in indexes: http://mirrors.aliyun.com/pypi/simple/
Collecting phonemizer
  Downloading http://mirrors.aliyun.com/pypi/packages/cb/5a/b699d5c74959c69728b44692cbacaf1035838ba5dc6aee9b8e80e60637f3/phonemizer-3.2.1-py3-none-any.whl (90 kB)
     -------------------------------------- 90.6/90.6 kB 270.6 kB/s eta 0:00:00
Requirement already satisfied: joblib in c:\program files\python38\lib\site-packages (from phonemizer) (1.2.0)
Collecting attrs>=18.1
  Downloading http://mirrors.aliyun.com/pypi/packages/fb/6e/6f83bf616d2becdf333a1640f1d463fef3150e2e926b7010cb0f81c95e88/attrs-22.2.0-py3-none-any.whl (60 kB)
     -------------------------------------- 60.0/60.0 kB 291.1 kB/s eta 0:00:00
Collecting segments
  Downloading http://mirrors.aliyun.com/pypi/packages/93/d4/74dba5011533e66becf35aae5cf1d726e760f445db052592bad70e75305c/segments-2.2.1-py2.py3-none-any.whl (15 kB)
Requirement already satisfied: typing-extensions in c:\program files\python38\lib\site-packages (from phonemizer) (4.5.0)
Collecting dlinfo
  Downloading http://mirrors.aliyun.com/pypi/packages/a7/f9/e014eb5740dfc6ebe6105f4c38890f361e5b0e1537a9f04bb4f34432efb9/dlinfo-1.2.1-py3-none-any.whl (3.6 kB)
Requirement already satisfied: regex in c:\program files\python38\lib\site-packages (from segments->phonemizer) (2022.10.31)
Collecting csvw>=1.5.6
  Downloading http://mirrors.aliyun.com/pypi/packages/93/0c/fbada6f0f50a57408b9f6699fecdc39c6ddbf46175d975a7de18edf605ae/csvw-3.1.3-py2.py3-none-any.whl (56 kB)
     -------------------------------------- 56.7/56.7 kB 329.6 kB/s eta 0:00:00
Collecting clldutils>=1.7.3
  Downloading http://mirrors.aliyun.com/pypi/packages/5c/75/18cfdd83c1176bf373c9bcfc60eb8e8c3358c56b24963dce9faaeb2c68ba/clldutils-3.19.0-py2.py3-none-any.whl (1.7 MB)
     ---------------------------------------- 1.7/1.7 MB 345.3 kB/s eta 0:00:00
Collecting pylatexenc
  Downloading http://mirrors.aliyun.com/pypi/packages/5d/ab/34ec41718af73c00119d0351b7a2531d2ebddb51833a36448fc7b862be60/pylatexenc-2.10.tar.gz (162 kB)
     ------------------------------------ 162.6/162.6 kB 305.3 kB/s eta 0:00:00
  Preparing metadata (setup.py): started
  Preparing metadata (setup.py): finished with status 'done'
Collecting markupsafe
  Downloading http://mirrors.aliyun.com/pypi/packages/93/fa/d72f68f84f8537ee8aa3e0764d1eb11e5e025a5ca90c16e94a40f894c2fc/MarkupSafe-2.1.2-cp38-cp38-win_amd64.whl (16 kB)
Collecting tabulate>=0.7.7
  Downloading http://mirrors.aliyun.com/pypi/packages/40/44/4a5f08c96eb108af5cb50b41f76142f0afa346dfa99d5296fe7202a11854/tabulate-0.9.0-py3-none-any.whl (35 kB)
Collecting lxml
  Downloading http://mirrors.aliyun.com/pypi/packages/95/2c/b6326b95954fcd2d1133ff60e7c10af8d7dd17b52d09eaa6db828fd13afb/lxml-4.9.2-cp38-cp38-win_amd64.whl (3.9 MB)
     ---------------------------------------- 3.9/3.9 MB 358.3 kB/s eta 0:00:00
Requirement already satisfied: python-dateutil in c:\program files\python38\lib\site-packages (from clldutils>=1.7.3->segments->phonemizer) (2.8.2)
Collecting markdown
  Downloading http://mirrors.aliyun.com/pypi/packages/86/be/ad281f7a3686b38dd8a307fa33210cdf2130404dfef668a37a4166d737ca/Markdown-3.4.1-py3-none-any.whl (93 kB)
     -------------------------------------- 93.3/93.3 kB 295.6 kB/s eta 0:00:00
Collecting colorlog
  Downloading http://mirrors.aliyun.com/pypi/packages/58/43/a363c213224448f9e194d626221123ce00e3fb3d87c0c22aed52b620bdd1/colorlog-6.7.0-py2.py3-none-any.whl (11 kB)
Requirement already satisfied: colorama in c:\program files\python38\lib\site-packages (from csvw>=1.5.6->segments->phonemizer) (0.4.6)
Requirement already satisfied: requests in c:\program files\python38\lib\site-packages (from csvw>=1.5.6->segments->phonemizer) (2.28.2)
Collecting uritemplate>=3.0.0
  Downloading http://mirrors.aliyun.com/pypi/packages/81/c0/7461b49cd25aeece13766f02ee576d1db528f1c37ce69aee300e075b485b/uritemplate-4.1.1-py2.py3-none-any.whl (10 kB)
Collecting rdflib
  Downloading http://mirrors.aliyun.com/pypi/packages/50/fb/a0f8b6ab6598b49871a48a189dc1942fb0b0543ab4c84f689486233ef1ec/rdflib-6.2.0-py3-none-any.whl (500 kB)
     ------------------------------------ 500.3/500.3 kB 356.9 kB/s eta 0:00:00
Collecting jsonschema
  Downloading http://mirrors.aliyun.com/pypi/packages/c1/97/c698bd9350f307daad79dd740806e1a59becd693bd11443a0f531e3229b3/jsonschema-4.17.3-py3-none-any.whl (90 kB)
     -------------------------------------- 90.4/90.4 kB 342.5 kB/s eta 0:00:00
Collecting rfc3986<2
  Downloading http://mirrors.aliyun.com/pypi/packages/c4/e5/63ca2c4edf4e00657584608bee1001302bbf8c5f569340b78304f2f446cb/rfc3986-1.5.0-py2.py3-none-any.whl (31 kB)
Collecting language-tags
  Downloading http://mirrors.aliyun.com/pypi/packages/b0/42/327554649ed2dd5ce59d3f5da176c7be20f9352c7c6c51597293660b7b08/language_tags-1.2.0-py3-none-any.whl (213 kB)
     ------------------------------------ 213.4/213.4 kB 342.7 kB/s eta 0:00:00
Collecting babel
  Downloading http://mirrors.aliyun.com/pypi/packages/df/c4/1088865e0246d7ecf56d819a233ab2b72f7d6ab043965ef327d0731b5434/Babel-2.12.1-py3-none-any.whl (10.1 MB)
     -------------------------------------- 10.1/10.1 MB 376.9 kB/s eta 0:00:00
Collecting isodate
  Downloading http://mirrors.aliyun.com/pypi/packages/b6/85/7882d311924cbcfc70b1890780763e36ff0b140c7e51c110fc59a532f087/isodate-0.6.1-py2.py3-none-any.whl (41 kB)
     -------------------------------------- 41.7/41.7 kB 184.1 kB/s eta 0:00:00
Collecting pytz>=2015.7
  Downloading http://mirrors.aliyun.com/pypi/packages/2e/09/fbd3c46dce130958ee8e0090f910f1fe39e502cc5ba0aadca1e8a2b932e5/pytz-2022.7.1-py2.py3-none-any.whl (499 kB)
     ------------------------------------ 499.4/499.4 kB 344.5 kB/s eta 0:00:00
Requirement already satisfied: six in c:\program files\python38\lib\site-packages (from isodate->csvw>=1.5.6->segments->phonemizer) (1.16.0)
Collecting pkgutil-resolve-name>=1.3.10
  Downloading http://mirrors.aliyun.com/pypi/packages/c9/5c/3d4882ba113fd55bdba9326c1e4c62a15e674a2501de4869e6bd6301f87e/pkgutil_resolve_name-1.3.10-py3-none-any.whl (4.7 kB)
Collecting pyrsistent!=0.17.0,!=0.17.1,!=0.17.2,>=0.14.0
  Downloading http://mirrors.aliyun.com/pypi/packages/b1/8d/bbce2d857ecdefb7170a8a37ade1de0f060052236c07693856ac23f3b1ee/pyrsistent-0.19.3-cp38-cp38-win_amd64.whl (62 kB)
     -------------------------------------- 62.7/62.7 kB 258.3 kB/s eta 0:00:00
Requirement already satisfied: importlib-resources>=1.4.0 in c:\program files\python38\lib\site-packages (from jsonschema->csvw>=1.5.6->segments->phonemizer) (5.12.0)
Requirement already satisfied: importlib-metadata>=4.4 in c:\program files\python38\lib\site-packages (from markdown->clldutils>=1.7.3->segments->phonemizer) (6.0.0)
Requirement already satisfied: setuptools in c:\program files\python38\lib\site-packages (from rdflib->csvw>=1.5.6->segments->phonemizer) (56.0.0)
Requirement already satisfied: pyparsing in c:\program files\python38\lib\site-packages (from rdflib->csvw>=1.5.6->segments->phonemizer) (3.0.9)
Requirement already satisfied: idna<4,>=2.5 in c:\program files\python38\lib\site-packages (from requests->csvw>=1.5.6->segments->phonemizer) (3.4)
Requirement already satisfied: certifi>=2017.4.17 in c:\program files\python38\lib\site-packages (from requests->csvw>=1.5.6->segments->phonemizer) (2022.12.7)
Requirement already satisfied: urllib3<1.27,>=1.21.1 in c:\program files\python38\lib\site-packages (from requests->csvw>=1.5.6->segments->phonemizer) (1.26.14)
Requirement already satisfied: charset-normalizer<4,>=2 in c:\program files\python38\lib\site-packages (from requests->csvw>=1.5.6->segments->phonemizer) (3.0.1)
Requirement already satisfied: zipp>=0.5 in c:\program files\python38\lib\site-packages (from importlib-metadata>=4.4->markdown->clldutils>=1.7.3->segments->phonemizer) (3.15.0)
Installing collected packages: rfc3986, pytz, pylatexenc, language-tags, dlinfo, uritemplate, tabulate, pyrsistent, pkgutil-resolve-name, markupsafe, lxml, isodate, colorlog, babel, attrs, rdflib, markdown, jsonschema, csvw, clldutils, segments, phonemizer
  DEPRECATION: pylatexenc is being installed using the legacy 'setup.py install' method, because it does not have a 'pyproject.toml' and the 'wheel' package is not installed. pip 23.1 will enforce this behaviour change. A possible replacement is to enable the '--use-pep517' option. Discussion can be found at https://github.com/pypa/pip/issues/8559
  Running setup.py install for pylatexenc: started
  Running setup.py install for pylatexenc: finished with status 'done'
Successfully installed attrs-22.2.0 babel-2.12.1 clldutils-3.19.0 colorlog-6.7.0 csvw-3.1.3 dlinfo-1.2.1 isodate-0.6.1 jsonschema-4.17.3 language-tags-1.2.0 lxml-4.9.2 markdown-3.4.1 markupsafe-2.1.2 phonemizer-3.2.1 pkgutil-resolve-name-1.3.10 pylatexenc-2.10 pyrsistent-0.19.3 pytz-2022.7.1 rdflib-6.2.0 rfc3986-1.5.0 segments-2.2.1 tabulate-0.9.0 uritemplate-4.1.1
安装tensorboard
tensorboard是tensorflow开发的一款绘图插件,它可以绘制网络的图像,可以绘制训练时的 Loss ,Accuracy等参数指标,tensorboard现在已经支持在pytorch中使用,使用方法参考pytorch文档,链接如下:torch.utils.tensorboard
- 安装tensorboard的最简单方法是使用pip:
pip install tensorboard
用国内的pip源安装
pip install tensorboard -i http://mirrors.aliyun.com/pypi/simple/ --trusted-host mirrors.aliyun.com
该过程不仅安装了 tensorboard ,还安装了依赖的absl-py、cachetools、google-auth、google-
auth-oauthlib、grpcio、oauthlib、protobuf 、pyasn1、pyasn1-modules、requests-oauthlib、rsa、tensorboard-data-serve、tensorboard-plugin-wit、werkzeug、wheel库。
-
你也可以选择下载 whl 文件离线安装
进入.whl文件所在的网站,下载对应版本到本地。注意,要对应本地环境的python版本。 -
如果您想从 tarball 构建,请从PyPI 文件页面获取最新的tar.gz发布文件。
cmd安装过程——
C:\Users\Administrator>pip install tensorboard -i http://mirrors.aliyun.com/pypi
/simple/ --trusted-host mirrors.aliyun.com
Looking in indexes: http://mirrors.aliyun.com/pypi/simple/
Collecting tensorboard
  Downloading http://mirrors.aliyun.com/pypi/packages/8d/71/75fcfab1ff98e3fad240
f760d3a6b5ca6bdbcc5ed141fb7abd35cf63134c/tensorboard-2.12.0-py3-none-any.whl (5.
6 MB)
     ---------------------------------------- 5.6/5.6 MB 453.2 kB/s eta 0:00:00
Collecting grpcio>=1.48.2
  Downloading http://mirrors.aliyun.com/pypi/packages/8d/0b/6b75908dac1028c0e7d0
70088e10951a3fe8f5ecc189ed12175526568a89/grpcio-1.51.3-cp38-cp38-win_amd64.whl (
3.7 MB)
     ---------------------------------------- 3.7/3.7 MB 185.7 kB/s eta 0:00:00
Collecting absl-py>=0.4
  Downloading http://mirrors.aliyun.com/pypi/packages/dd/87/de5c32fa1b1c6c3305d5
76e299801d8655c175ca9557019906247b994331/absl_py-1.4.0-py3-none-any.whl (126 kB)

     ------------------------------------ 126.5/126.5 kB 113.0 kB/s eta 0:00:00
Requirement already satisfied: markdown>=2.6.8 in c:\program files\python38\lib\
site-packages (from tensorboard) (3.4.1)
Collecting protobuf>=3.19.6
  Downloading http://mirrors.aliyun.com/pypi/packages/7e/76/df06bc132557a83e8a34
77e50c3ccf06c489a90cdbc78083aa2eaeb60a4c/protobuf-4.22.0-cp38-cp38-win_amd64.whl
 (420 kB)
     ------------------------------------ 420.6/420.6 kB 461.6 kB/s eta 0:00:00
Requirement already satisfied: setuptools>=41.0.0 in c:\program files\python38\l
ib\site-packages (from tensorboard) (56.0.0)
Collecting wheel>=0.26
  Downloading http://mirrors.aliyun.com/pypi/packages/bd/7c/d38a0b30ce22fc26ed7d
bc087c6d00851fb3395e9d0dac40bec1f905030c/wheel-0.38.4-py3-none-any.whl (36 kB)
Collecting tensorboard-plugin-wit>=1.6.0
  Downloading http://mirrors.aliyun.com/pypi/packages/e0/68/e8ecfac5dd594b676c23
a7f07ea34c197d7d69b3313afdf8ac1b0a9905a2/tensorboard_plugin_wit-1.8.1-py3-none-a
ny.whl (781 kB)
     -------------------------------------- 781.3/781.3 kB 1.3 MB/s eta 0:00:00
Collecting werkzeug>=1.0.1
  Downloading http://mirrors.aliyun.com/pypi/packages/f6/f8/9da63c1617ae2a1dec2f
bf6412f3a0cfe9d4ce029eccbda6e1e4258ca45f/Werkzeug-2.2.3-py3-none-any.whl (233 kB
)
     -------------------------------------- 233.6/233.6 kB 1.2 MB/s eta 0:00:00
Requirement already satisfied: numpy>=1.12.0 in c:\program files\python38\lib\si
te-packages (from tensorboard) (1.23.5)
Collecting tensorboard-data-server<0.8.0,>=0.7.0
  Downloading http://mirrors.aliyun.com/pypi/packages/9d/cc/6f07c0043b44b3c3879e
cfec1b8a450b6f5e3f8dccfedc9f5f1bc2c650e6/tensorboard_data_server-0.7.0-py3-none-
any.whl (2.4 kB)
Requirement already satisfied: requests<3,>=2.21.0 in c:\program files\python38\
lib\site-packages (from tensorboard) (2.28.2)
Collecting google-auth<3,>=1.6.3
  Downloading http://mirrors.aliyun.com/pypi/packages/93/c4/16f8ad44ed7544244a98
83f35cc99dc96378652a0ec7cc39028b1c697a1e/google_auth-2.16.2-py2.py3-none-any.whl
 (177 kB)
     -------------------------------------- 177.2/177.2 kB 1.3 MB/s eta 0:00:00
Collecting google-auth-oauthlib<0.5,>=0.4.1
  Downloading http://mirrors.aliyun.com/pypi/packages/b1/0e/0636cc1448a7abc444fb
1b3a63655e294e0d2d49092dc3de05241be6d43c/google_auth_oauthlib-0.4.6-py2.py3-none
-any.whl (18 kB)
Collecting rsa<5,>=3.1.4
  Downloading http://mirrors.aliyun.com/pypi/packages/49/97/fa78e3d2f65c02c8e126
8b9aba606569fe97f6c8f7c2d74394553347c145/rsa-4.9-py3-none-any.whl (34 kB)
Collecting pyasn1-modules>=0.2.1
  Downloading http://mirrors.aliyun.com/pypi/packages/95/de/214830a981892a3e286c
3794f41ae67a4495df1108c3da8a9f62159b9a9d/pyasn1_modules-0.2.8-py2.py3-none-any.w
hl (155 kB)
     ------------------------------------ 155.3/155.3 kB 619.8 kB/s eta 0:00:00
Collecting cachetools<6.0,>=2.0.0
  Downloading http://mirrors.aliyun.com/pypi/packages/db/14/2b48a834d349eee94677
e8702ea2ef98b7c674b090153ea8d3f6a788584e/cachetools-5.3.0-py3-none-any.whl (9.3
kB)
Requirement already satisfied: six>=1.9.0 in c:\program files\python38\lib\site-
packages (from google-auth<3,>=1.6.3->tensorboard) (1.16.0)
Collecting requests-oauthlib>=0.7.0
  Downloading http://mirrors.aliyun.com/pypi/packages/6f/bb/5deac77a9af870143c68
4ab46a7934038a53eb4aa975bc0687ed6ca2c610/requests_oauthlib-1.3.1-py2.py3-none-an
y.whl (23 kB)
Requirement already satisfied: importlib-metadata>=4.4 in c:\program files\pytho
n38\lib\site-packages (from markdown>=2.6.8->tensorboard) (6.0.0)
Requirement already satisfied: idna<4,>=2.5 in c:\program files\python38\lib\sit
e-packages (from requests<3,>=2.21.0->tensorboard) (3.4)
Requirement already satisfied: charset-normalizer<4,>=2 in c:\program files\pyth
on38\lib\site-packages (from requests<3,>=2.21.0->tensorboard) (3.0.1)
Requirement already satisfied: certifi>=2017.4.17 in c:\program files\python38\l
ib\site-packages (from requests<3,>=2.21.0->tensorboard) (2022.12.7)
Requirement already satisfied: urllib3<1.27,>=1.21.1 in c:\program files\python3
8\lib\site-packages (from requests<3,>=2.21.0->tensorboard) (1.26.14)
Requirement already satisfied: MarkupSafe>=2.1.1 in c:\program files\python38\li
b\site-packages (from werkzeug>=1.0.1->tensorboard) (2.1.2)
Requirement already satisfied: zipp>=0.5 in c:\program files\python38\lib\site-p
ackages (from importlib-metadata>=4.4->markdown>=2.6.8->tensorboard) (3.15.0)
Collecting pyasn1<0.5.0,>=0.4.6
  Downloading http://mirrors.aliyun.com/pypi/packages/62/1e/a94a8d635fa3ce4cfc7f
506003548d0a2447ae76fd5ca53932970fe3053f/pyasn1-0.4.8-py2.py3-none-any.whl (77 k
B)
     -------------------------------------- 77.1/77.1 kB 857.8 kB/s eta 0:00:00
Collecting oauthlib>=3.0.0
  Downloading http://mirrors.aliyun.com/pypi/packages/7e/80/cab10959dc1faead58dc
8384a781dfbf93cb4d33d50988f7a69f1b7c9bbe/oauthlib-3.2.2-py3-none-any.whl (151 kB
)
     -------------------------------------- 151.7/151.7 kB 1.0 MB/s eta 0:00:00
Installing collected packages: tensorboard-plugin-wit, pyasn1, wheel, werkzeug,
tensorboard-data-server, rsa, pyasn1-modules, protobuf, oauthlib, grpcio, cachet
ools, absl-py, requests-oauthlib, google-auth, google-auth-oauthlib, tensorboard

Successfully installed absl-py-1.4.0 cachetools-5.3.0 google-auth-2.16.2 google-
auth-oauthlib-0.4.6 grpcio-1.51.3 oauthlib-3.2.2 protobuf-4.22.0 pyasn1-0.4.8 py
asn1-modules-0.2.8 requests-oauthlib-1.3.1 rsa-4.9 tensorboard-2.12.0 tensorboar
d-data-server-0.7.0 tensorboard-plugin-wit-1.8.1 werkzeug-2.2.3 wheel-0.38.4
安装 tensorboard 参阅资料:
Pytorch下tensorboard的安装与配置
TensorBoard最全使用教程:看这篇就够了
安装Unidecode
安装Unidecode的最简单方法是使用pip:
pip install Unidecode
要从源发行版安装Unidecode并运行单元测试,请用:
python setup.py install
python setup.py test
您可以通过以下方式获得Unidecode的最新开发版本:
$ git clone https://www.tablix.org/~avian/git/unidecode.git
在 GitHub 上 有 一 个 官方 镜像 。 https://github.com/avian2/unidecode
cmd安装过程——
C:\Users\Administrator>pip install Unidecode
Collecting Unidecode
  Downloading Unidecode-1.3.6-py3-none-any.whl (235 kB)
     ------------------------------------ 235.9/235.9 kB 268.0 kB/s eta 0:00:00
Installing collected packages: Unidecode
Successfully installed Unidecode-1.3.6