详细教程
下载LaTex
访问官网,点击Concise instructions, per platform: 下的 install on Windows 。

找到Easy install。
When installing from the internet, we recommend downloading and running install-tl-windows.exe.
This installer first unpacks itself and then starts the installer proper, which is the same as for other platforms. An ‘Advanced’ button gives you many additional customization options.
When successful, the installer tries to do the post-install things that are considered appropriate on Windows:
- Adds a TeX Live submenu of Windows’ Start menu. Entries include a GUI for TeX Live Manager and the TeXworks editor if was installed.
- Optionally adds some filetypes and file associations.
- Adds the directory of TeX Live Windows binaries to the search path.
The TeX Live Manager GUI mentioned above can be used to add or remove packages, and to keep the installation up to date.
Note. For Cygwin installations, see the Unix/Linux page.
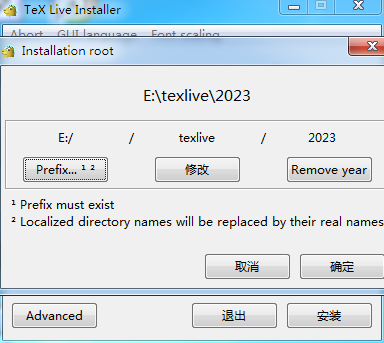
下载上文的install-tl-windows.exe 到本地,双击运行。
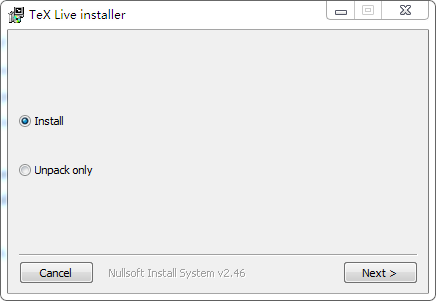
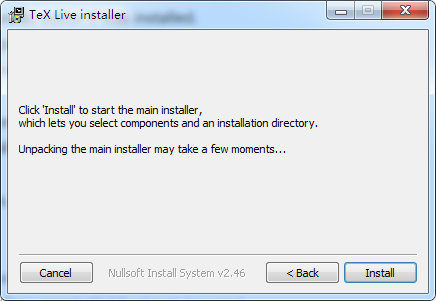
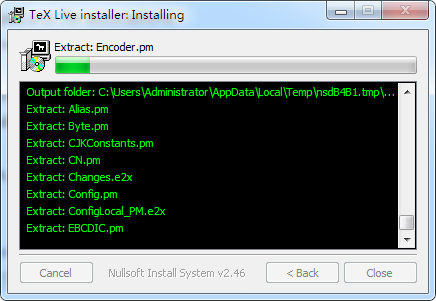
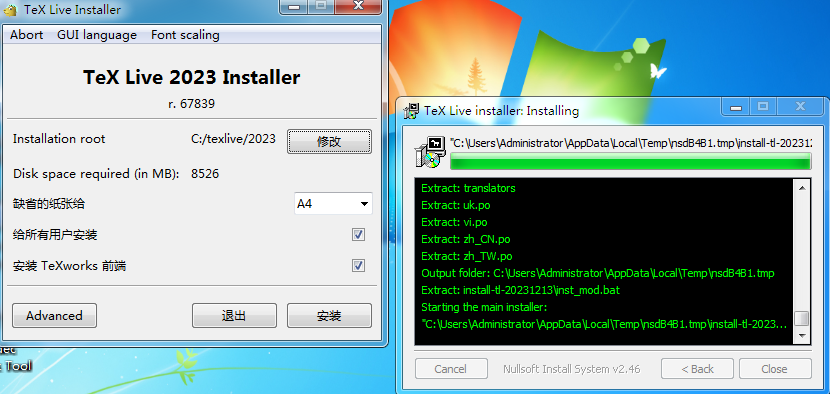
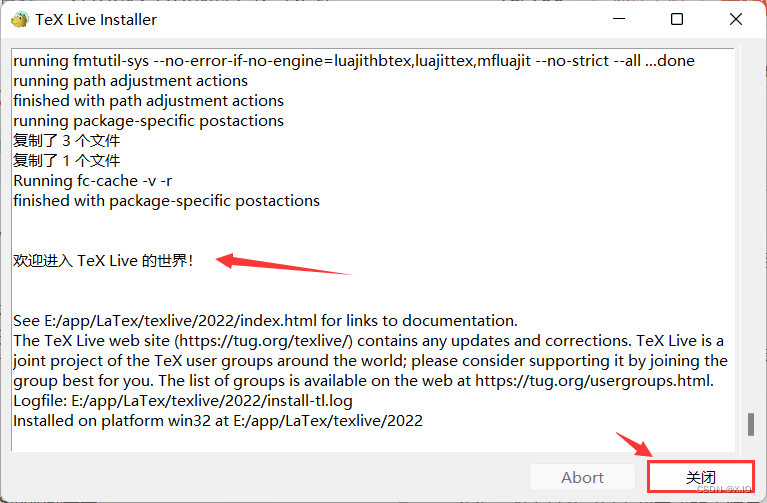
安装完成,如下图:
Sublime Text 配置
Ctrl+Shift+P,输入LaTeXTools安装它。不过如今安装不上,只能手动安装。
把整个仓库克隆到本地,塞到 Sublime Text 的插件文件夹(C:\Users\Administrator\AppData\Roaming\Sublime Text\Packages)
git clone https://github.com/SublimeText/LaTeXTools
先把Sublime关闭掉,然后再重启软件,使Sublime能够在菜单中加载出 LaTeXTools。
Sublime中进行LaTexTools配置
在Sublime菜单栏依次选择Preferences-Package Settings-LaTexTools-Reset user settings to default。
然后重新在Sublime菜单栏依次选择Preferences-Package Settings-LaTexTools-Settings-User。
使用快捷键Ctrl+F,下方弹出搜索窗口,在其中输入windows为关键字,按Enter进行搜索。找到“windows”的path路径:
	"windows": {
		// Path used when invoking tex & friends; "" is fine for MiKTeX
		// For TeXlive 2011 (or other years) use
		// "texpath" : "C:\\texlive\\2011\\bin\\win32;$PATH",
		"texpath" : "",
		// TeX distro: "miktex" or "texlive"
		"distro" : "miktex",
		// Command to invoke Sumatra. If blank, "SumatraPDF.exe" is used (it has to be on your PATH)
		"sumatra": "",
		// Command to invoke Sublime Text. Used if the keep_focus toggle is true.
		// If blank, "subl.exe" or "sublime_text.exe" will be used.
		"sublime_executable": "",
		// how long (in seconds) to wait after the jump_to_pdf command completes
		// before switching focus back to Sublime Text. This may need to be
		// adjusted depending on your machine and configuration.
		"keep_focus_delay": 0.5
	},
将其修改成如下内容:
	"windows": {
		// Path used when invoking tex & friends; "" is fine for MiKTeX
		// For TeXlive 2011 (or other years) use
		// "texpath" : "C:\\texlive\\2011\\bin\\win32;$PATH",
		"texpath" : "E:\\texlive\\2023\\bin\\windows;$PATH",
		// TeX distro: "miktex" or "texlive"
		"distro" : "texlive",
		// Command to invoke Sumatra. If blank, "SumatraPDF.exe" is used (it has to be on your PATH)
		"sumatra": "",
		// Command to invoke Sublime Text. Used if the keep_focus toggle is true.
		// If blank, "subl.exe" or "sublime_text.exe" will be used.
		"sublime_executable": "C:\\Program Files\\Sublime Text\\subl.exe",
		// how long (in seconds) to wait after the jump_to_pdf command completes
		// before switching focus back to Sublime Text. This may need to be
		// adjusted depending on your machine and configuration.
		"keep_focus_delay": 60
	},
注意观察上面更改的部分, 分别是:
- 第 5 行: 在 texpath 后面的双引号之间添加 texlive 的 win32 的文件路径.
- 第 7 行: 在 distro 后面的双引号之间键入 texlive, 也就选择你安装的 TeX 的发行版本的,我的是 texlive, 所以键入 texlive , 如果你安装的是 miktex, 当然也应该改成 miktex.
- 第 9 行: 在 sumatra 后面的双引号之间输入 SumatraPDF 的安装路径.
- 第 12 行: sublime_executable 后面的双引号后面填入 subl.exe 的路径.
- 第 16 行: 此行是设置从pdf 阅读器调整到 Sublime Text 的时间, 通常也设置长些, 默认的 0.5 秒的效果就是看到 SumatraPDF阅读器一闪而过, 这也许不是一个好的体验.
关闭 Sublime text 编译过程中开启新窗口
这里大家可以看到我们没有添加第 9 行的内容,而是修改了第 12 行的内容。
Windows平台 subl.exe 与 Sublime_text.exe 在同一个安装路径下,我们可以只填入 subl.exe 的路径。
至于一些教程提到的改"builder": "traditional",为"builder": "simple",……
默认是traditional,请勿修改。
使用LaTeXTools前请阅读该插件的 README.markdown,这里我摘取部分大家需要关注的内容——
Keybindings
Keybindings have been chosen to make them easier to remember, and also to minimize clashes with existing (and standard) ST bindings. I am taking advantage of the fact that ST supports key combinations, i.e. sequences of two (or more) keys. The basic principle is simple:
-
Most LaTeXTools facilities are triggered using
Ctrl+l(Windows, Linux) orCmd+l(OS X), followed by some other key or key combination -
Compilation uses the standard ST "build" keybinding, i.e.
Ctrl-bon Windows and Linux andCmd-bon OS X. So does the "goto anything" facility (though this may change).
For example: to jump to the point in the PDF file corresponding to the current cursor position, use Ctrl-l, j: that is, hit Ctrl-l, then release both the Ctrl and the l keys, and quickly type the j key (OS X users: replace Ctrl with Cmd). To wrap the selected text in an \emph{} command, use Ctrl-l, Ctrl-e: that is, hit Ctrl-l, release both keys, then hit Ctrl-e (again, OS X users hit Cmd-l and then Cmd-e).
Ctrl-l (Cmd-l on OS X) is the standard ST keybinding for "expand selection to line"; this is remapped to Ctrl-l,Ctrl-l (Cmd-l,Cmd-l on OS X). This is the only standard ST keybinding that is affected by the plugin---an advantage of new-style keybindings.
Most plugin facilities are invoked using sequences of 2 keys or key combinations, as in the examples just given. A few use sequences of 3 keys or key combinations.
Henceforth, I will write C- to mean Ctrl- for Linux or Windows, and Cmd- for OS X. You know your platform, so you know what you should use. In a few places, to avoid ambiguities, I will spell out which key I mean.
Compiling LaTeX files
Keybinding: C-b (standard ST keybinding)
LaTeXTools offers a fully customizable build process. This section describes the default process, also called "traditional" because it is the same (with minor tweaks) as the one used in previous releases. However, see below for how to customize the build process.
The default ST Build command takes care of the following:
- It saves the current file
- It invokes the tex build command (
texifyfor MikTeX;latexmkfor TeXlive and MacTeX). - It parses the tex log file and lists all errors, warnings and, if enabled, bad boxes in an output panel at the bottom of the ST window: click on any error/warning/bad boxes to jump to the corresponding line in the text, or use the ST-standard Next Error/Previous Error commands.
- It invokes the PDF viewer for your platform and performs a forward search: that is, it displays the PDF page where the text corresponding to the current cursor position is located.
Project files are fully supported! Some of the options related to building tex files are described here. However, you should consult the subsection on project-specific settings for further details.
Multi-file documents are supported as follows. If the first line in the current file consists of the text %!TEX root = <master file name>, then tex & friends are invoked on the specified master file, instead of the current one. Note: the only file that gets saved automatically is the current one. Also, the master file name must have a valid tex extension (i.e., one configured in the tex_file_exts settings), or it won't be recognized.
As an alternative, to using the %!TEX root = <master file name> syntax, if you use a Sublime project, you can set the TEXroot option (under settings):
{
	... <folder-related settings> ...

	"settings": {
		"TEXroot": "yourfilename.tex"
	}
}
Note that if you specify a relative path as the TEXroot in the project file, the path is determined relative to the location of the project file itself. It may be less ambiguous to specify an absolute path to the TEXroot if possible.
TeX engine selection is supported. If the first line of the current file consists of the text %!TEX program = <program>, where program is pdflatex, lualatex or xelatex, the corresponding engine is selected. If no such directive is specified, pdflatex is the default. Multi-file documents are supported: the directive must be in the root (i.e. master) file. Also, for compatibility with TeXshop, you can use TS-program instead of program. Note: for this to work, you must not customize the command option in LaTeXTools.sublime-settings. If you do, you will not get this functionality. Finally, if you use project files, the program builder setting can also be customized there, under settings.
TeX options: you can pass TeX options to your engine in two ways (thanks Ian Bacher!). One is to use a %!TEX options = ... line at the top of your file. The other is to use the options builder setting in your settings file. This can be useful, for instance, if you need to allow shell escape. Finally, if you use project files, the options builder setting can also be customized there (again, under settings).
Customizing or replacing the compilation command (latexmk or texify) is also possible by setting the command option under Builder Settings. If you do, the TeX engine selection facility may no longer work because it relies on a specific compilation command. However, if you want to customize or replace latexmk/texify, you probably know how to select the right TeX engine, so this shouldn't be a concern. Also note that if you are using latexmk and you set the $pdflatex variable, the TeX options facility will not function, as latexmk does not support this. See the Settings option below for details. Note: if you change the compilation command, you are responsible for making it work on your setup. Only customize the compilation command if you know what you're doing.
使用 LaTeXTools 时我们要注意以下几点:
- 编译前,注意将编译系统改为LaTeX,按 Ctrl+Shift+B 编译;
- 默认使用的是 pdflatex ,现在想使用 xelatex 进行编译,使用如下代码:
%!TEX program = xelatex
\documentclass{article}
\begin{document}
this is a way
\end{document}
加上 %!TEX program = xelatex 后,可以切换到 xelatex 进行编译。
开启 SumatraPDF 的反向搜索功能
方法 1
使用 Win+R 后,输入 cmd,执行以下命令
sumatrapdf.exe -inverse-search "\" C:\Program Files\Sublime Text\sublime_text.exe\" \"%f:%l\"
方法 2
通常我们在 设置-选项 中是找不到 设置反向搜索命令行 的,因为 SumatraPDF 默认不开启TeX 增强功能。
我们需要打开高级设置,settings->Advanced options,然后找到如下代码
EnableTeXEnhancements = false
将参数 false 改为 true。
EnableTeXEnhancements = true
重新启动 SumatraPDF ,设置反向搜索命令行 部分就出现了。
在 SumatraPDF 中点 设置-选项,在 设置反向搜索命令行 底下的输入框中输入
"C:\Program Files\Sublime Text\sublime_text.exe" "%f:%l"
这样在 SumatraPDF 中双击 PDF 显示的相应位置就可以跳转到 Sublime Text 编辑的 LaTeX 源代码处, 实现反向搜索。
SumatraPDF 配置
最后我们提一点SumatraPDF 高级设置。
SumatraPDF 菜单 - 设置 - 高级选项,替换内容为
// 无文档时,窗口的背景色,默认为黄色
MainWindowBackground = #fff200
// 是否允许用 Esc 键退出 SumatraPDF
EscToExit = false
// 是否用现有窗口打开文档
ReuseInstance = false

// 是否使用系统颜色显示 背景/文本色
UseSysColors = false

// 启动时是否恢复会话
RestoreSession = true

// 自定义 PDF, XPS, DjVu 和 PostScript 的 UI 界面
FixedPageUI [
// 文本色,默认为黑
    TextColor = #000000

// 背景色,默认为白
    BackgroundColor = #ffffff

// 选定文本色
    SelectionColor = #f5fc0c

// 文档在窗口中显示时的上,右,下,左边距
    WindowMargin = 2 4 2 4

// 书籍模式双页显示时,水平和垂直间距
    PageSpacing = 4 4

//梯度渐变色,只支持三种颜色. 实验性, 也许对继续阅读有帮助.

//通常建议为: #2828aa #28aa28 #aa2828
    GradientColors =
]

// 电子书(EPUB, Mobi, FictionBook)的 UI 界面定制选项.

// 若 UseFixedPageUI 为 True 时使用默认配置.
EbookUI [
//字体名称.重新打开文档后生效
    FontName = Georgia

//字体大小.重新打开文档后生效
    FontSize = 12.5

//文本色
    TextColor = #5f4b32

//页面背景色
    BackgroundColor = #fbf0d9

// 如果为 True, 电子书也将使用 PDF 文档的默认配置(开启打印和搜索,禁用自动 reflow)
    UseFixedPageUI = false
]

//漫画书和图片的 UI 界面定制选项
ComicBookUI [
// 文档在窗口中显示时的上,右,下,左边距
    WindowMargin = 0 0 0 0

// 书籍模式双页显示时,水平和垂直间距
    PageSpacing = 4 4

// 如果为 True, 默认显示漫画书文件为漫画模式 (一次性从右向左显示2页)
    CbxMangaMode = false
]

// CHM 文件定制选项.
ChmUI [
//若为真,界面将使用默认的 PDF 文档风格
    UseFixedPageUI = false
]

//各种文件类型的附加外部查看器列表(可以有多个条目格式)
ExternalViewers [
[
//命令行的调用外部查看器,可以用 %p 页号和 “%1” 文件名(在包含空格的路径中添加引号)
    CommandLine =

//菜单中显示外部查看器的名称
Name =打开对话框的过滤选项,要指定支持的文件类型,多个项目使用;分割,不要包含任何空格 (比如 *.pdf;*.xps)
Filter =
]
]

//是否显示菜单栏,可以使用 F9 或 ALT
ShowMenubar = true

//文件更改后是否自动重载 (目前还不支持工作在 ebook UI 模式) (introduced in version 2.5)
ReloadModifiedDocuments = true

//标题栏是否显示完整路径 (introduced in version 3.0)
FullPathInTitle = false

//缩放比例的间隔 介于 8.33 和 6400 之间
ZoomLevels = 8.33 12.5 18 25 33.33 50 66.67 75 100 125 150 200 300 400 600 800 1000

//缩放比率的步长,如果为0,则使用默认
ZoomIncrement = 0

//设置打印对话框的默认选项
PrinterDefaults [
默认值是 scaling (shrink, fit, none)
PrintScale = shrink
]

//自定义显示搜索结果 (used from LaTeX editors)
ForwardSearch [

//当设置为正数值时,将向前搜索高亮样式改为矩形.在页面的左边(从页边空白处注明)
    HighlightOffset = 0

//高亮选区的高度 (if HighlightOffset is > 0)
    HighlightWidth = 15

//高亮搜索的颜色
    HighlightColor = #6581ff

//为真时一直显示高亮
    HighlightPermanent = false
]

//一个空格分隔的密码尝试打开受密码保护的文件时(必须输入包含空格的密码时)

//(introduced in version 2.4)
DefaultPasswords =

//自定义主屏幕 DPI

//(如果这个值不是正数,将使用系统的UI设置  (introduced in version 2.5)
CustomScreenDPI = 0

//是否为每个文档保存显示配置
RememberStatePerDocument = true

// 当前 UI 的语言, 使用 ISO 码
UiLanguage =

//是否显示工具栏
ShowToolbar = true

//是否侧栏显示收藏夹
ShowFavorites = false

// SumatraPDF 关联的文件格式扩展名 (e.g. “.pdf .xps .epub”)
AssociatedExtensions =

//是否自动应用文件扩展名关联
AssociateSilently = false

// 是否每天检测一次更新
CheckForUpdates = true

//要忽略更新的版本
VersionToSkip =

//是否记住上次打开的文档
RememberOpenedFiles = true

//反向搜索时启动 LaTeX 编辑器
InverseSearchCmdLine =

//是否增强的 LaTex 反向搜索
EnableTeXEnhancements = false

//默认的页面布局.

//有效值: automatic, single page, facing, book view,

//continuous, continuous facing, continuous book view
DefaultDisplayMode = automatic

//默认缩放模式 使用比例(in %) 或下述值: fit page, fit width, fit content
DefaultZoom = fit page

//默认窗口状态. 1 is normal, 2 is maximized,

//3 is fullscreen, 4 is minimized
WindowState = 1

//默认窗口位置(x,y)和尺寸(宽,高)
WindowPos = 0 0 0 0

//对于支持解析的文档, 在侧栏显示目录标签(书签)
ShowToc = true

//侧栏宽度 favorites/bookmarks
SidebarDx = 0

//如果收藏夹和书签侧边栏部分可见,这就是书签的高度(目录表)部分
TocDy = 0

//是否显示启动页面
ShowStartPage = true

//是否使用标签模式
UseTabs = true

//打开文件的信息
FileStates [
[
//文档路径
    FilePath =

//为书签/收藏夹保留的值
    Favorites [
[
收藏夹在菜单中显示的名称
Name =

//书签页面数值
        PageNo = 0

//页面标签
        PageLabel =
]
]

//文档列表项目是否可以使用固定
    IsPinned = false

//文档列表项目是否可以隐藏
    IsMissing = false

//是否记录文档打开次数
    OpenCount = 0

//再次打开加密文档时,是否询问密码
    DecryptionKey =

//打开文件是否使用通用对话框
    UseDefaultState = false

//页面布局.

//有效值为: automatic, single page, facing, book view,

//continuous, continuous facing, continuous book view
    DisplayMode = automatic

//文档滚动距离 (in x and y direction)
    ScrollPos = 0 0

//上次阅读页面的编号
    PageNo = 1

//缩放比例或有效值: fit page, fit width, fit content
    Zoom = fit page

//页面旋转角度, 90 度递增
    Rotation = 0

//窗口状态. 1 is normal, 2 is maximized, 3 is fullscreen, 4 is minimized
    WindowState = 0

//默认位置 (可以任意显示器)
    WindowPos = 0 0 0 0

//是否显示书签
    ShowToc = true

//侧栏宽度
    SidebarDx = 0

//漫画模式,只限于漫画书
    DisplayR2L = false

//在电子书UI中恢复上次读取页所需的数据
    ReparseIdx = 0

//需要确定表的哪些部分已展开的数据.
    TocState =
]
]

//保存上次会话,用于崩溃时恢复会话 (introduced in version 3.1)
SessionData [
[
//data required for restoring the view state of a single tab
    TabStates [
[
//path of the document
        FilePath =

//same as FileStates -> DisplayMode
        DisplayMode = automatic

//number of the last read page
        PageNo = 1

//same as FileStates -> Zoom
        Zoom = fit page

//same as FileStates -> Rotation
        Rotation = 0

//how far this document has been scrolled (in x and y direction)
        ScrollPos = 0 0

//if true, the table of contents was shown when the document was closed
        ShowToc = true

//same as FileStates -> TocState
        TocState =
]
]

//当前选择的标签序列 ( 1 为基数)
    TabIndex = 1

//同步 FileState -> WindowState
    WindowState = 0

//默认位置
    WindowPos = 0 0 0 0

//侧栏关闭时的宽度
    SidebarDx = 0
]
]

//自动更新后重载文档的数据请求 (introduced in version 3.0)
ReopenOnce =

//上次更新时间
TimeOfLastUpdateCheck = 0 0

//在历史记录中保存打开次数
OpenCountWeek = 0
保存后重启 SumatraPDF ,再次打开高级设置。找到 ShortCuts 配置处,添加以下内容:
Shortcuts [
	[
		Cmd = CmdSaveAnnotations
		Key = s, S
	]
	[
		Cmd = CmdDeleteAnnotation
		Key = d, D
	]
	[
		Cmd = CmdEditAnnotations
		Key = e, E
	]
	[
		Cmd = CmdCreateAnnotUnderline
		Key = w, W
	]
	[
		Cmd = CmdCreateAnnotFreeText
		Key = t, T
	]
]
请根据需要修改高级设置内容。
参考
Sublime Text 3 插件 latextools 无法切换编译器? - 知乎
Sublime text 3 + Latex + SumatraPDF反向检索_反向查找 sumatra sublime-CSDN博客
如何优雅地使用 Sublime 编辑 LaTeX - 知乎
LaTex+Sublime+SumatraPDF安装详细教程 - 知乎
SumatraPDF 高级设置 - MTAz - 博客园
配置SumatraPDF快捷键实现Pdf阅读快速标注 - 知乎
Customizing SumatraPDF 3.5.1
调整SumatraPDF暗黑模式_sumatrapdf 黑色-CSDN博客