LaTeX介绍
LaTeX(LATEX,音译“拉泰赫”)是一种基于ΤΕΧ的排版系统,由美国计算机学家莱斯利·兰伯特(Leslie Lamport)在20世纪80年代初期开发,利用这种格式,即使使用者没有排版和程序设计的知识也可以充分发挥由TeX所提供的强大功能,能在几天、甚至几小时内生成很多具有书籍质量的印刷品。对于生成复杂表格和数学公式,这一点表现得尤为突出。因此它非常适用于生成高印刷质量的科技和数学类文档。这个系统同样适用于生成从简单的信件到完整书籍的所有其他种类的文档。
LaTeX是一种“非所见即所得”的排版系统,用户需要输入特定的代码,保存在后缀为.tex的文件中,通过编译得到所需的pdf文件,例如以下代码:
\documentclass{article}
\begin{document}
Hello, world!
\end{document}
最后输出的结果是一个pdf文件,内容是”Hello, world!“。
安装LaTeX与配置环境
LaTeX的使用主要需要安装两个东西: 1. 根据平台选择一个TeX发行版进行安装,建议选择最全功能最多的版本。TeX发行版的概念相当于Linux及其发行版,Linux内核虽然只有一个,但是有很多基于内核的不同特色的Linux发行版,比如Ubuntu,Fedora等等不胜枚举。这里我们选择TeXlive。 2. 选择一个合适的LaTex编辑器。在安装好LaTeX环境以后,通常都会有一个自带的编辑器,比如CTex的WinEdt,MacTeX的TeXShop,不过功能并不强大,好比 Windows 记事本,只有一些基本的文本编辑功能。这里我们选择比较强大的TeXstudio。
一、安装TeX Live
1. 下载
每个平台的简明操作指南:
在Unix/GNU/Linux上安装
在Windows上安装
在MacOS上安装:MacTeX发行版
您可以阅读完整手册了解所有可能性,包括自动安装和使用自定义存储库。
推荐下载离线安装包,然后安装的方式。可以使用官方的镜像下载,也可以利用国内的镜像下载。

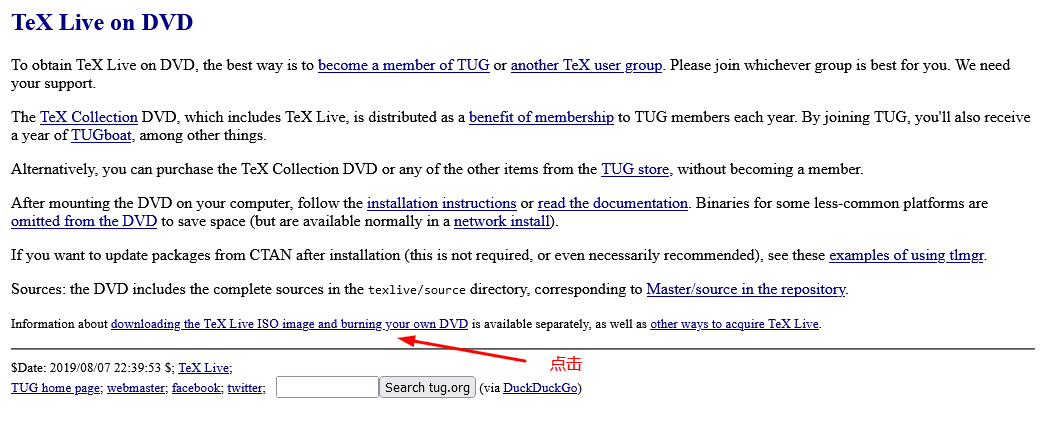
官网下载比较慢,我们可以利用国内的镜像网站来下载。
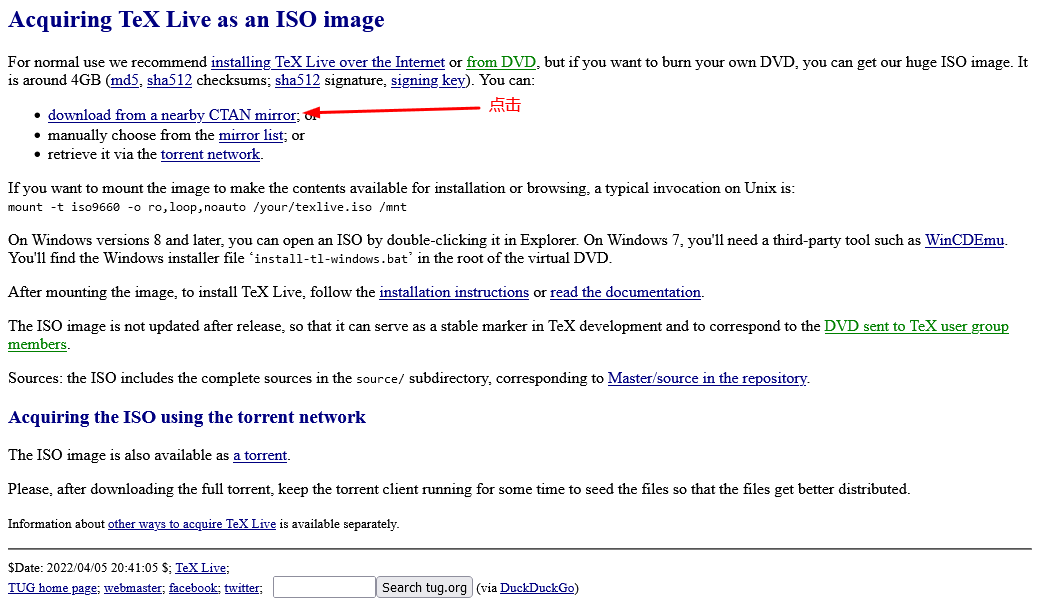
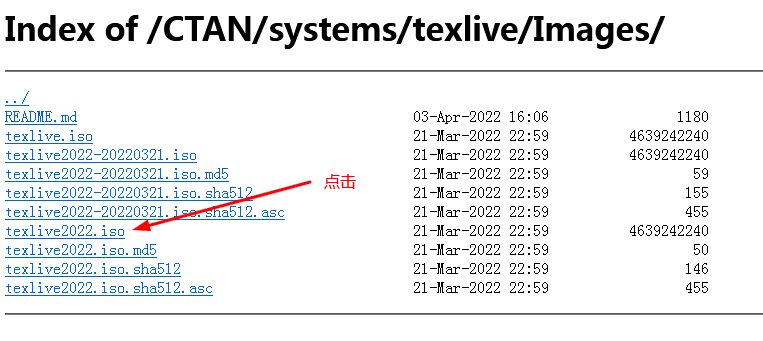
清华大学:https://mirrors.tuna.tsinghua.edu.cn/CTAN/systems/texlive/Images/texlive2022.iso;
北京交通大学:https://mirror.bjtu.edu.cn/ctan/systems/texlive/Images/
选择 texlive2022.iso(以此类推);
上海交通大学:https://mirrors.sjtug.sjtu.edu.cn/ctan/systems/texlive/Images/
选择 texlive2022.iso(以此类推);
中国科技大学:https://mirrors.ustc.edu.cn/CTAN/systems/texlive/Images/
选择 texlive2022.iso(以此类推);
重庆大学:https://mirrors.cqu.edu.cn/CTAN/systems/texlive/Images/
选择 texlive2022.iso(以此类推);
腾讯云:https://mirrors.cloud.tencent.com/CTAN/systems/texlive/Images/
选择 texlive2022.iso(以此类推)。
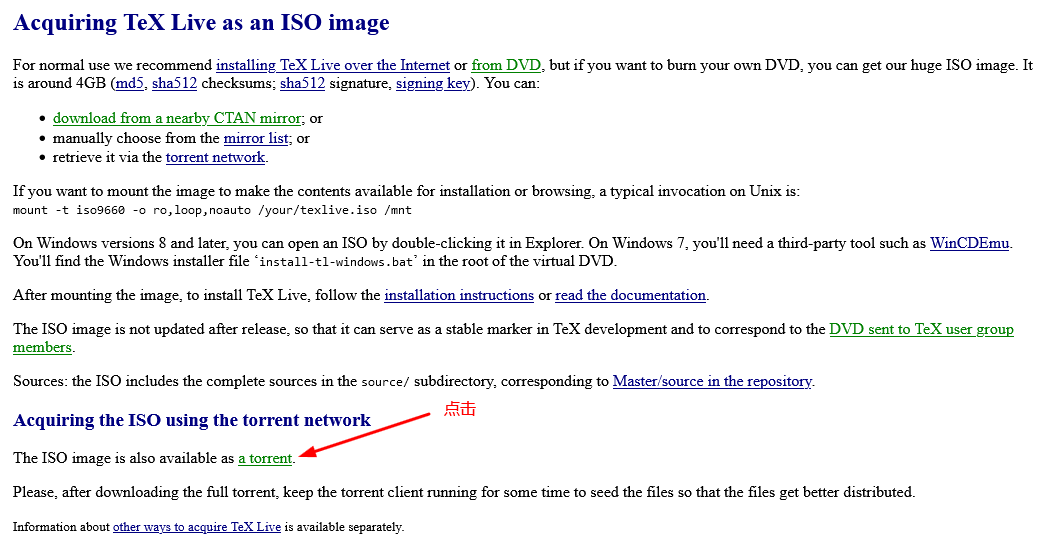
下载Torrent文件使用BT下载也是个不错的选择,试了一下下载速度还行,有公网的可以用BT下载。
2. 安装
将texlive2022.iso 文件解压,然后右键“以管理员身份运行”打开其中的install-tl-advanced.bat文件。
点击Advanced。
修改Directories TEXDIR: Installation root 为C://texlive/2022,安装。
安装完成,用时56分钟。
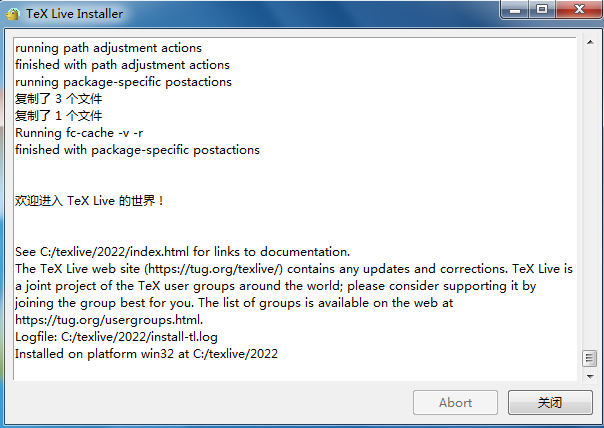
验证是否安装成功,打开cmd,输入tex -version,如果出现版本号即说明安装成功。
Microsoft Windows [版本 6.1.7601]
版权所有 (c) 2009 Microsoft Corporation。保留所有权利。

C:\Users\Administrator>tex -version
TeX 3.141592653 (TeX Live 2022)
kpathsea version 6.3.4
Copyright 2022 D.E. Knuth.
There is NO warranty.  Redistribution of this software is
covered by the terms of both the TeX copyright and
the Lesser GNU General Public License.
For more information about these matters, see the file
named COPYING and the TeX source.
Primary author of TeX: D.E. Knuth.
latex2021安装失败
1、运行install-tl-windows.bat批处理程序之后出现了No such file or directory....
是操作系统用户名是中文的原因,使用win + R打开命令行即可看见自己的操作系统的用户名,这个时候可以使用下面的方法解决:
右键桌面我的电脑(或者是计算机)图标,找到属性-->高级系统设置-->环境变量,在最上面一栏可以看到用户变量这个时候找到TEMP,TMP的属性值修改为:%SystemRoot%\TEMP,对于下面一栏中的系统变量也是一样修改为%SystemRoot%\TEMP,修改完成之后运行之后就可以正常安装latex了,可以修改latex安装到任意一个盘
————————————————
版权声明:本文为CSDN博主「yuzhang_zy」的原创文章,遵循CC 4.0 BY-SA版权协议,转载请附上原文出处链接及本声明。
原文链接:https://blog.csdn.net/qq_39445165/article/details/116561117
2、texlive2021安装不成功(windows10),关于报错“Cannot open c"\Users...”
系统先前安装了ctex在C盘,根据官网(https://ctan.org/pkg/install-latex-guide-zh-cn ) 的安装介绍,已排查环境变量中【存在mingw,jdk的相关内容】或【缺失C:WIndowssystem32】的问题,但安装texlive2021时会出现如下报错
(...省略正常安装代码)
Installing [0092/4151, time/total: 03:01/02:18:44]: alkalami [125k]
Installing [0093/4151, time/total: 03:03/02:20:03]: allrunes [8078k]
tar: Cannot open C:UsersSONGSH~1LOCALS~1TempaSp7tkKDBEqgXEYiSL2c/allrunes.r42221.tar: Permission denied
TLUtils::untar: F:tlpkginstallertar.exe xmf C:UsersSONGSH~1LOCALS~1TempaSp7tkKDBEqgXEYiSL2c/allrunes.r42221.tar failed (in D:/texlive/2021/texmf-dist)
TLPDB::_install_data: untar failed for F:/archive/allrunes.r42221.tar.xz
TLUtils::install_packages: Failed to install allrunes
Installation failed.
Rerunning the installer will try to restart the installation.
Or you can restart by running the installer with:
install-tl-windows.bat --profile installation.profile [YOUR-EXTRA-ARGS]
or
install-tl-advanced.bat --profile installation.profile [YOUR-EXTRA-ARGS]
F:install-tl: Writing log in current directory: C:/WINDOWS/system32/install-tl.log
Wide character in print at F:install-tl line 2486, <STDIN> line 6.
Wide character in print at F:install-tl line 2486, <STDIN> line 6.
Wide character in print at F:install-tl line 2486, <STDIN> line 6.
Wide character in print at F:install-tl line 2486, <STDIN> line 6.
install-latex 最新版写了『如何在中文用户名下安装』
————————————————
原文链接:https://ask.latexstudio.net/ask/question/3809.html
3. 卸载
Windows下Tex Live的安装目录,如C:\texlive\2022\tlpkg\installer,然后运行里边的uninst.bat文件。
二、安装TeXstudio
1. 下载及安装
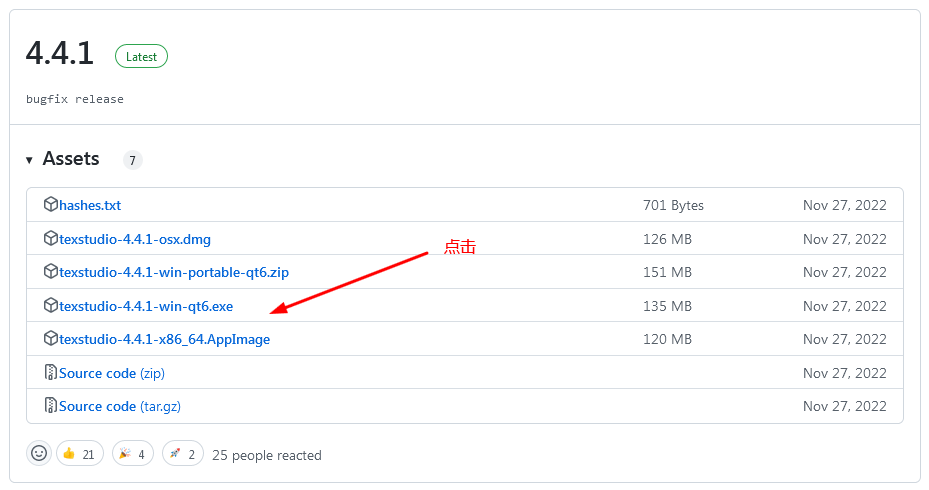
直接去官网下载,有时会上不去,可以到Github搜索texstudio-org/texstudio下载,也可以去这里下载。下载后直接点击安装,一样选择安装路径,然后进行一些简单的设置。这里我选择“texstudio-4.4.1-win-qt6.exe”。
2. 配置
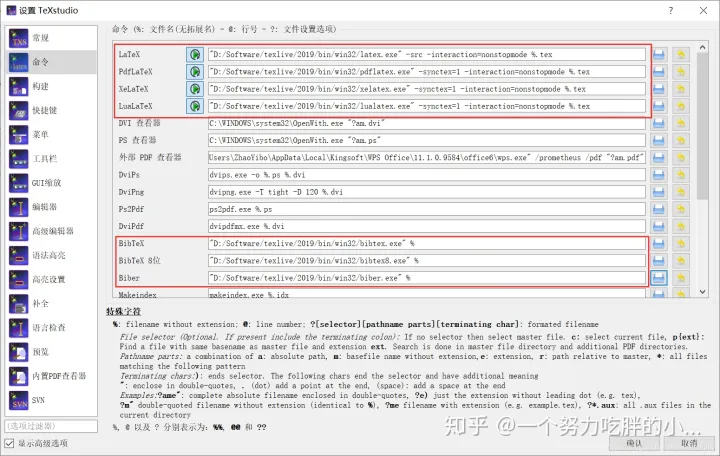
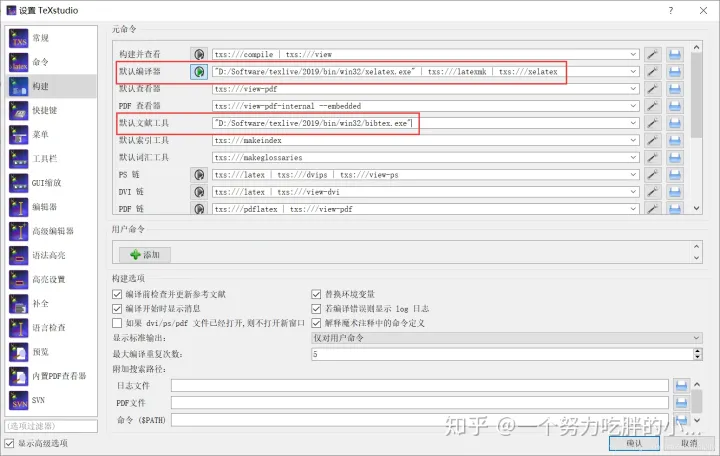
依次找到Options→Configure TeXstudio→Commands,指定Commands命令的执行程序,将BibTeX、BibTeX 8-Bit、Biber的路径设置为TeXlive安装路径下对应EXE文件。
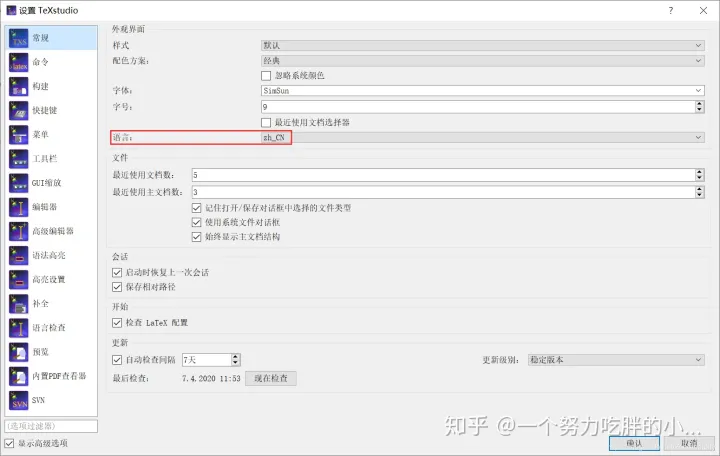
设置中文界面:安装结束后,一开始的打开界面是英文的,这里我们可以切换成中文。 依次点击:Options→Configure Texstudio→General→Language→zh_CN
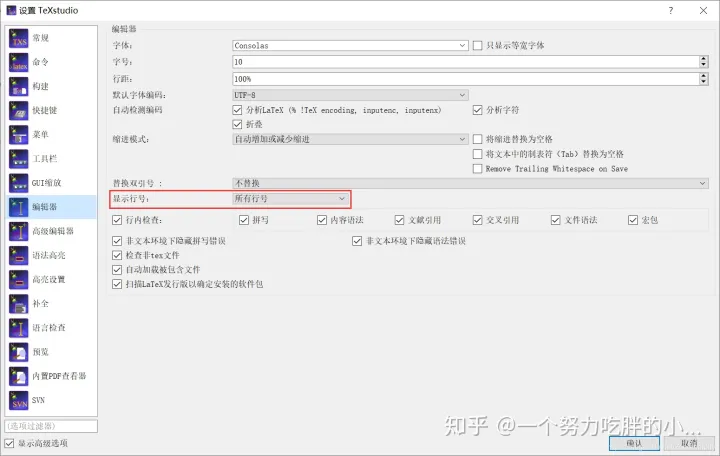
添加行号:添加段落行号,这样可以很方便查看段落的某句话所在的位置,尤其是在运行报错时,有行号就非常方便查看错误的位置了。 依次点击:选项→设置Texstudio→显示高级选项→编辑器→显示行号→所有行号
设置编译器与编码:为了正常的输出中文,我们需要把默认编译器改成xelatex,utf-8编码。如果是为了编写英文论文,要用“pdflatex”。
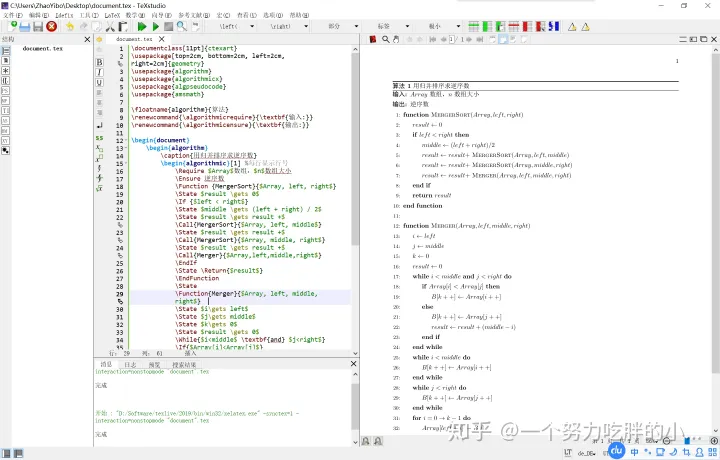
3.测试
输入下述代码,运行,得到下述结果即代表安装配置成功。
\documentclass[11pt]{ctexart}
\usepackage[top=2cm, bottom=2cm, left=2cm, right=2cm]{geometry}
\usepackage{algorithm}
\usepackage{algorithmicx}
\usepackage{algpseudocode}
\usepackage{amsmath}

\floatname{algorithm}{算法}
\renewcommand{\algorithmicrequire}{\textbf{输入:}}
\renewcommand{\algorithmicensure}{\textbf{输出:}}

\begin{document}
    \begin{algorithm}
        \caption{用归并排序求逆序数}
        \begin{algorithmic}[1] %每行显示行号
            \Require $Array$数组,$n$数组大小
            \Ensure 逆序数
            \Function {MergerSort}{$Array, left, right$}
            \State $result \gets 0$
            \If {$left < right$}
            \State $middle \gets (left + right) / 2$
            \State $result \gets result +$ \Call{MergerSort}{$Array, left, middle$}
            \State $result \gets result +$ \Call{MergerSort}{$Array, middle, right$}
            \State $result \gets result +$ \Call{Merger}{$Array,left,middle,right$}
            \EndIf
            \State \Return{$result$}
            \EndFunction
            \State
            \Function{Merger}{$Array, left, middle, right$}
            \State $i\gets left$
            \State $j\gets middle$
            \State $k\gets 0$
            \State $result \gets 0$
            \While{$i<middle$ \textbf{and} $j<right$}
            \If{$Array[i]<Array[j]$}
            \State $B[k++]\gets Array[i++]$
            \Else
            \State $B[k++] \gets Array[j++]$
            \State $result \gets result + (middle - i)$
            \EndIf
            \EndWhile
            \While{$i<middle$}
            \State $B[k++] \gets Array[i++]$
            \EndWhile
            \While{$j<right$}
            \State $B[k++] \gets Array[j++]$
            \EndWhile
            \For{$i = 0 \to k-1$}
            \State $Array[left + i] \gets B[i]$
            \EndFor
            \State \Return{$result$}
            \EndFunction
        \end{algorithmic}
    \end{algorithm}
\end{document}
————————————————
版权声明:本文为知乎博主「一个努力吃胖的小瘦子」「Dylaaan」的原创文章,遵循CC 4.0 BY-SA版权协议,转载请附上原文出处链接及本声明。
原文链接:
https://zhuanlan.zhihu.com/p/138586028
https://zhuanlan.zhihu.com/p/456055339
Texstudio无法运行
双击启动提示
“无法定位程序输入点CreateEventW于动态链接库api-ms-win-core-synch-l1-2-0.dll”
windows 7 不支持Qt6,使用Qt5的平台能解决问题。也就是说,Windows 7 用户要么选择Qt5平台旧版本,要么弃用选择其他编辑器。